

Unfortunately some pictures are missing due to a database crash, I am working to reload the missing images and also update the article with my latest improvements.
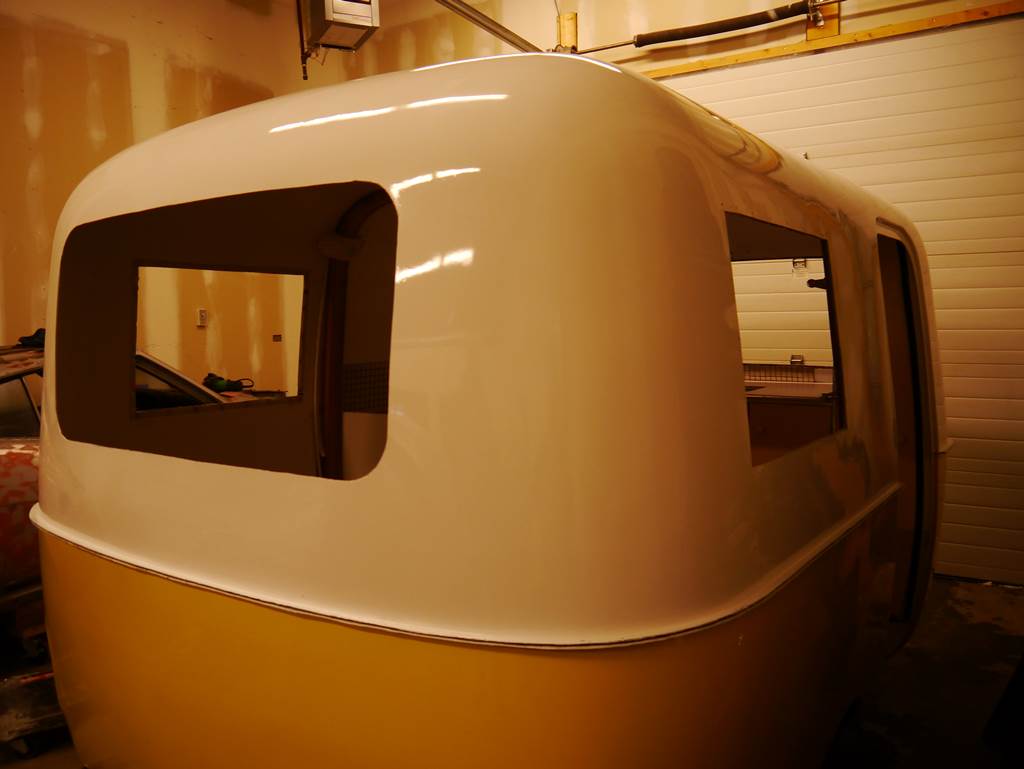
“Buttercup” how we built our custom Boler
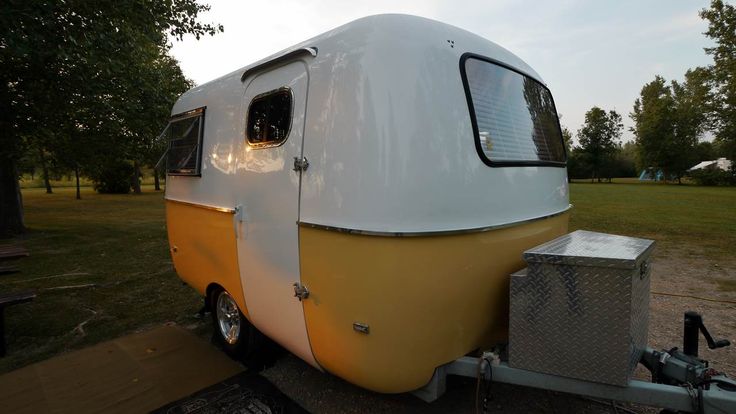
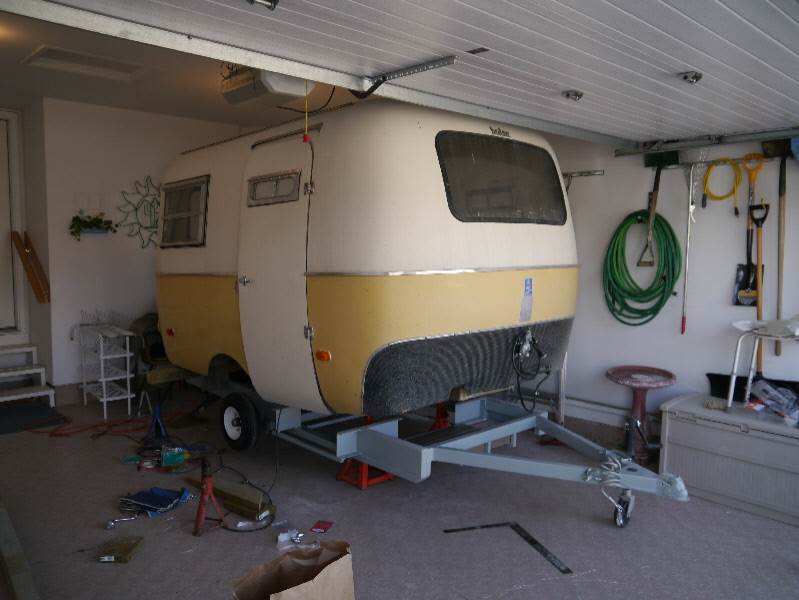
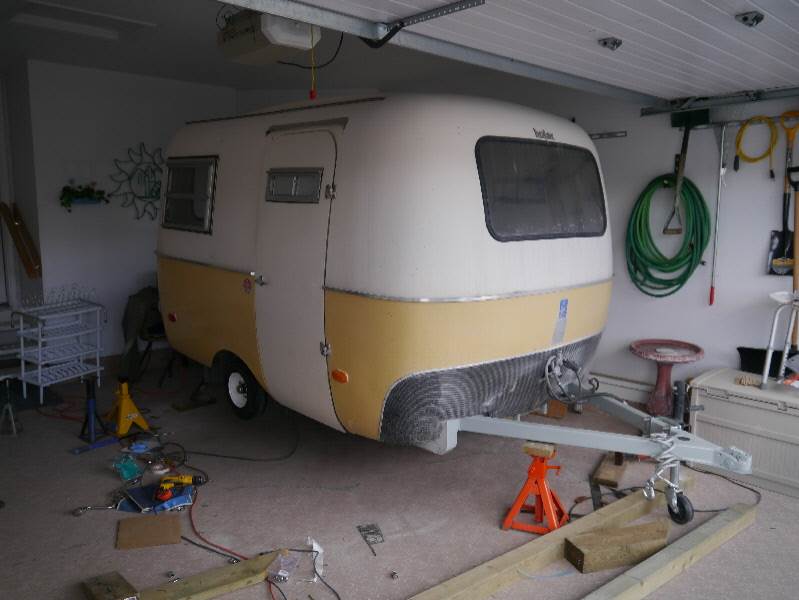
I was taught that when you start a project you should always have the end in mind, so let’s start this story with how our finished Boler looks today. This may inspire some of you, or it may just wet your appetite for more, this project took three years of hard work, some trial and error and an ever increasing pile of expenses. For those that are interested you can follow our journey,
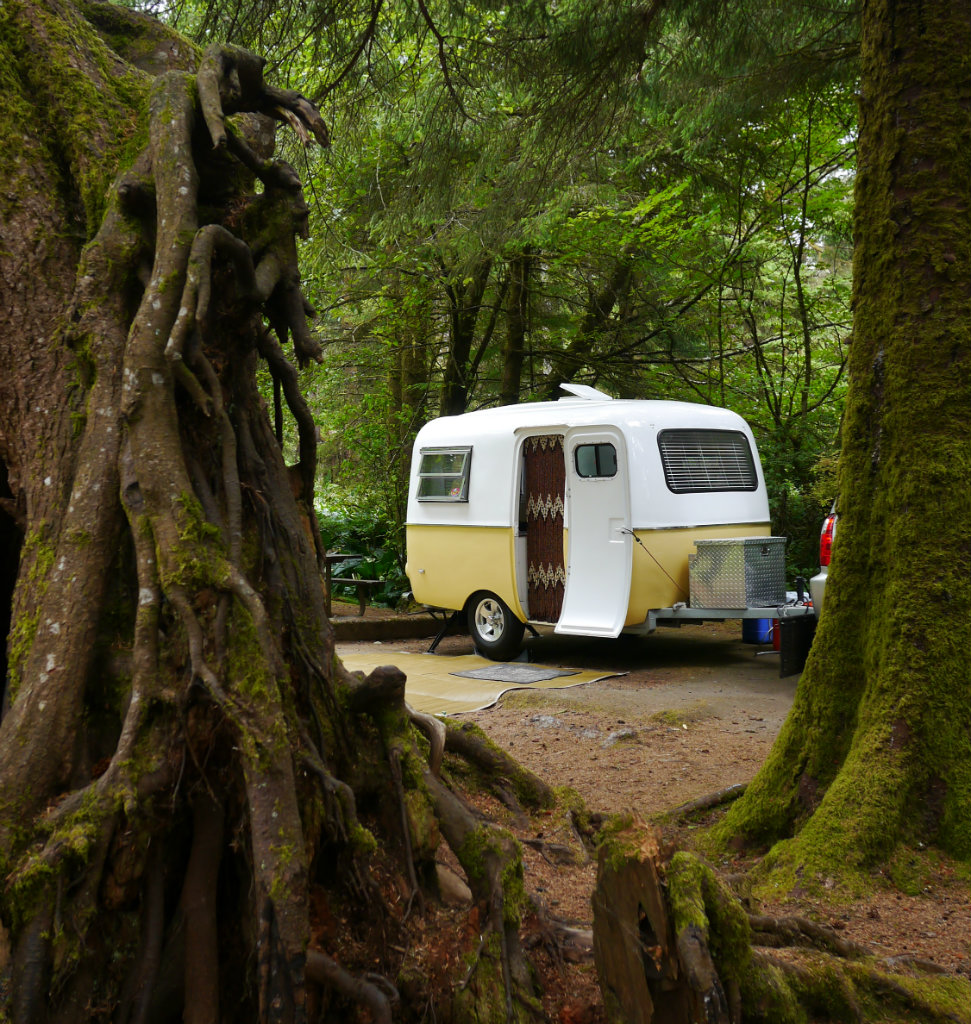
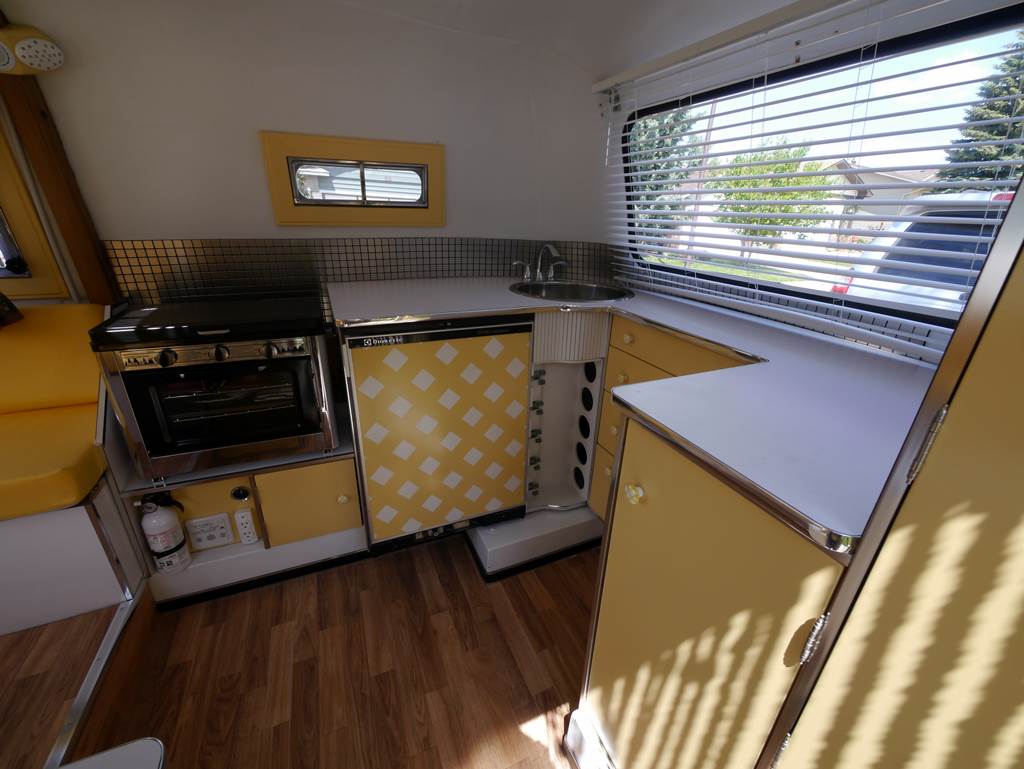
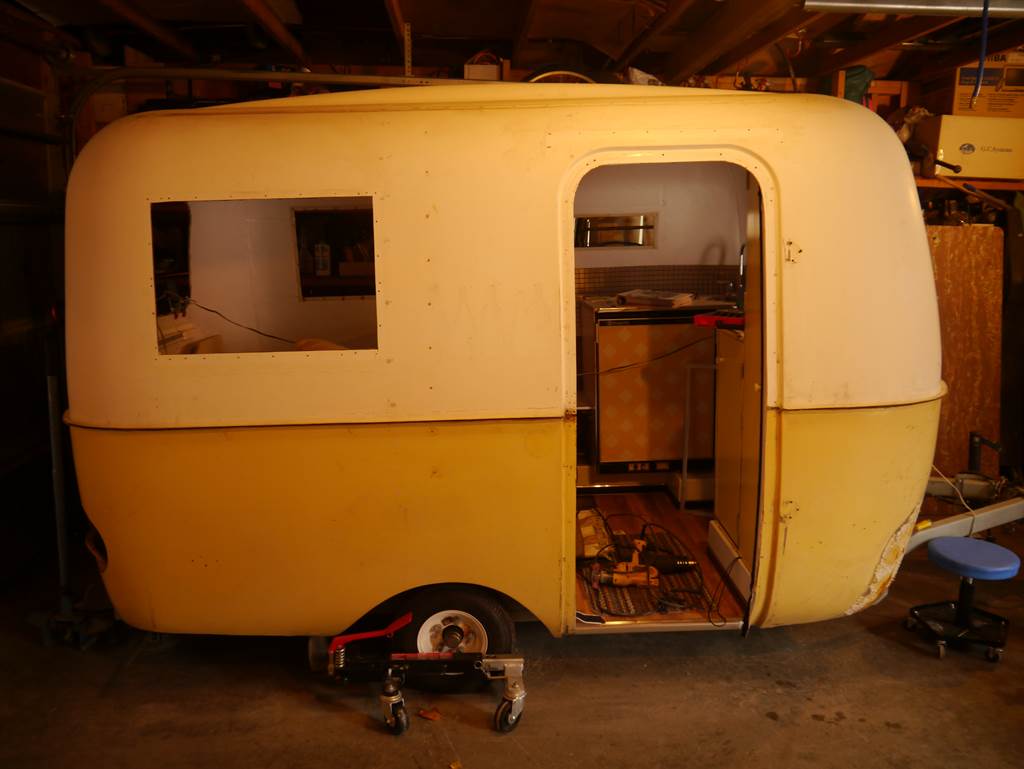
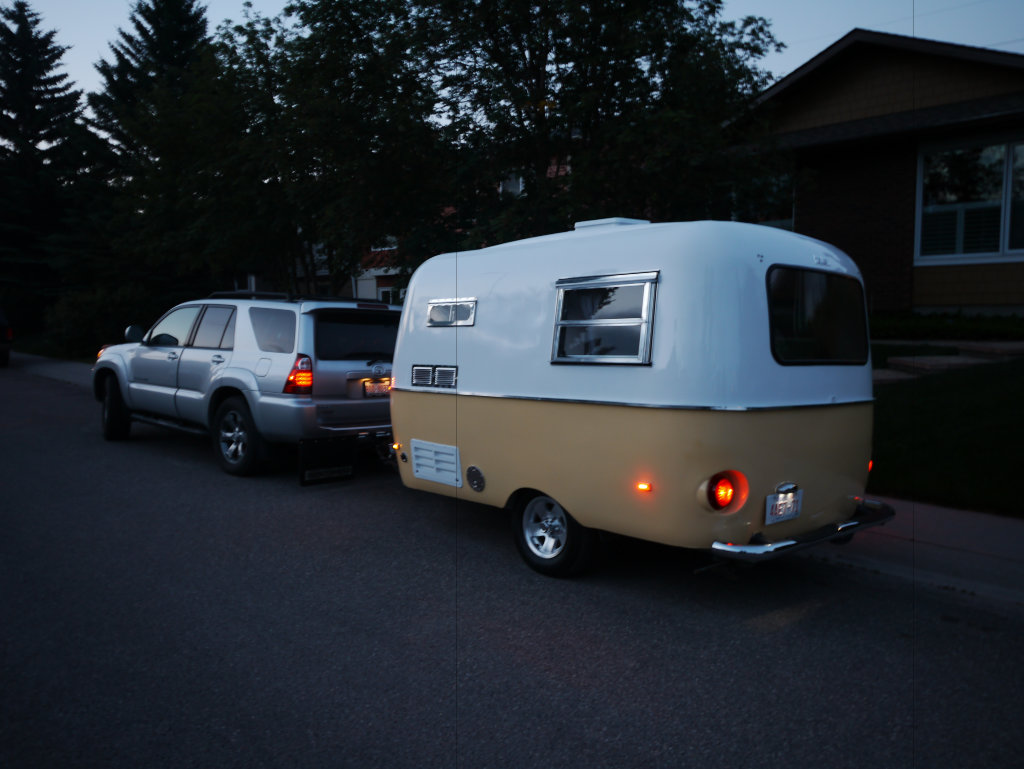
From the outside the original 1974 two tone color scheme was kept, the fresh paint brightened up and “modernized” the exterior by using polar white on the top and a pastel yellow on the bottom, the same color scheme is carried through the interior. The aluminum windows and belly band are original, but hand polished to reveal the extraordinary shine that was hidden underneath 40 years of oxidation.
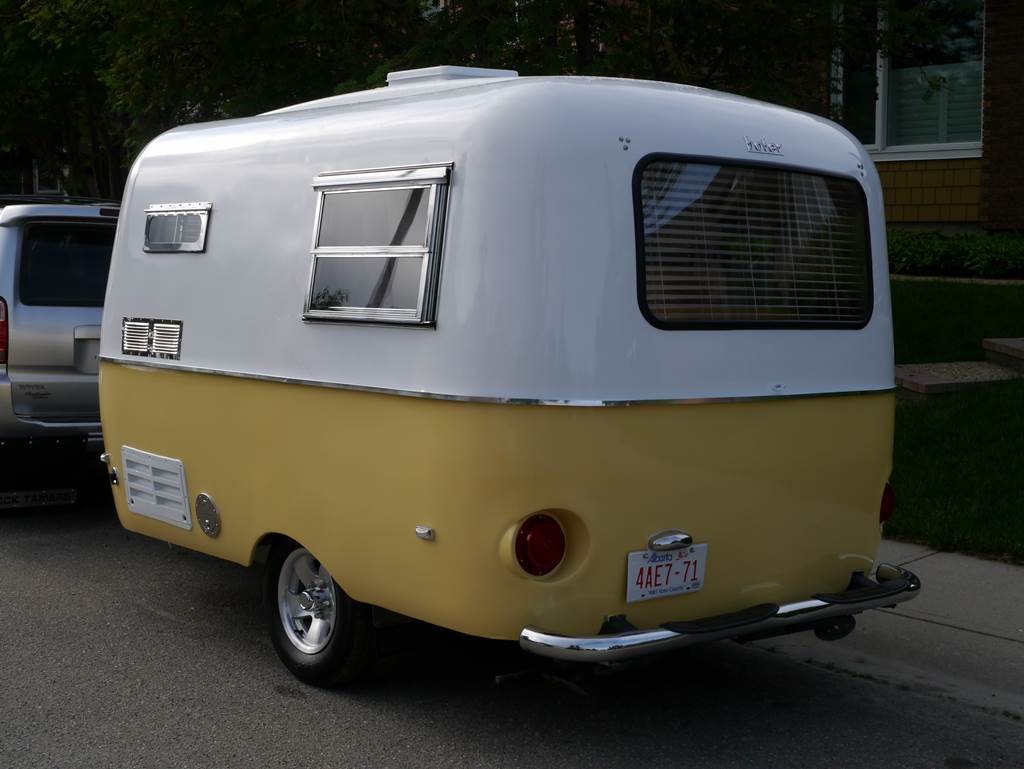
To maintain the vintage look the original taillight lenses used but LED light assemblies are inserted and sealed into the lenses from the back side, finally small LED marker lights are used on each side corner. The small awning window in the door had been updated with a sliding radiused window that is twice the size of the original and allows for good ventilation. The chrome bumper, aluminum wheels and tongue box are the finishing touches
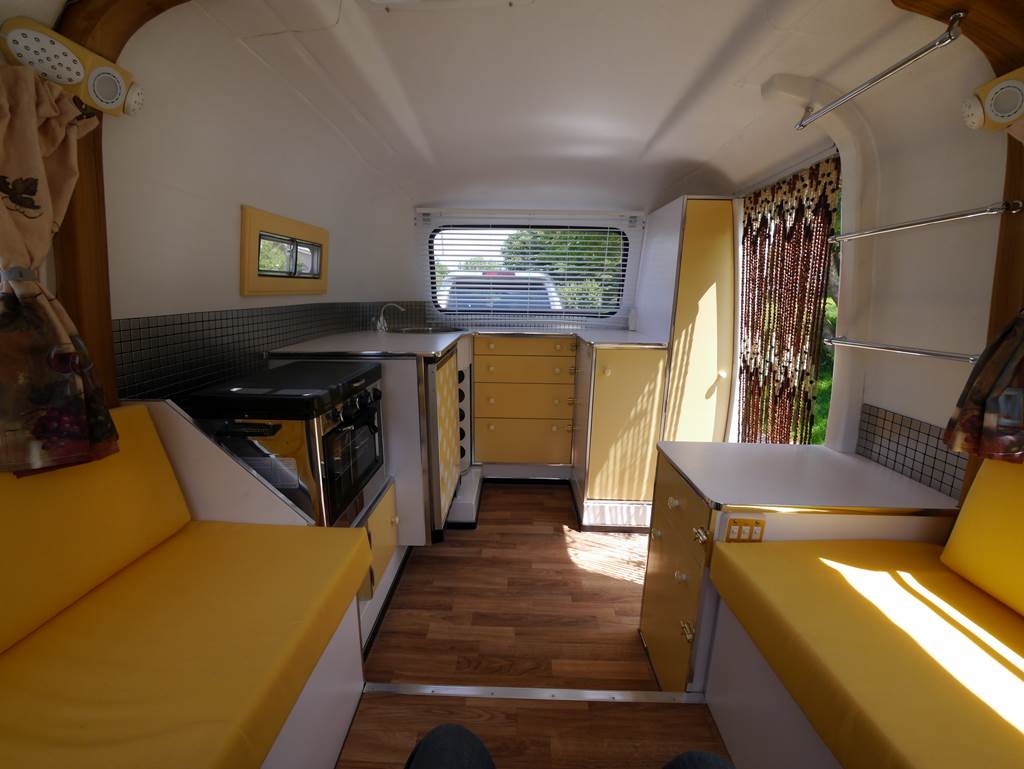
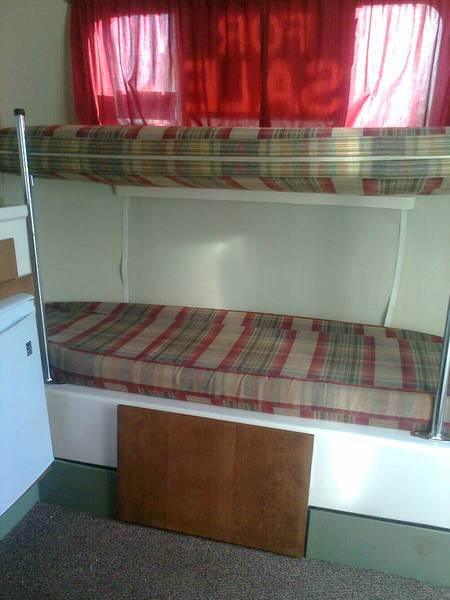
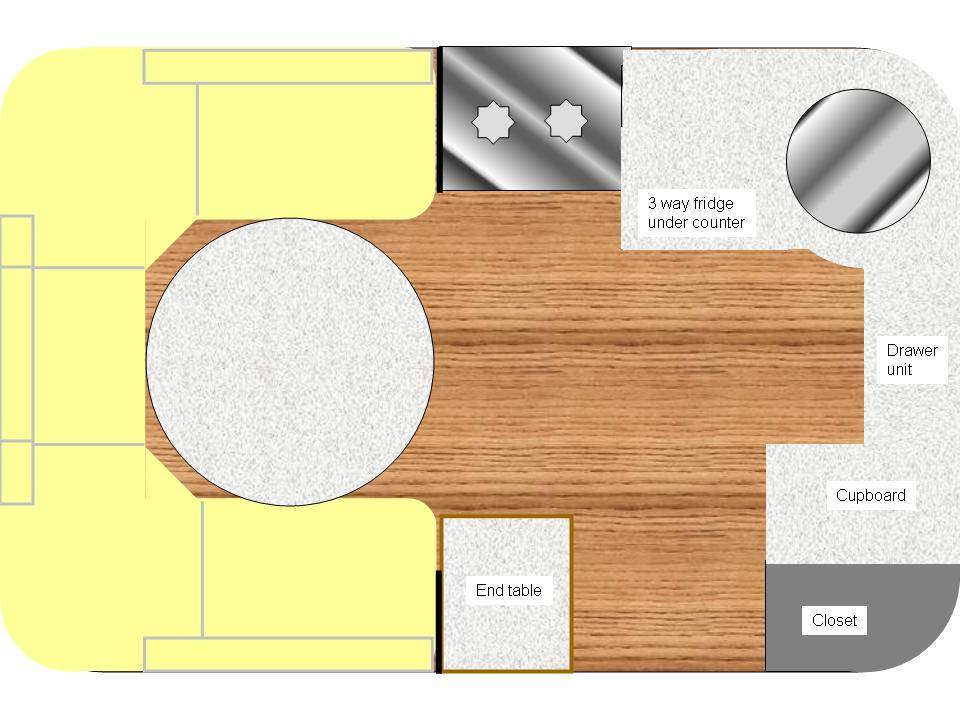
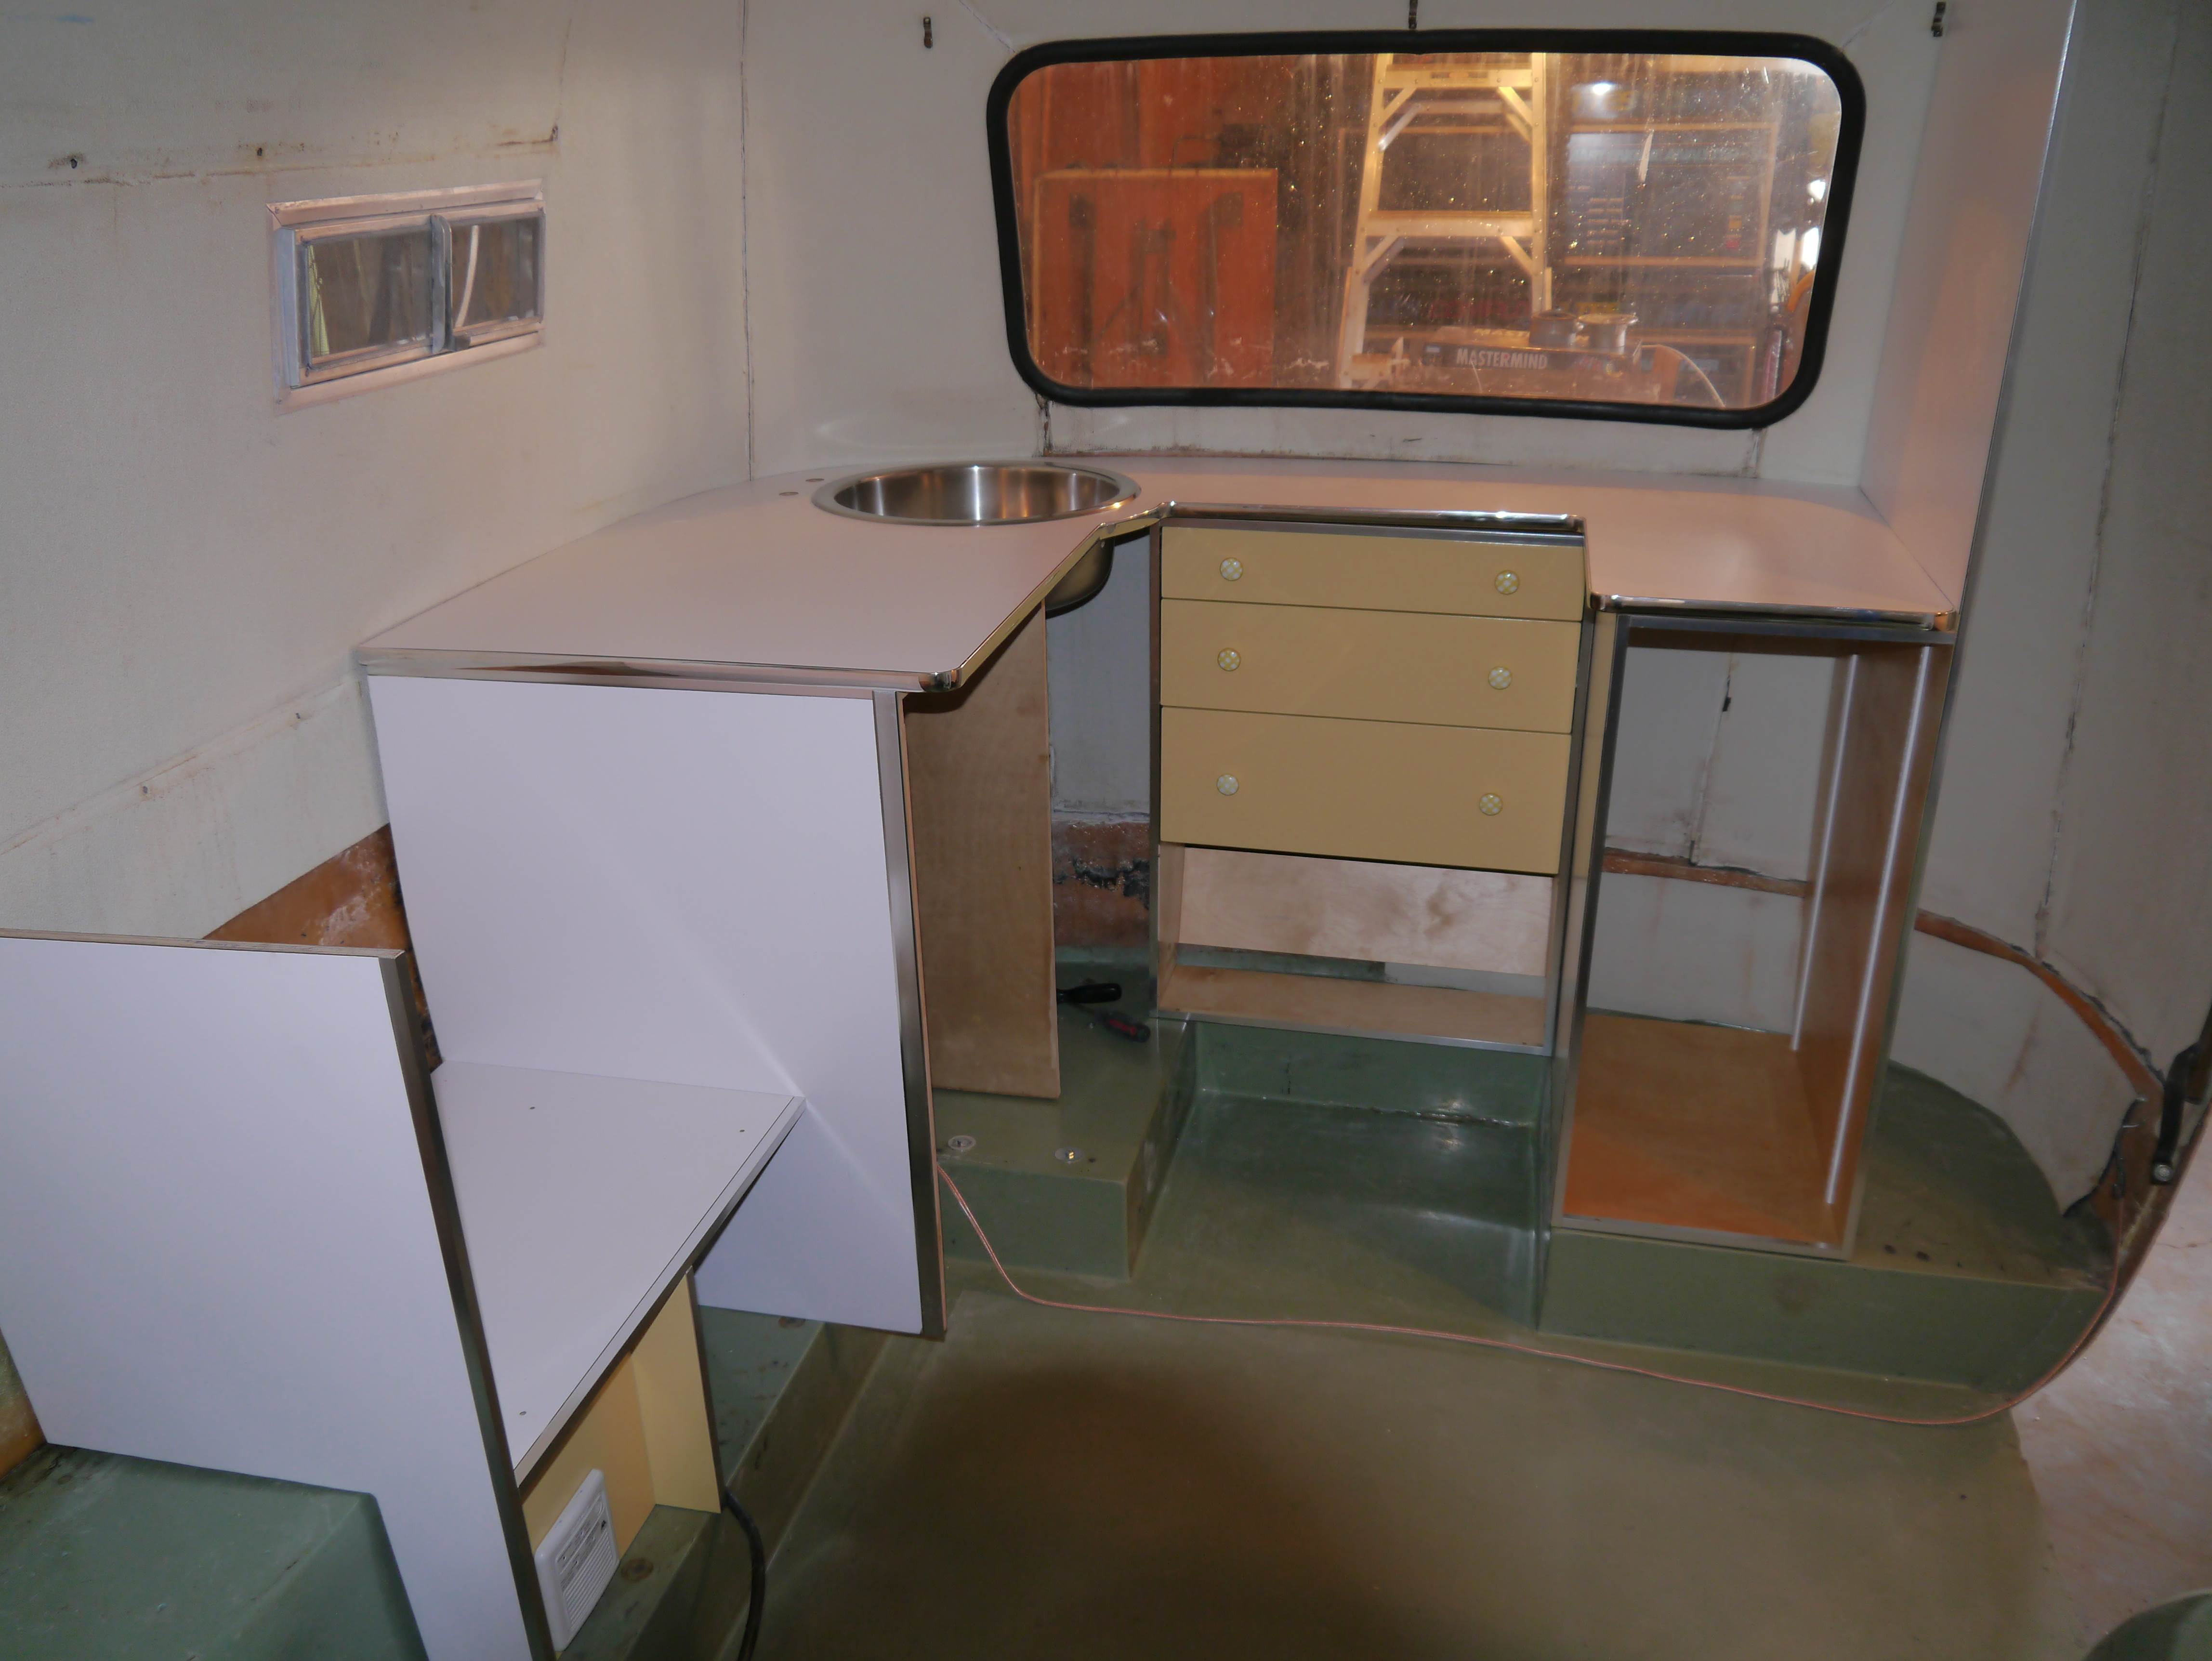
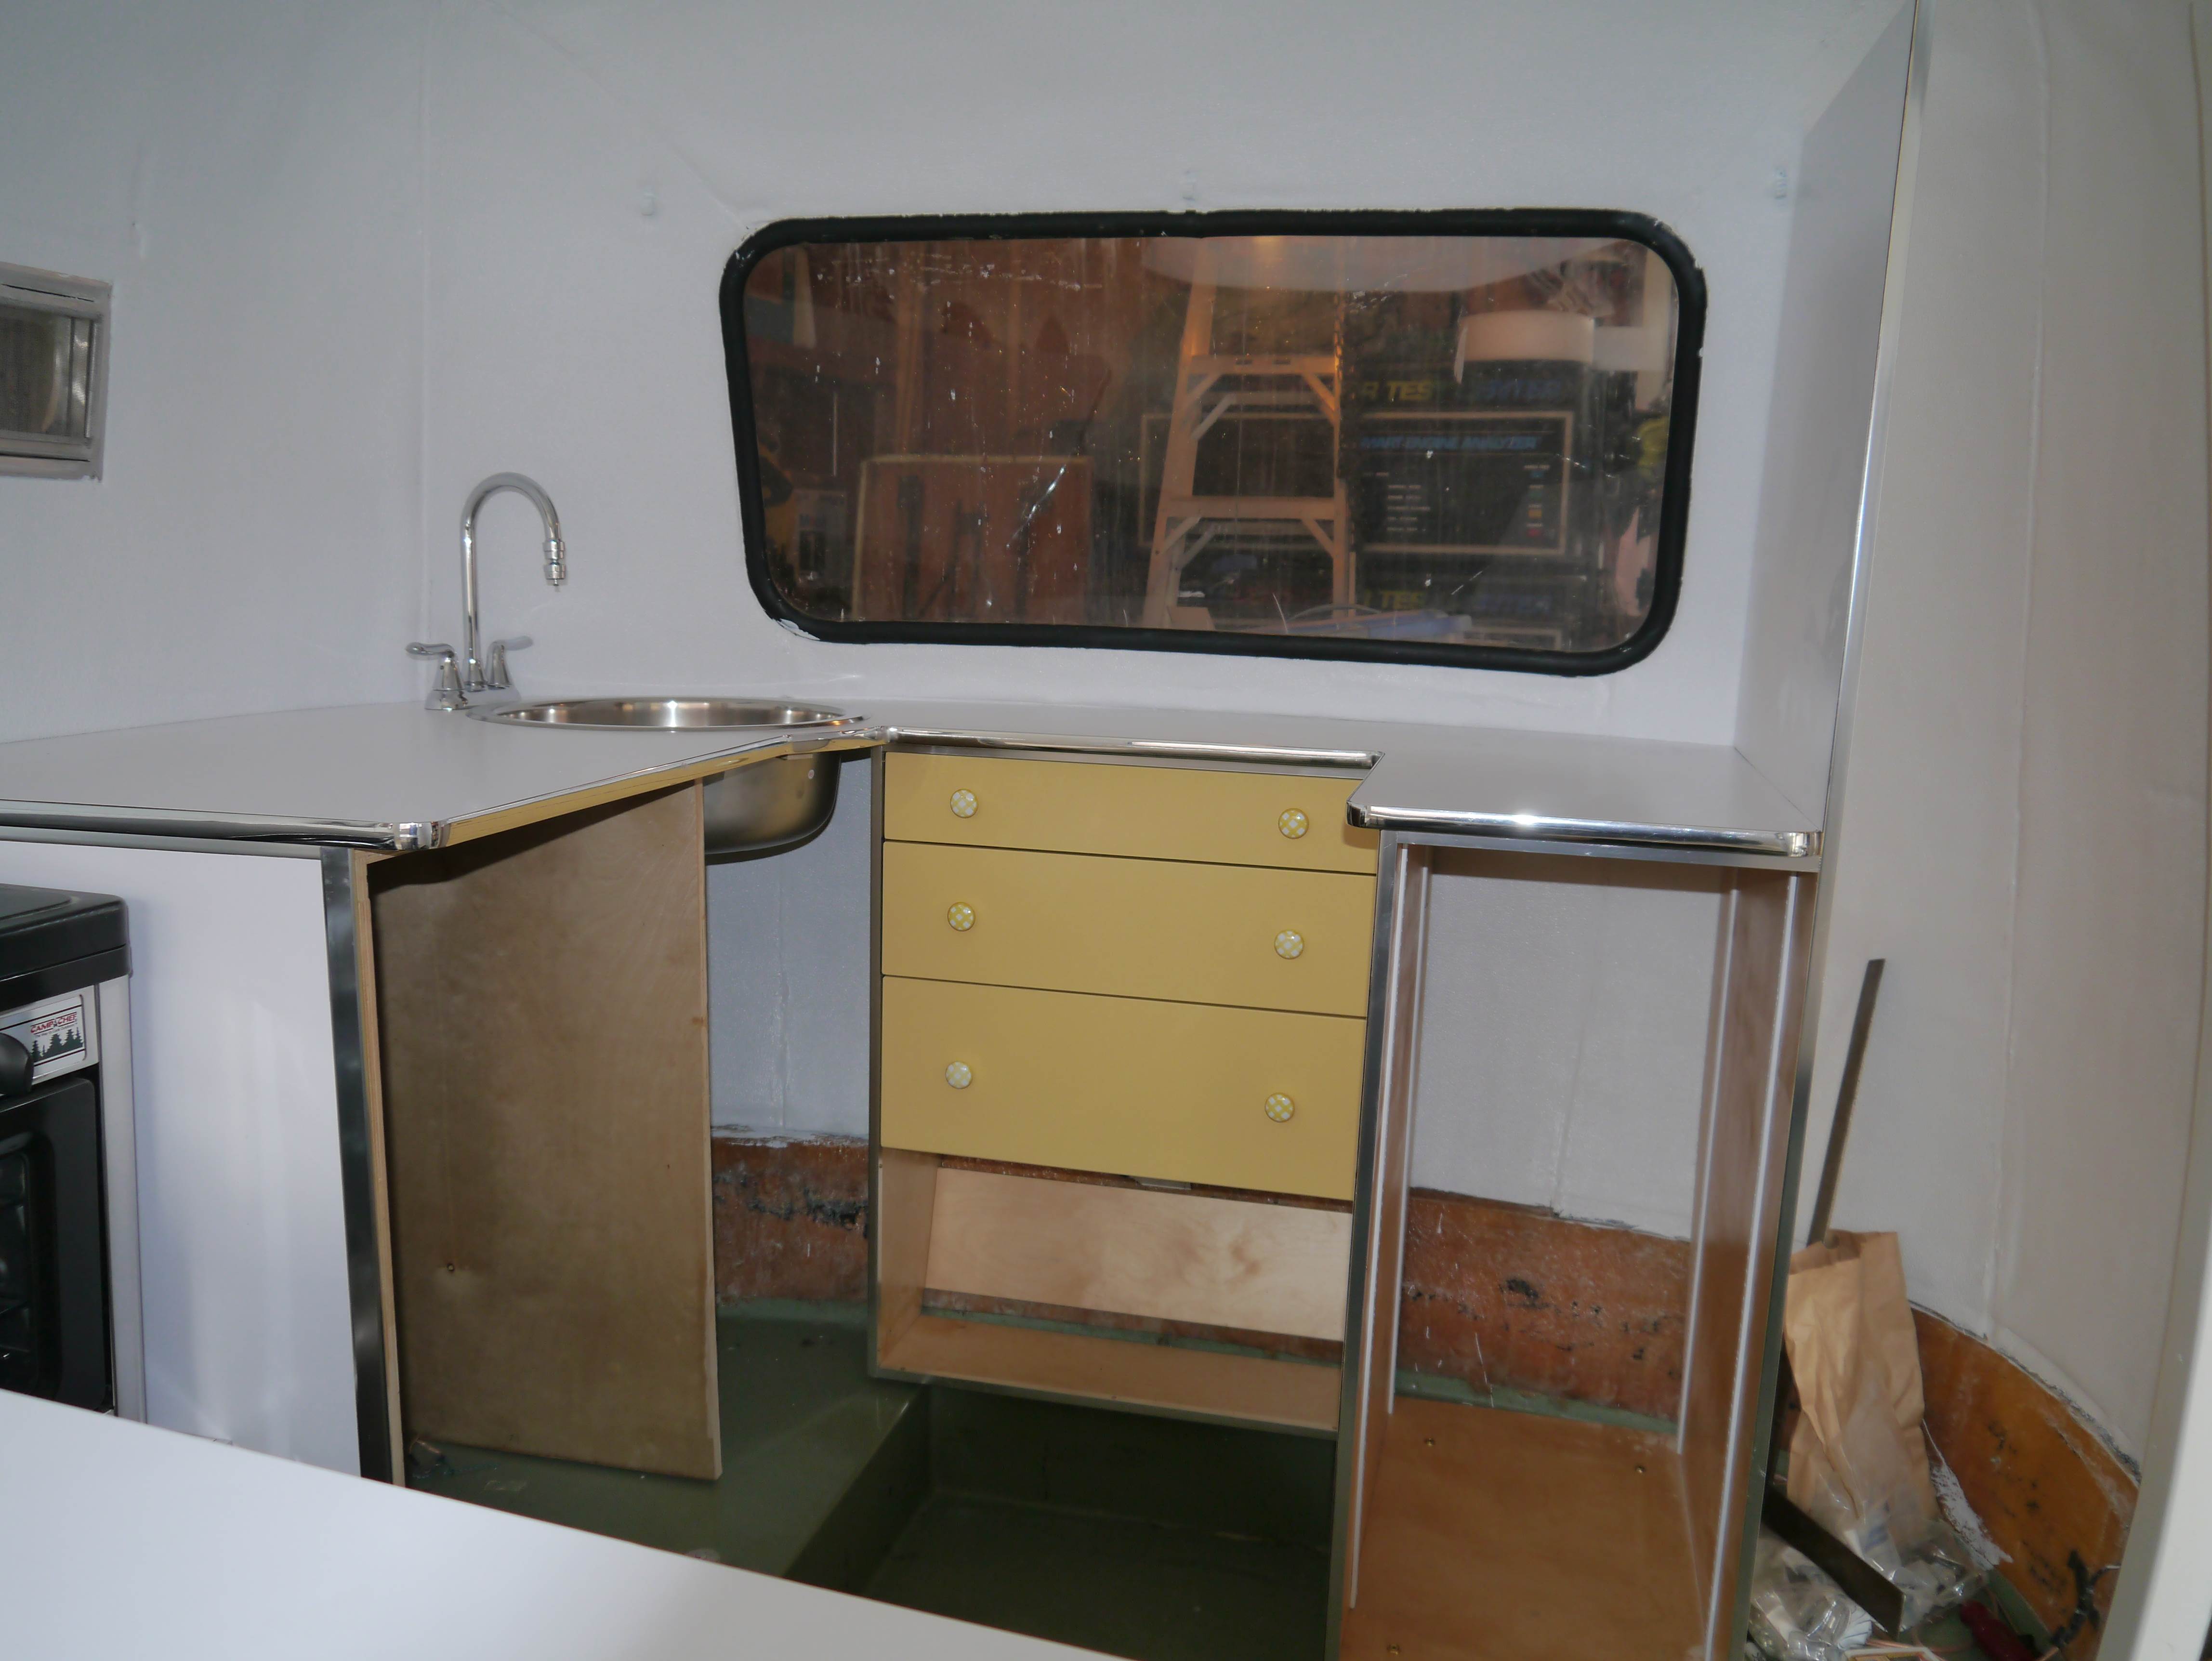
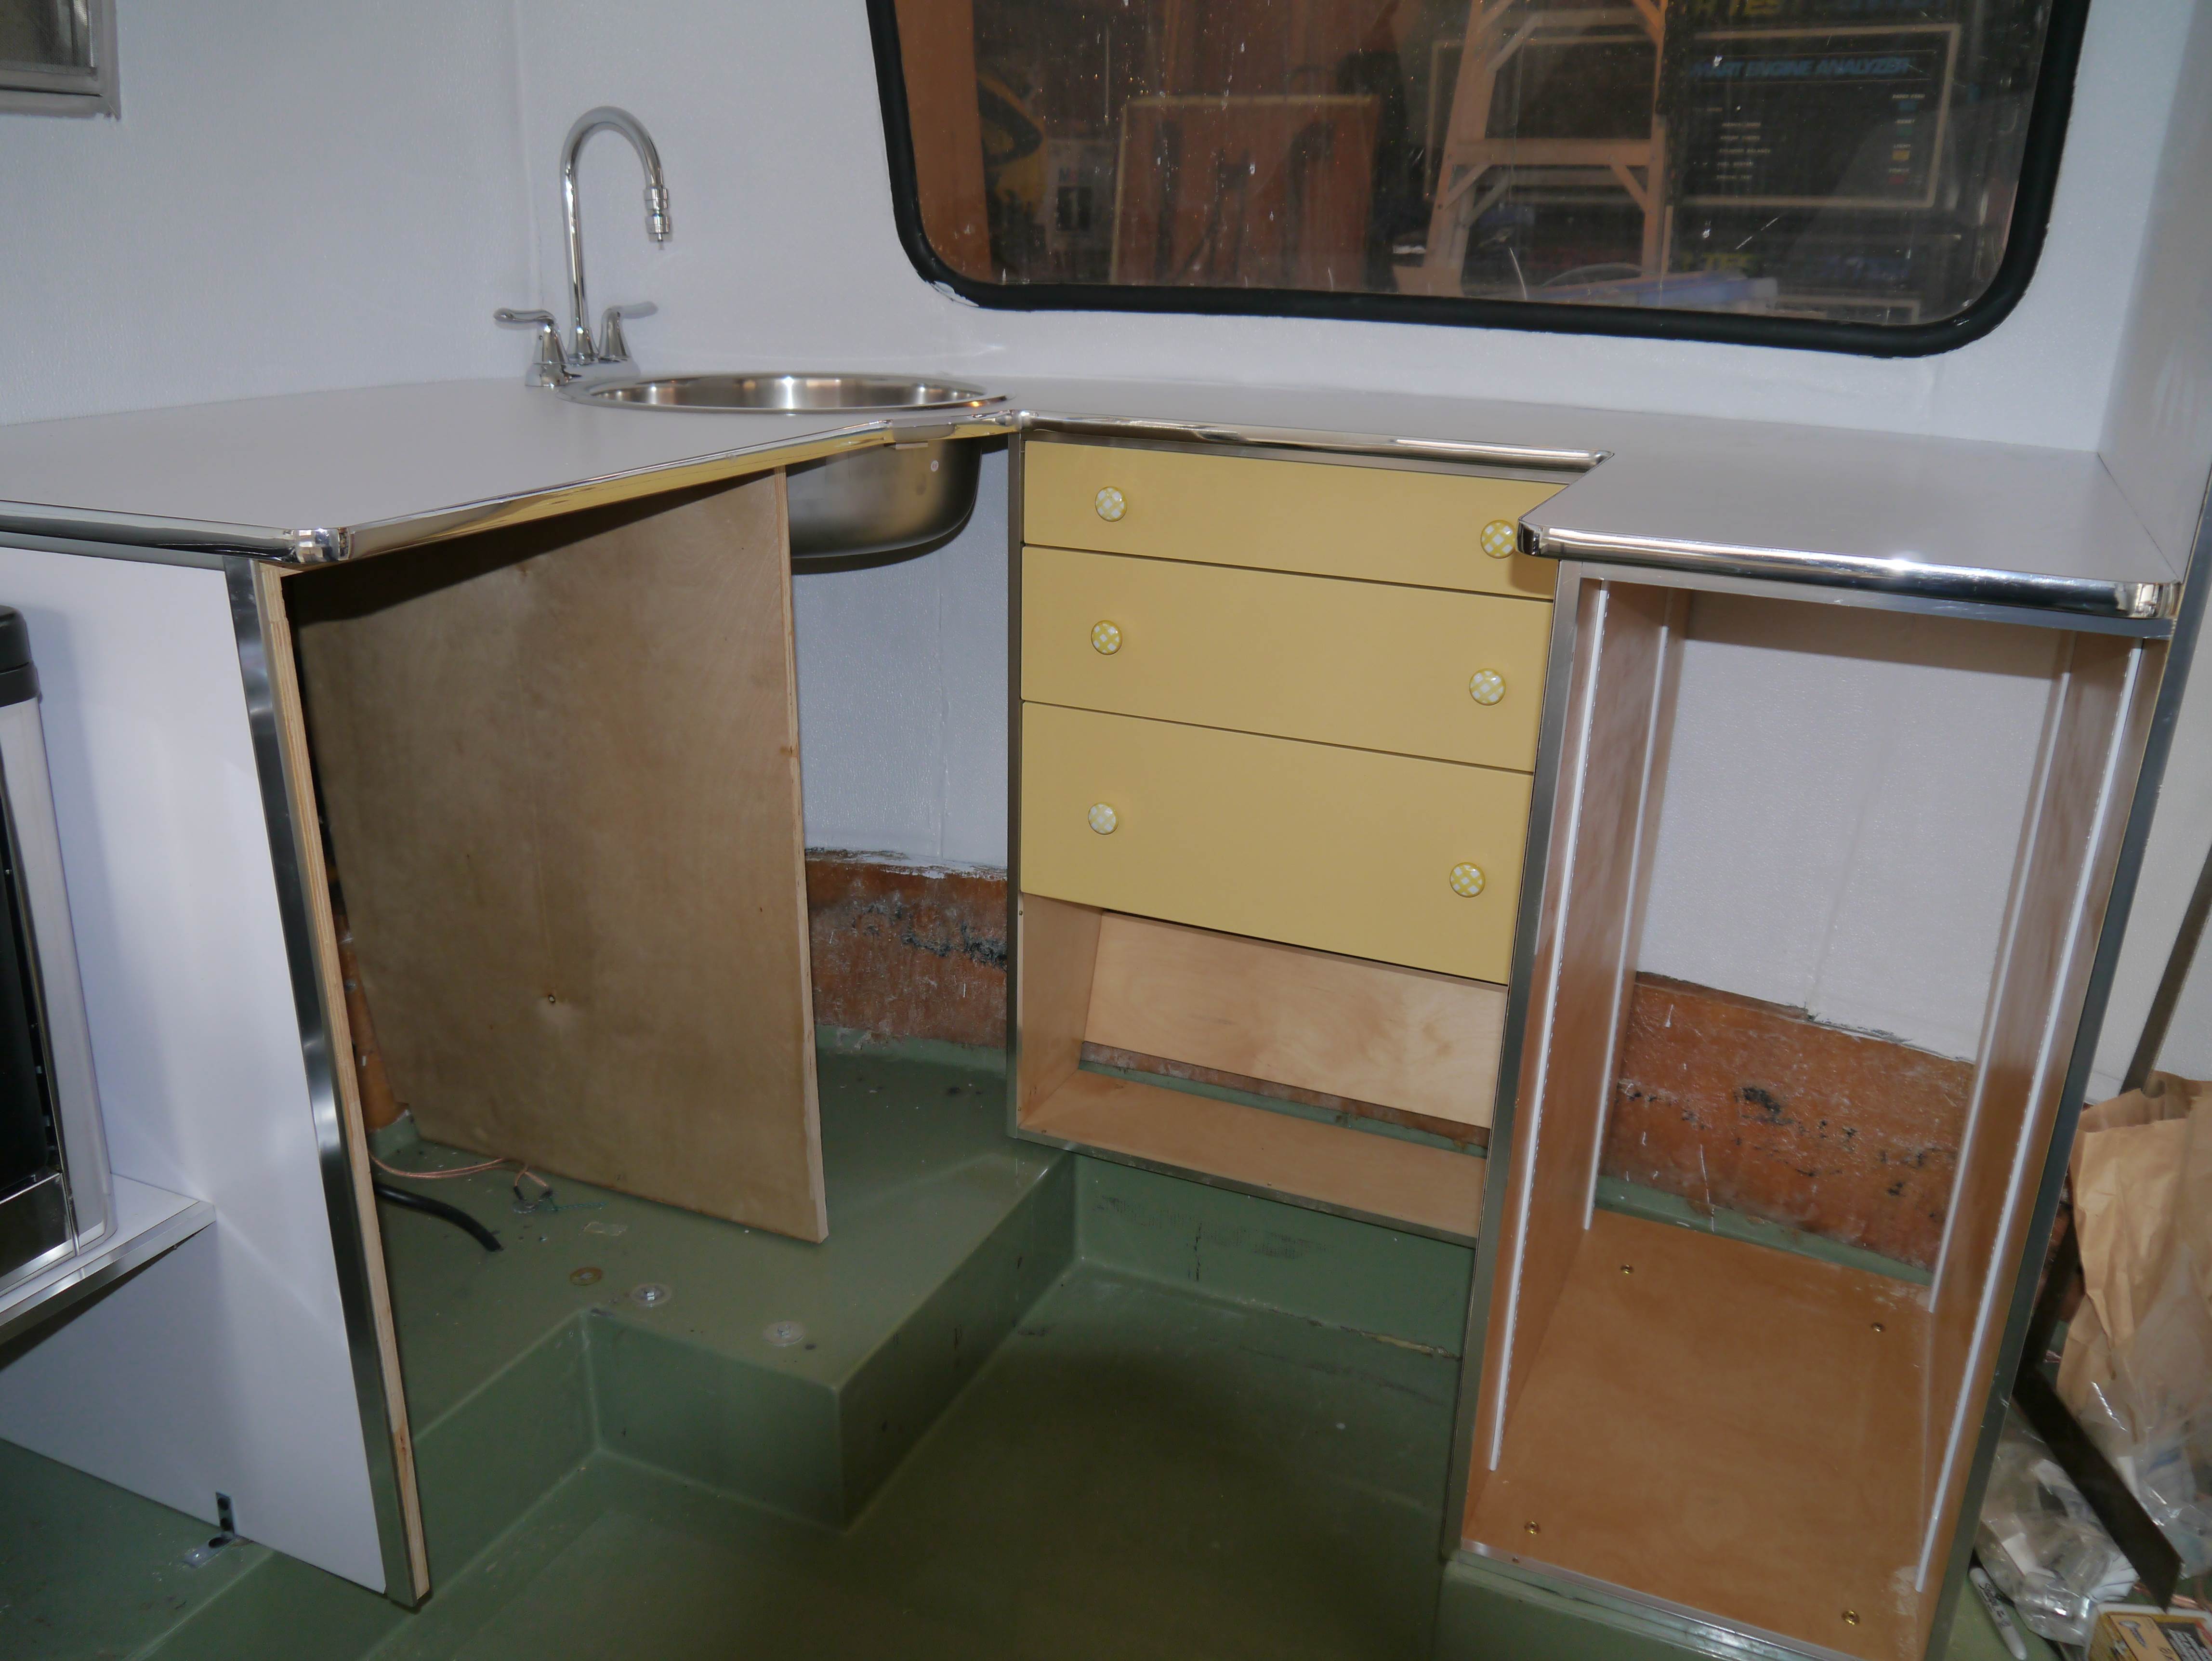
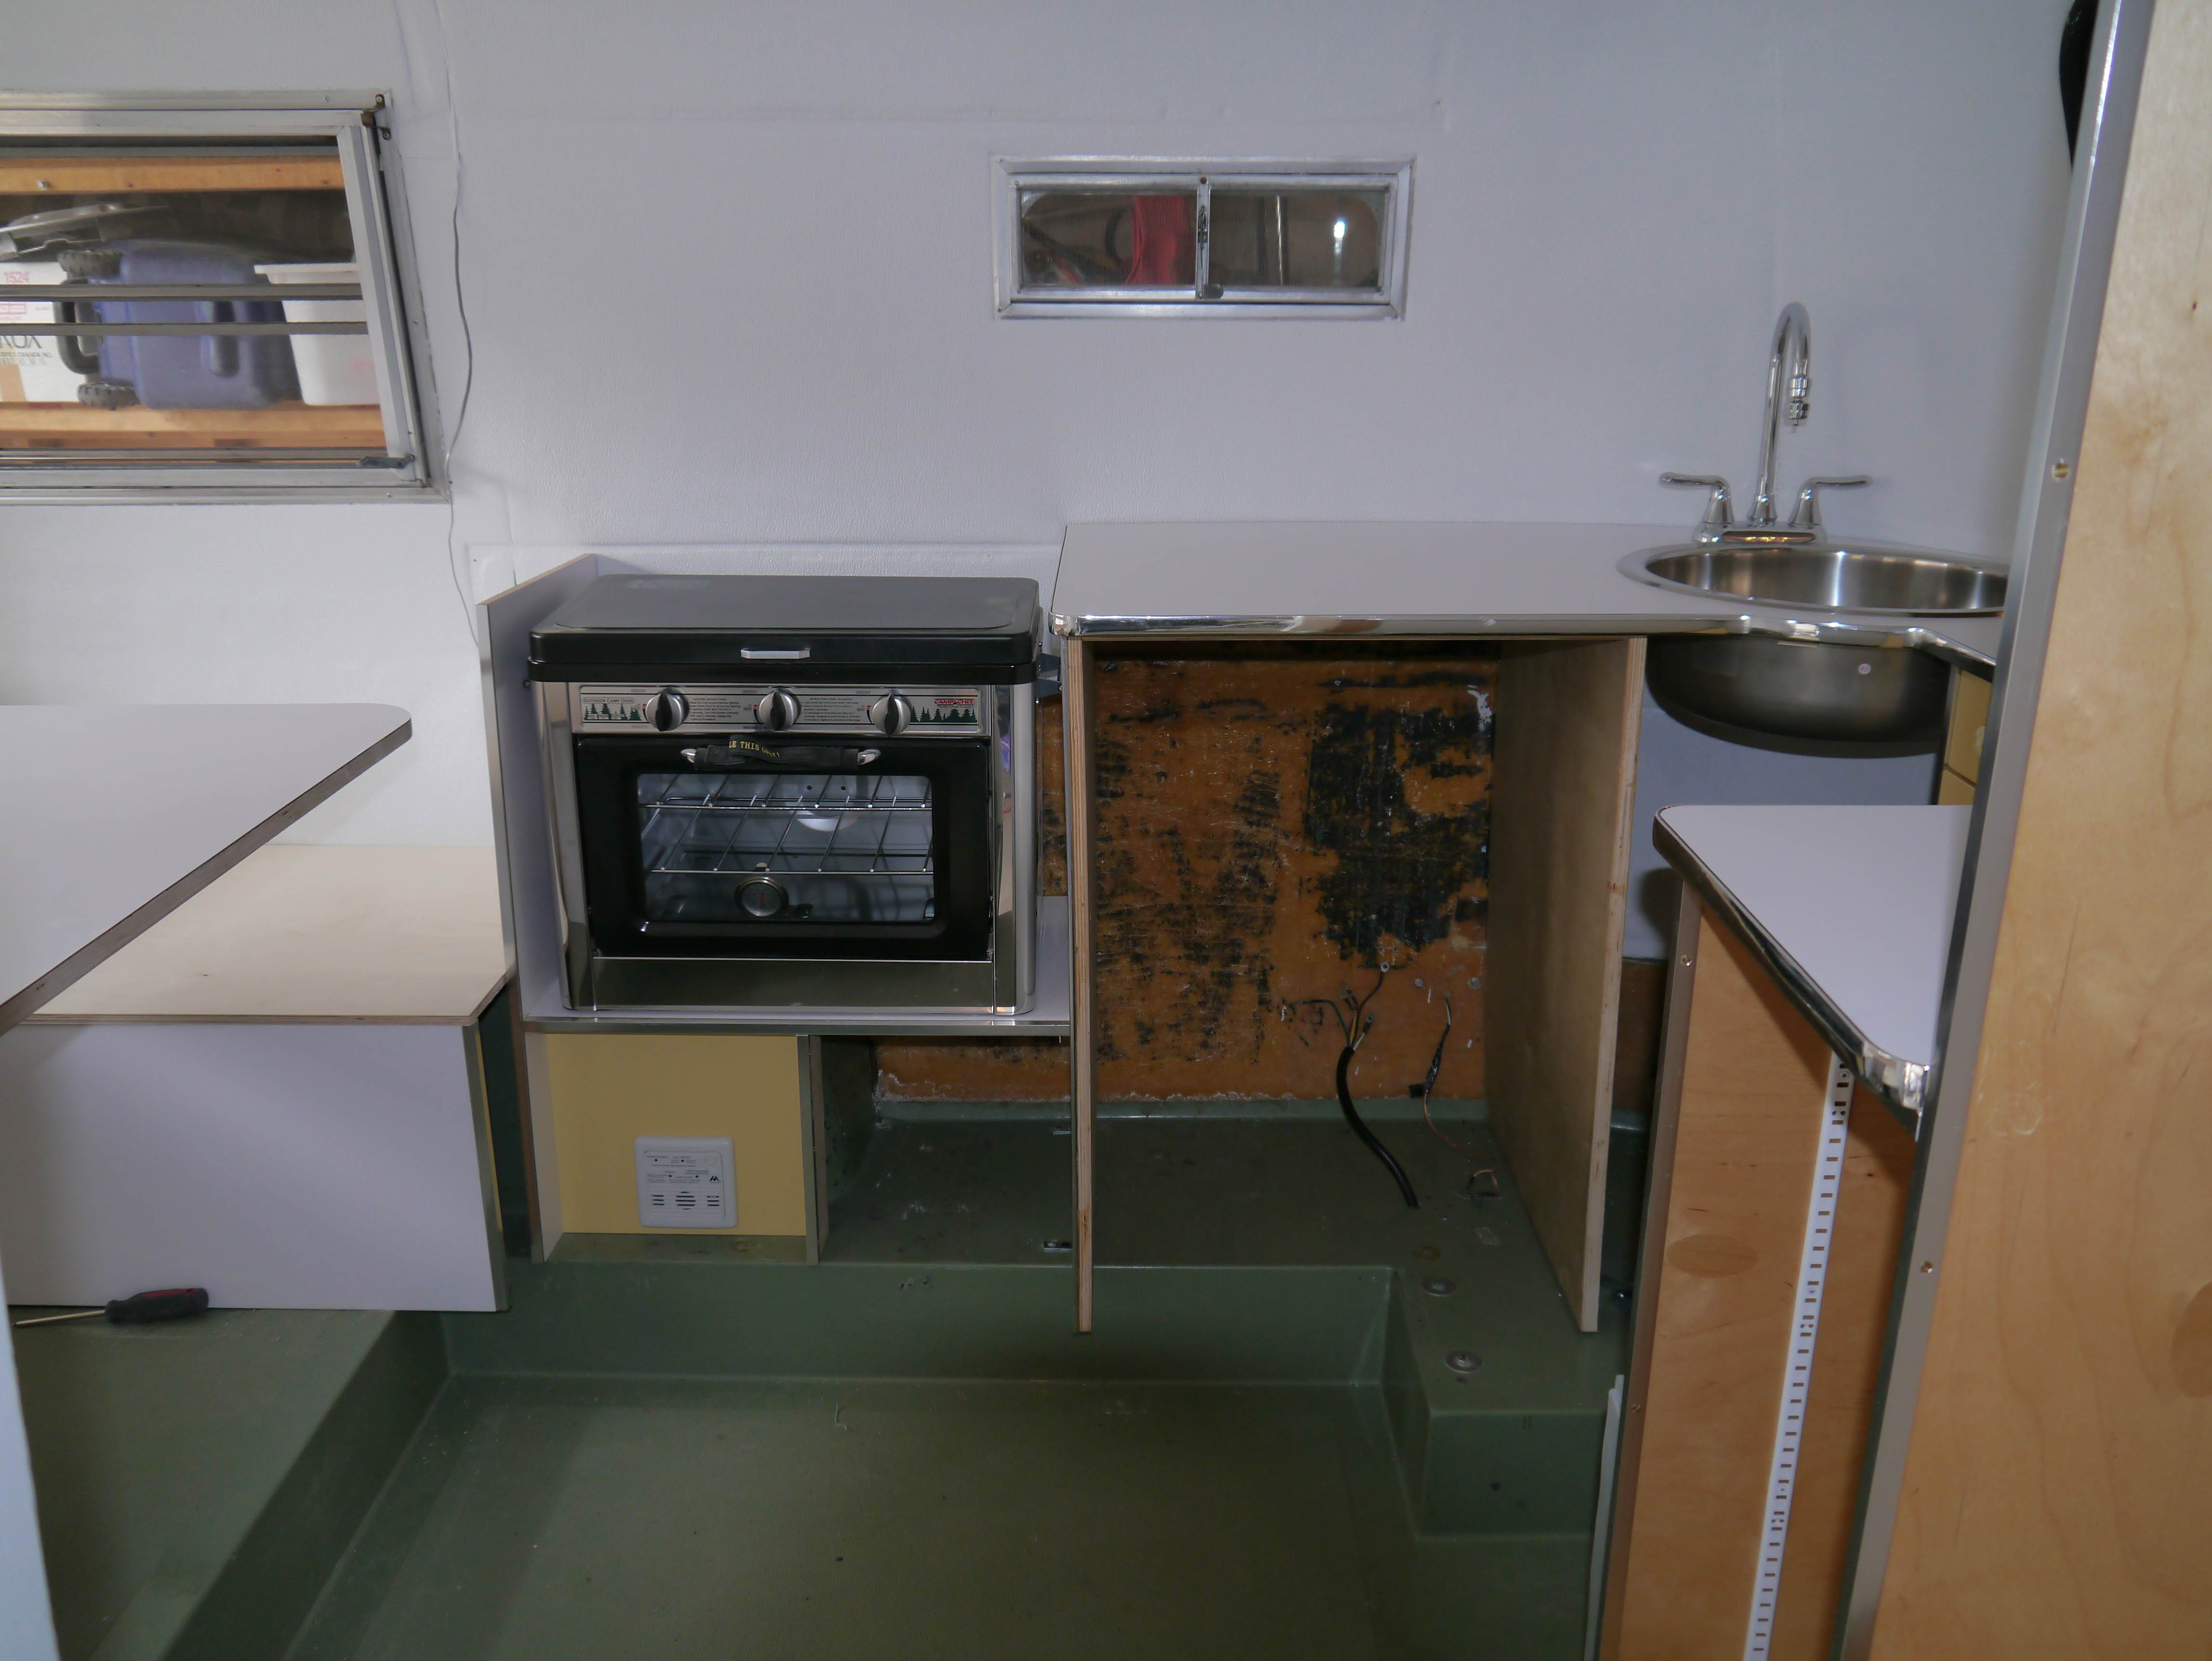
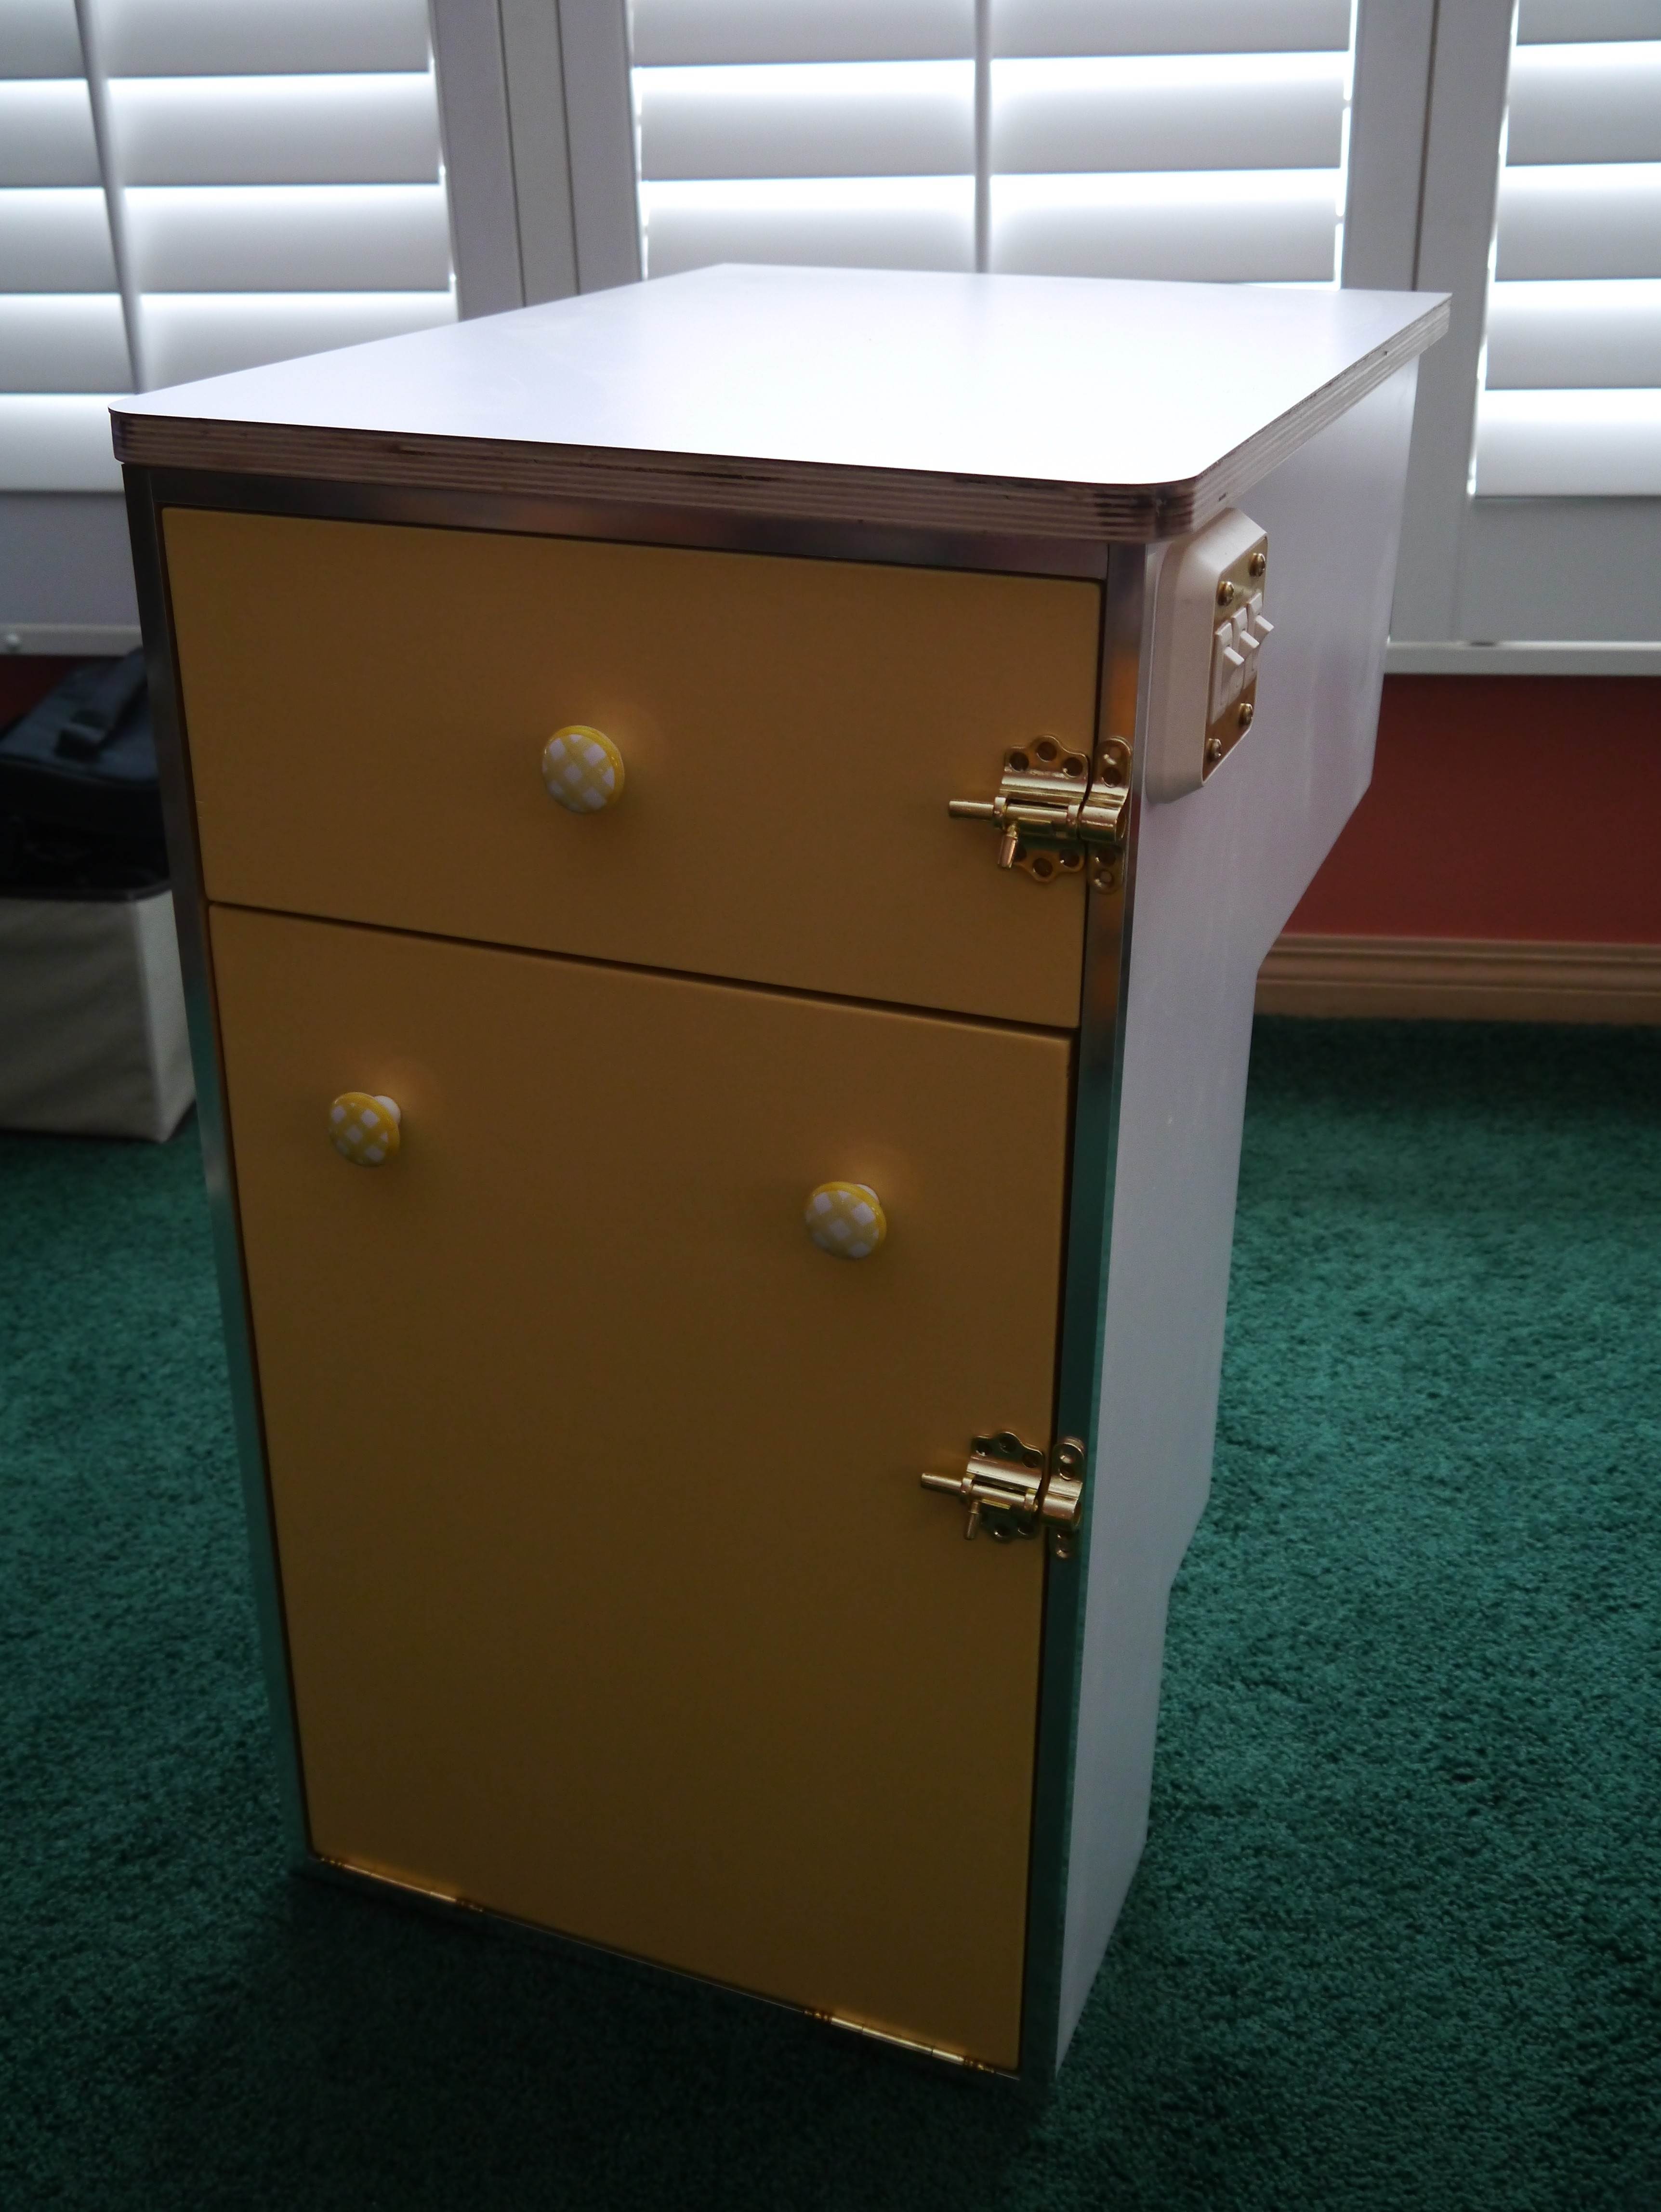
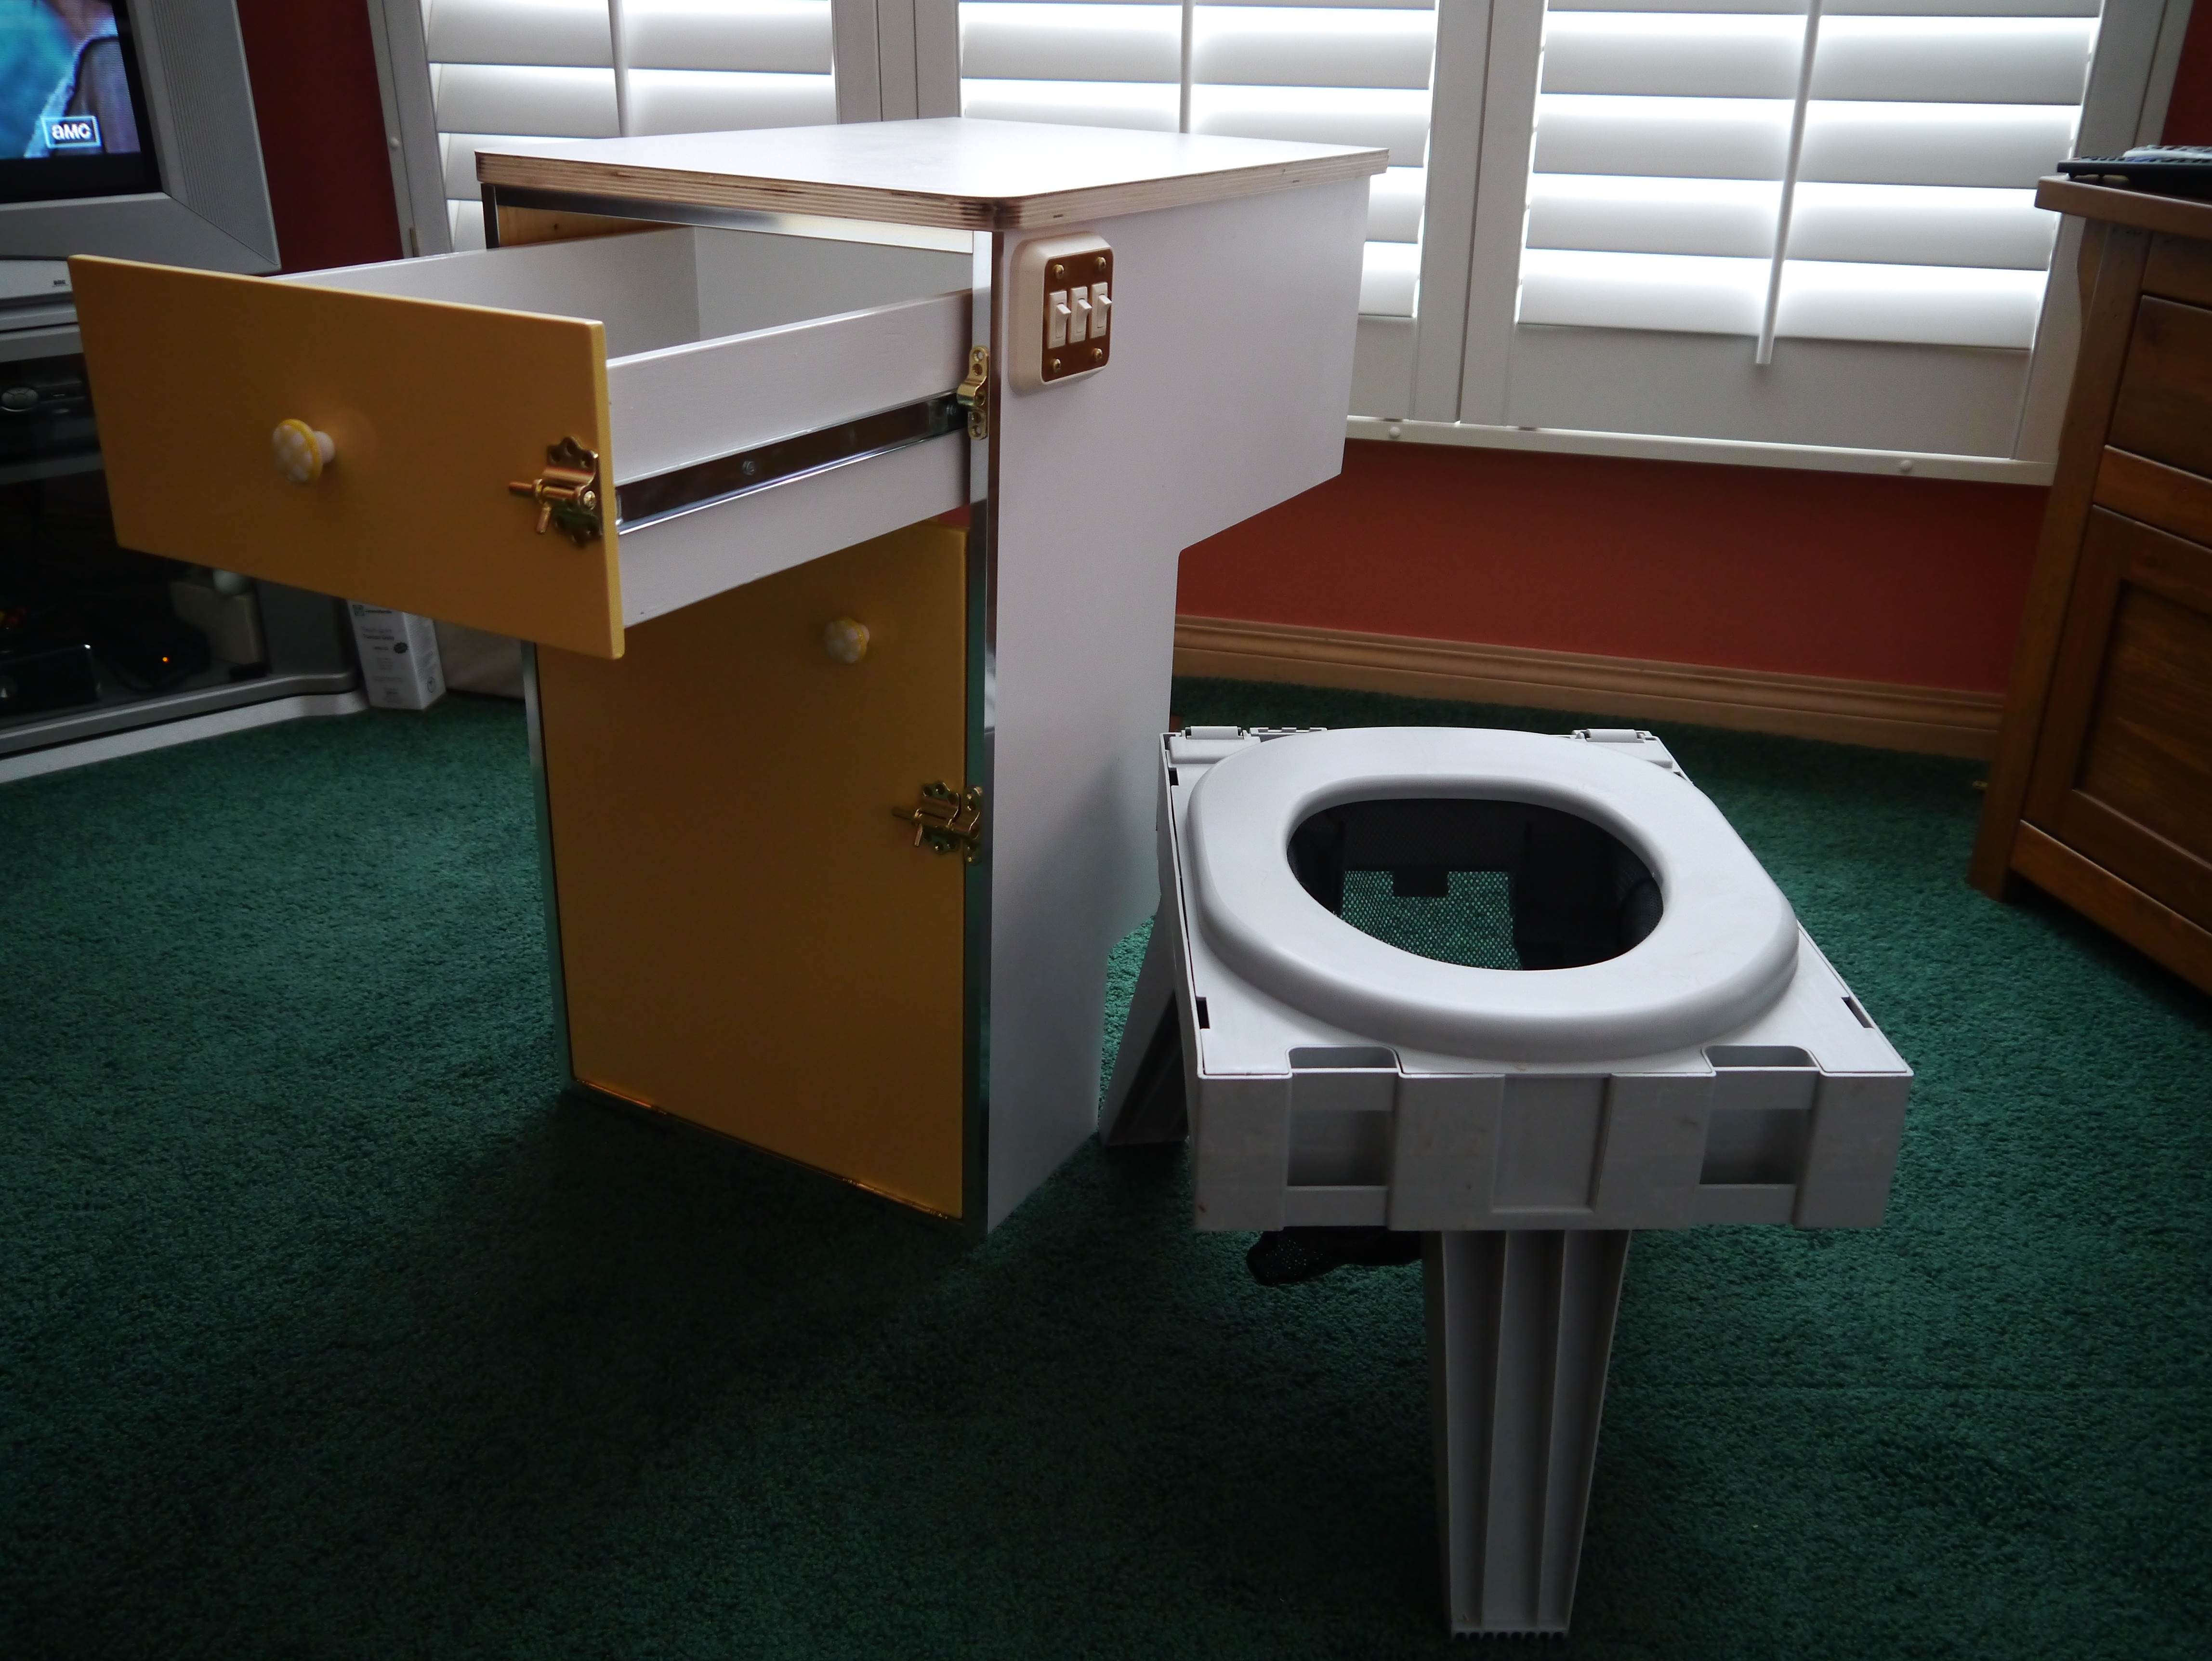
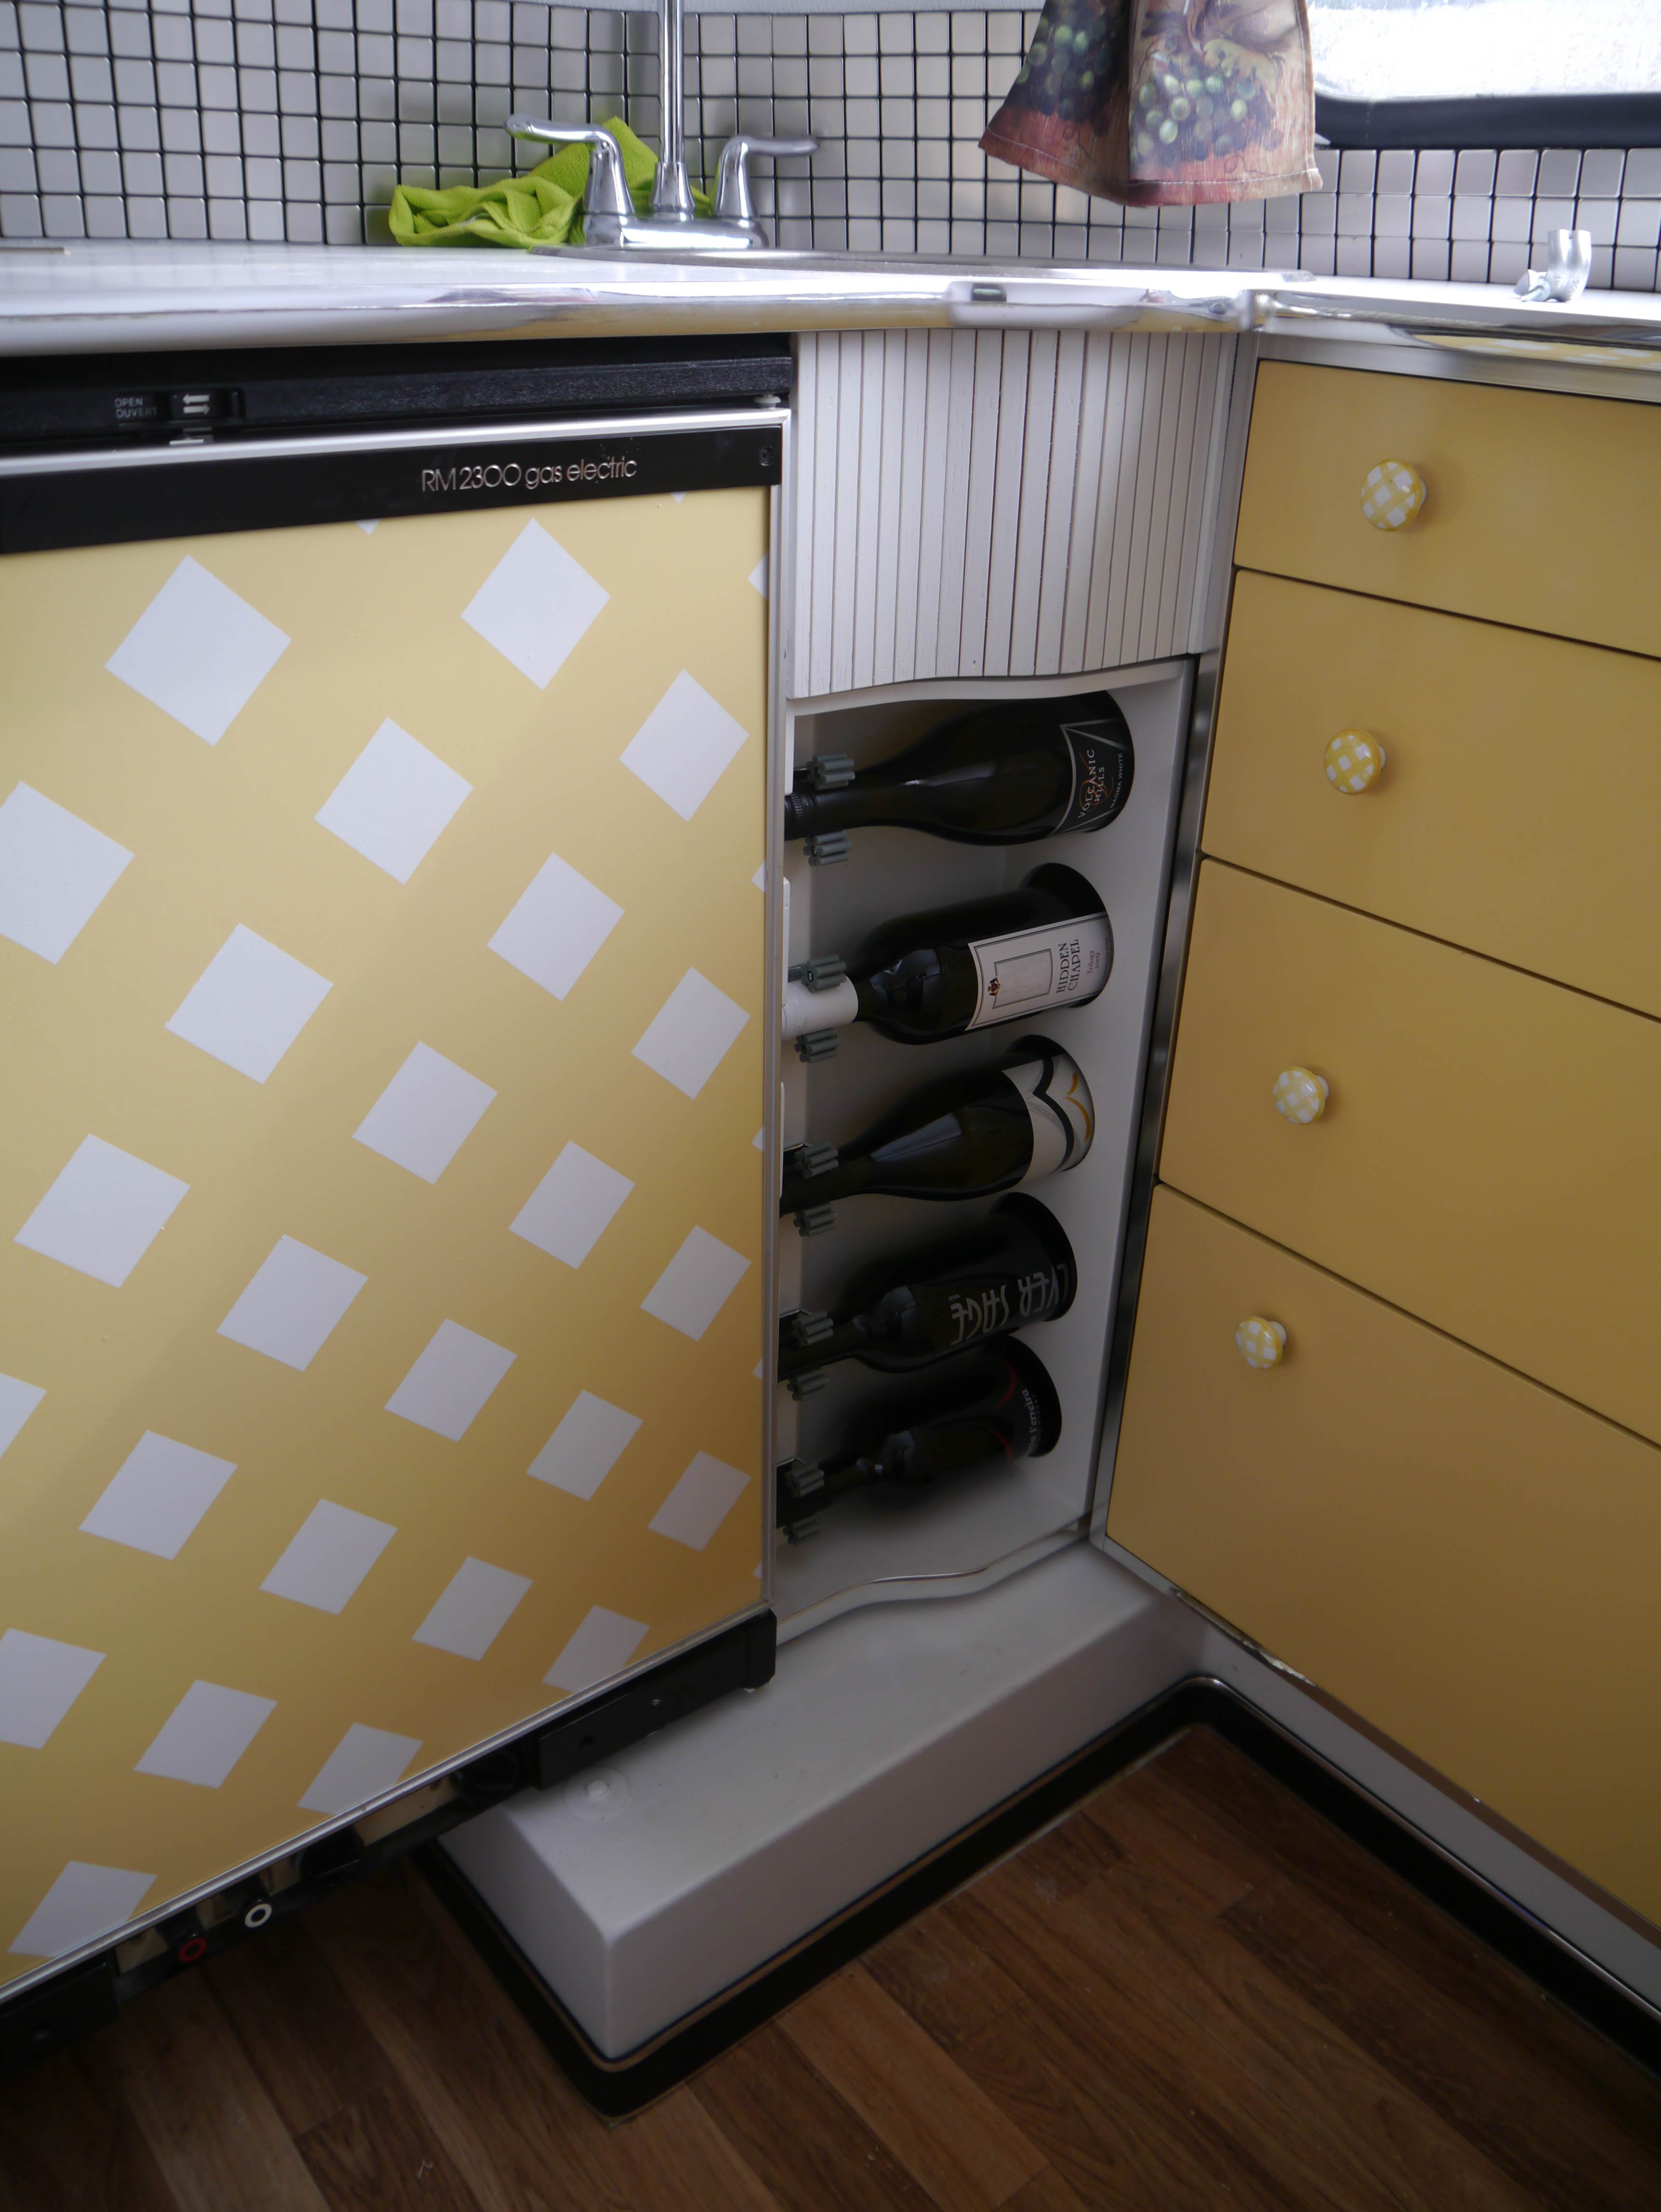
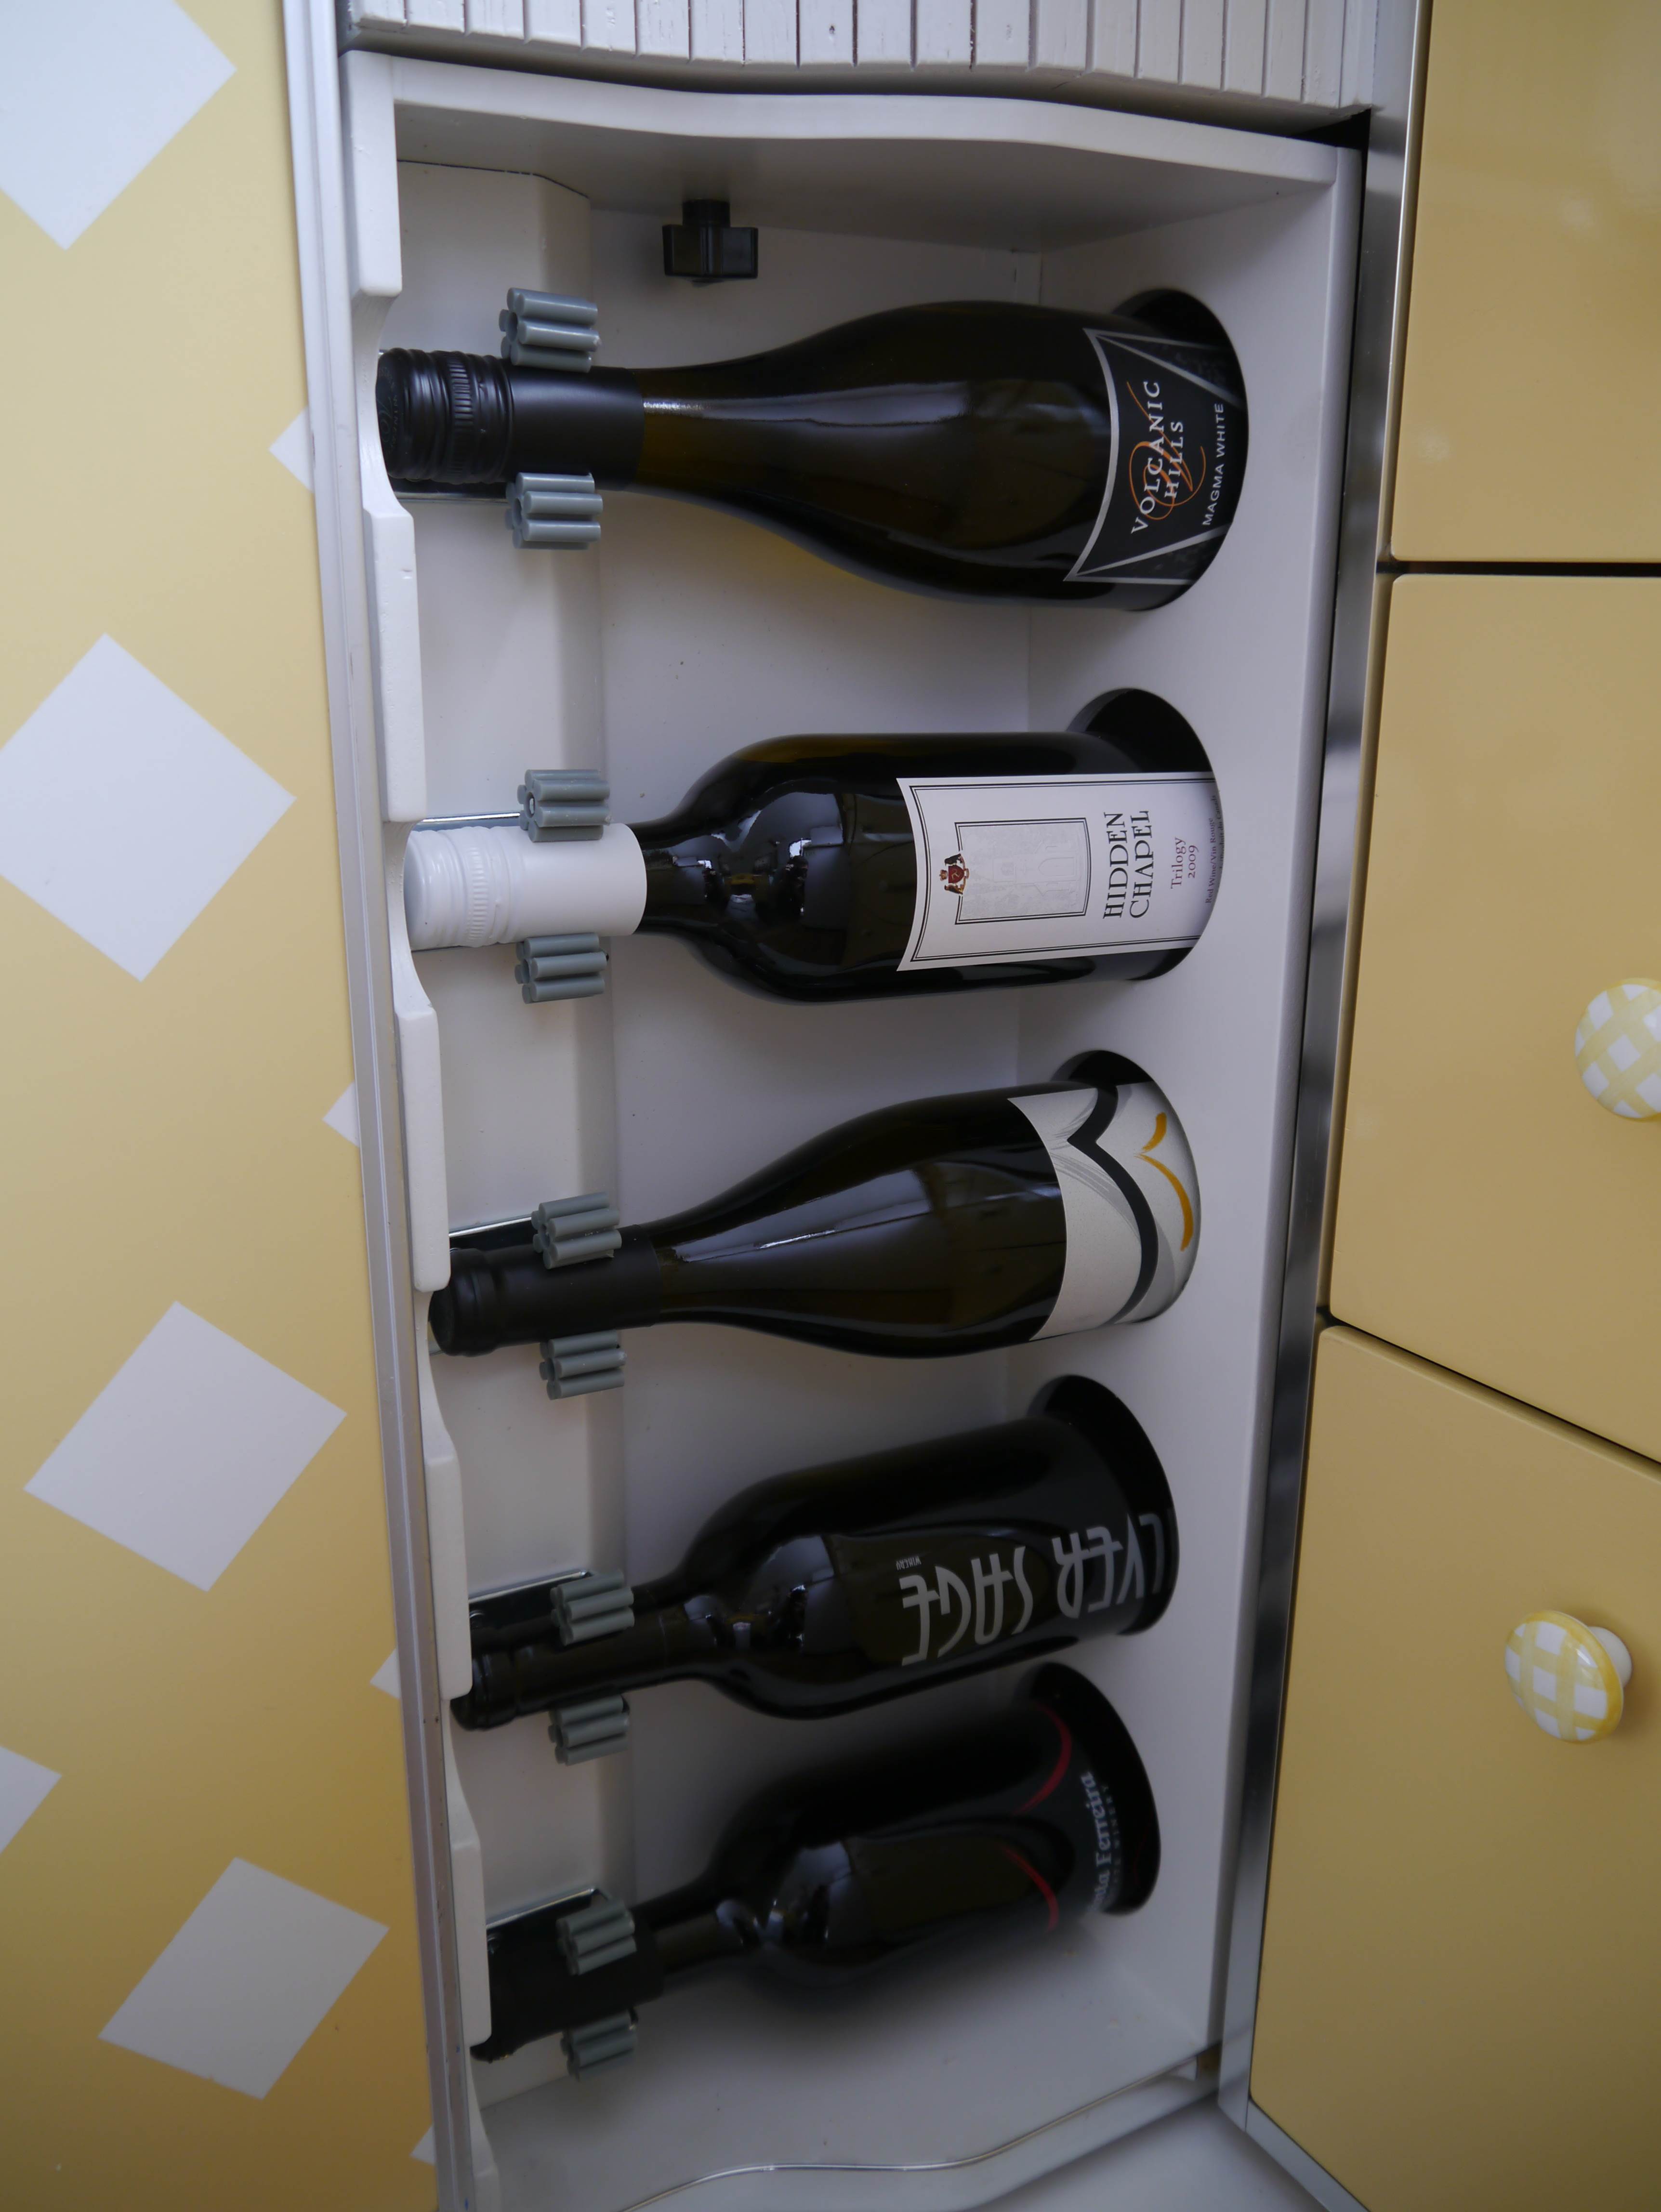
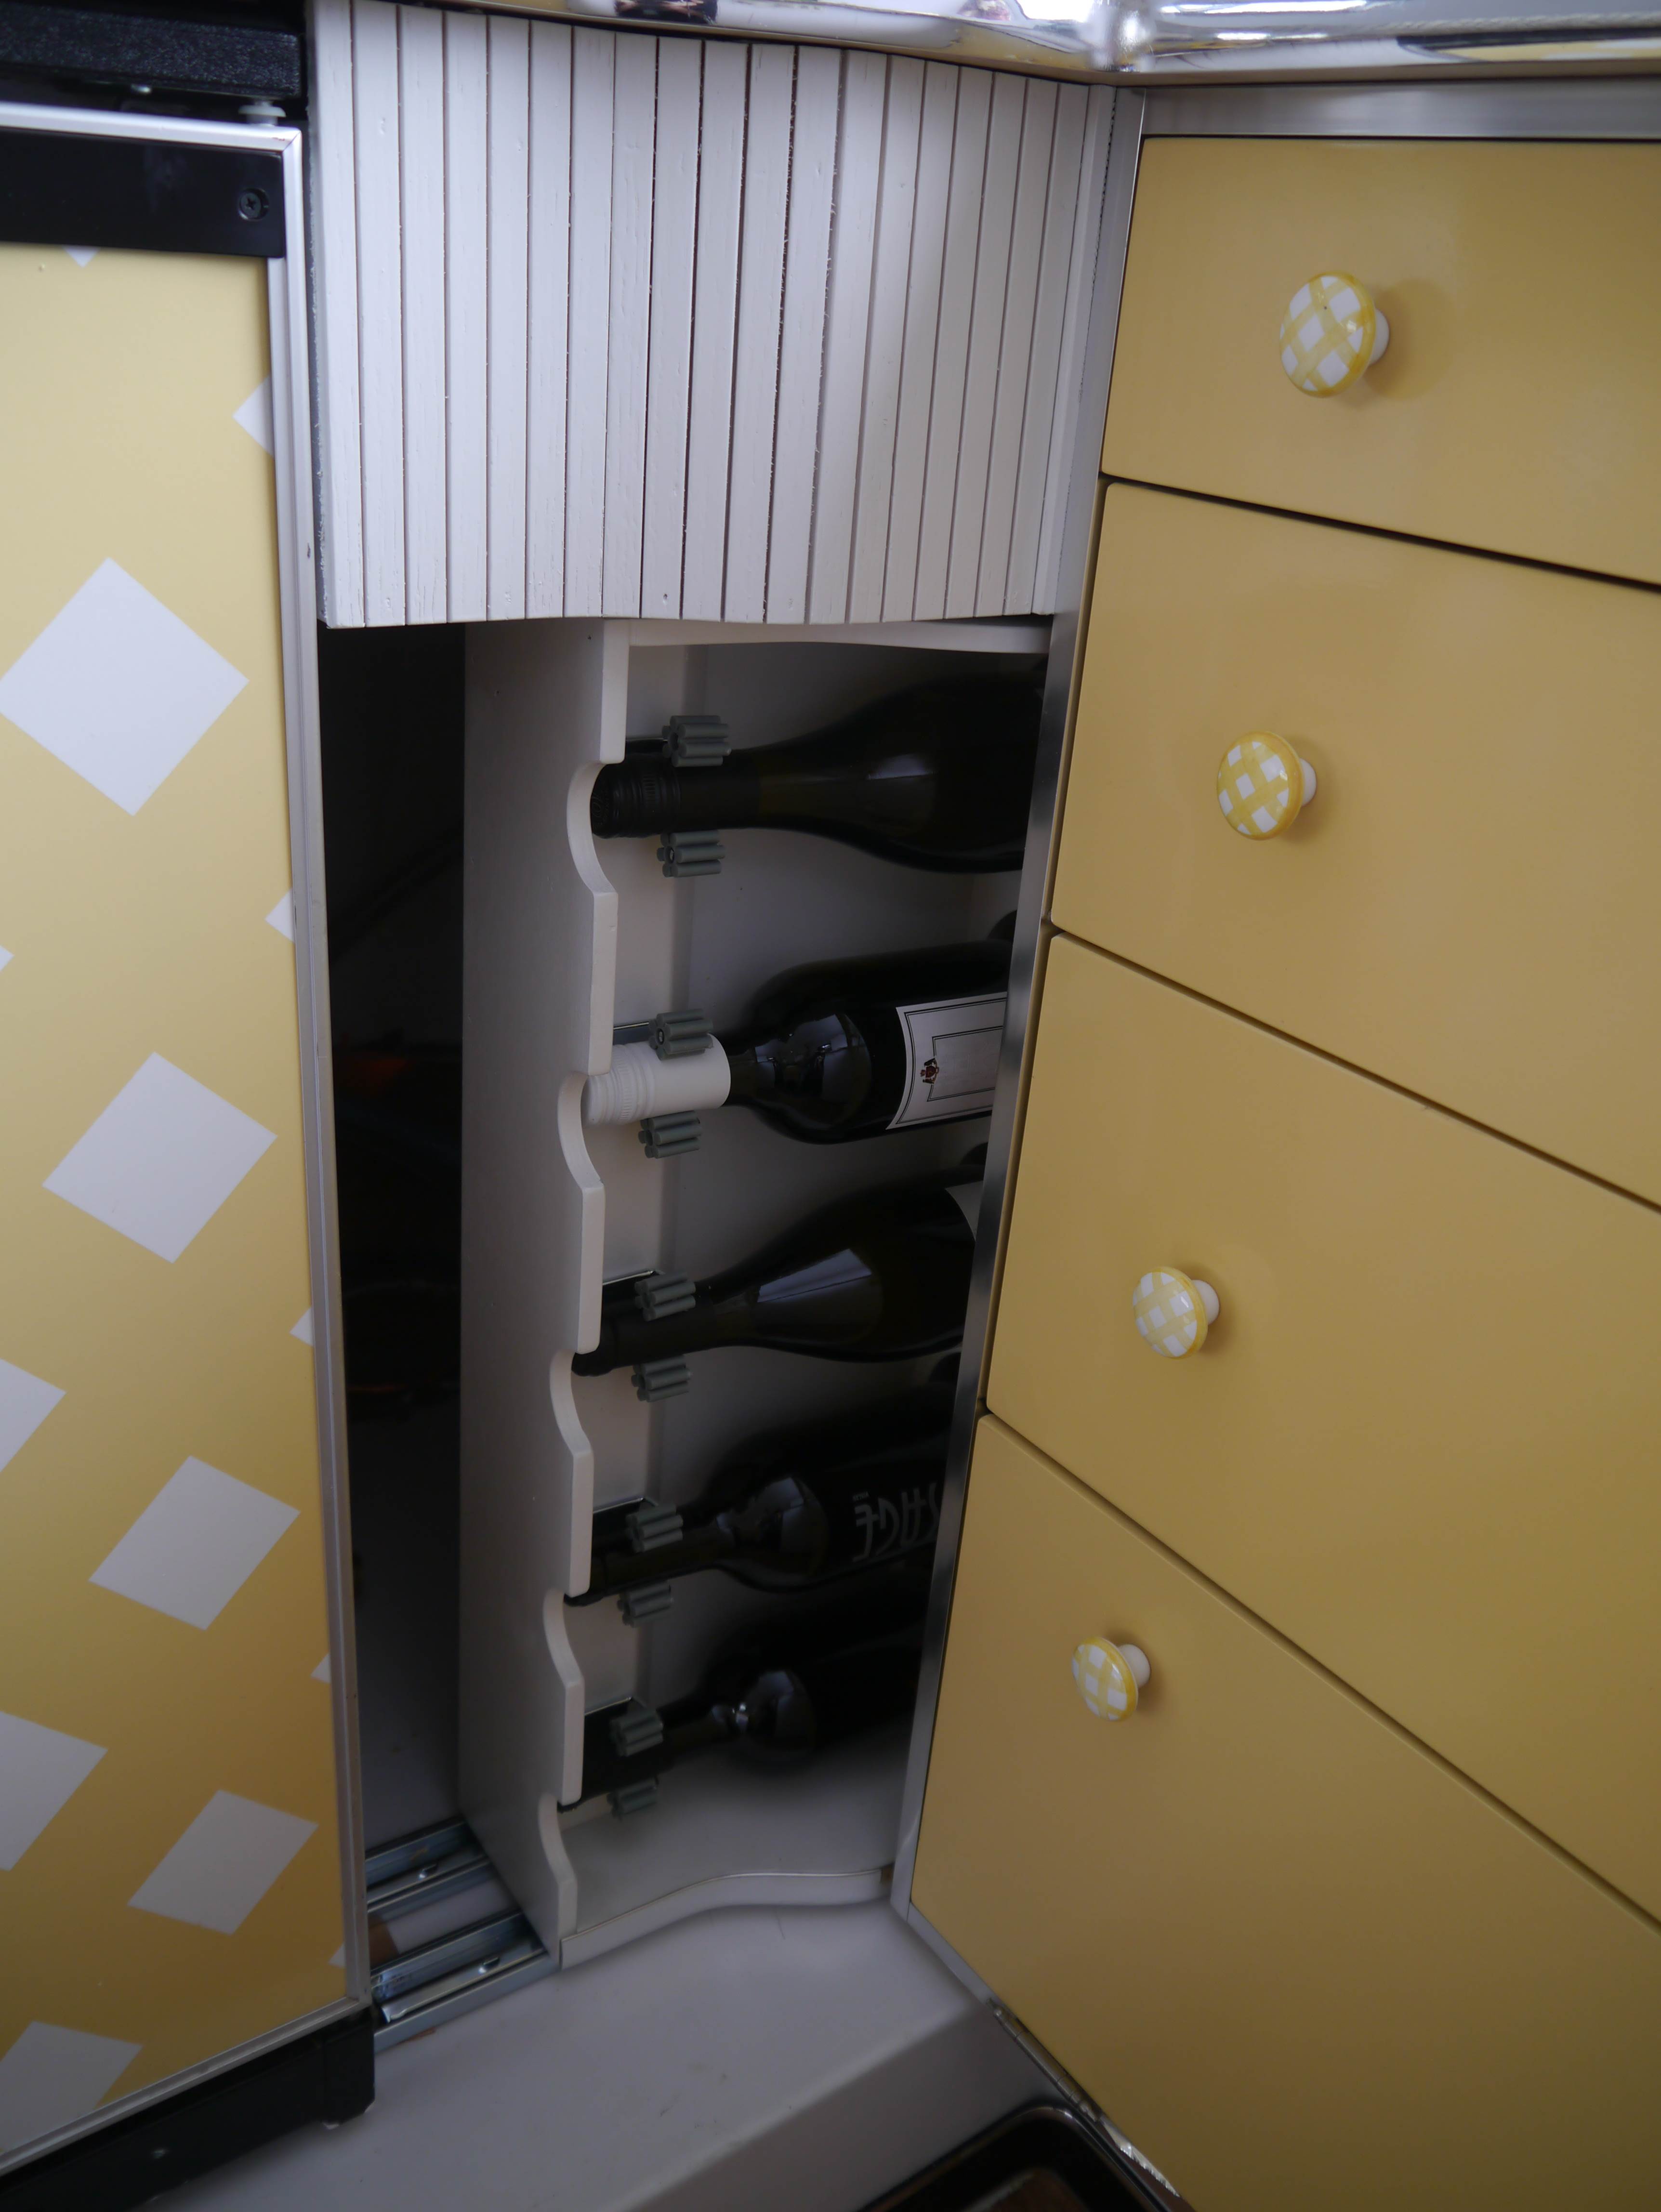
Although the outside looks relatively stock and retro the inside reveals a completely unique custom floor plan; the dinette area was widened by 10” to form a “U” seating with a large 34″ square table which converts into a true 54” double bed. The brilliant white kitchen counters feature a full size round corner sink and chrome edging. Appliances include a two burner stove with oven, 3 cu/ft fridge with a hand painted front panel that matches the drawer knobs, There is plenty of storage with 4 large drawers in the front under the window, a large storage cupboard under the wrap around counter, the closet has been moved into the front corner. The final touch is the built in wine rack which slides sideways to reveal the electric water pump and hot water heater. Beside the main entry door is a small cabinet with one drawer and a custom tilt out that conveniently holds the portable toilet.

The following sections summarize the changes we made:
Back to the Beginning – Our Original Boler
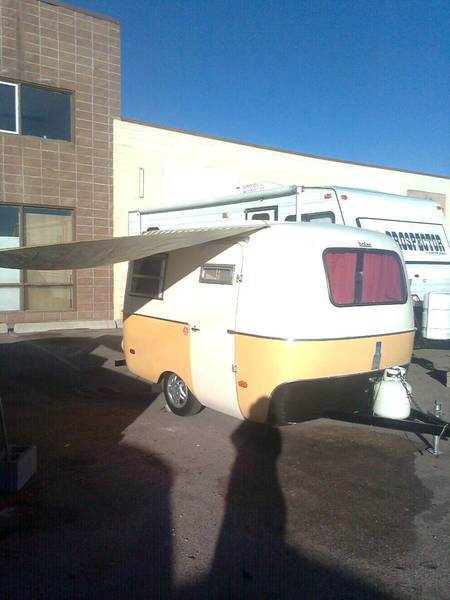
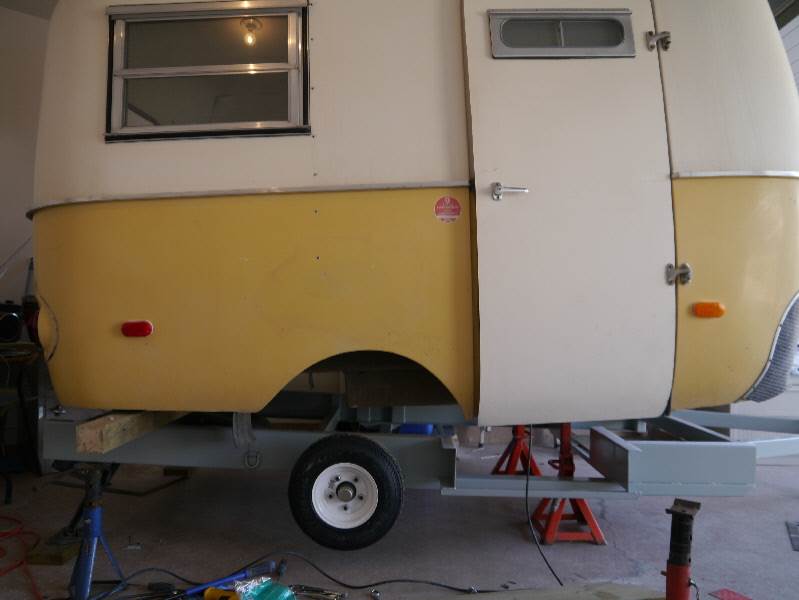
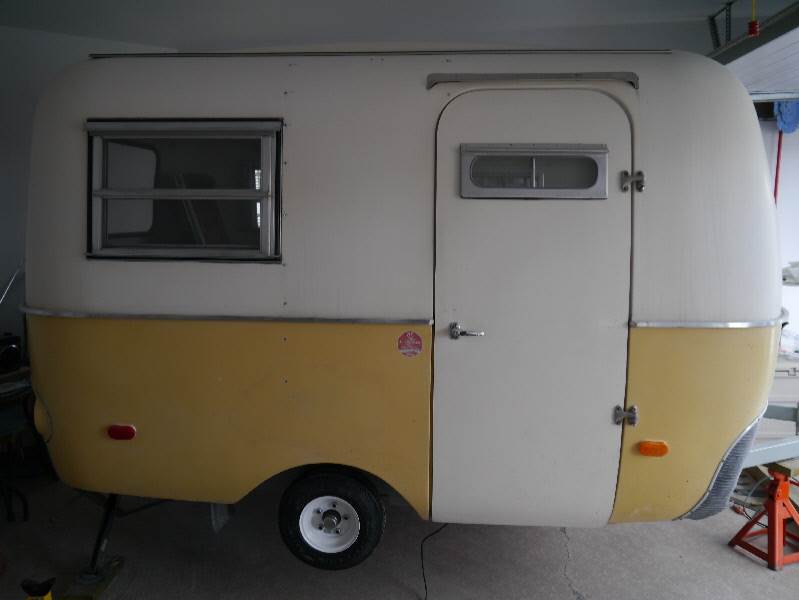
This is the story of how simply buying a 1974 Boler trailer has turned into an obsession, and like many renovation projects has grown far beyond the initial plan. Let me start with some background. We live in Calgary Alberta, our back yard is the Canadian Rocky Mountains which has some of the best scenery and camping in the world. As a family we have enjoyed camping trips throughout the summer months, sitting around the campfire, hiking the many trails and sleeping in a tent. As my wife and I get older the idea of packing and unpacking the car, setting up the tent, crawling around on the ground and the hardest part, getting up off the ground in the morning it was time to get something a little more comfortable. Like many I have always noticed the unique look of the Boler trailer and in January of 2011 I found a 1974 Boler 1300 in reasonable shape. The outside looked to be in fairly good for its age, there was a small area of damage near the left rear corner where it hit something while being backed in, just in front of that damage was a section that contoured in slightly and the gel coat was cracked but in my mind these were minor and easily fixed. The inside had dark burgundy curtains, plaid upholstery, a 110V dorm fridge in place of the ice box (this looked brand new), the original sink, faucet and stove, fiberglass table and new maple plywood doors. The floor was covered with brown outdoor carpet which was very worn and dirty
This is what our Boler looked like when we bought it:


From the start we knew the Boler floor plan was not ideal for us, we love cooking and the original 8″ of counter space between the stove and sink were not enough. The very narrow bed made t difficult for the two of us to get a good night’s sleep, and the overall lack of storage presented a challenge that all Boler owners have to deal with.
Original Boler and the Transformation Plan
Custom Frame & Axle
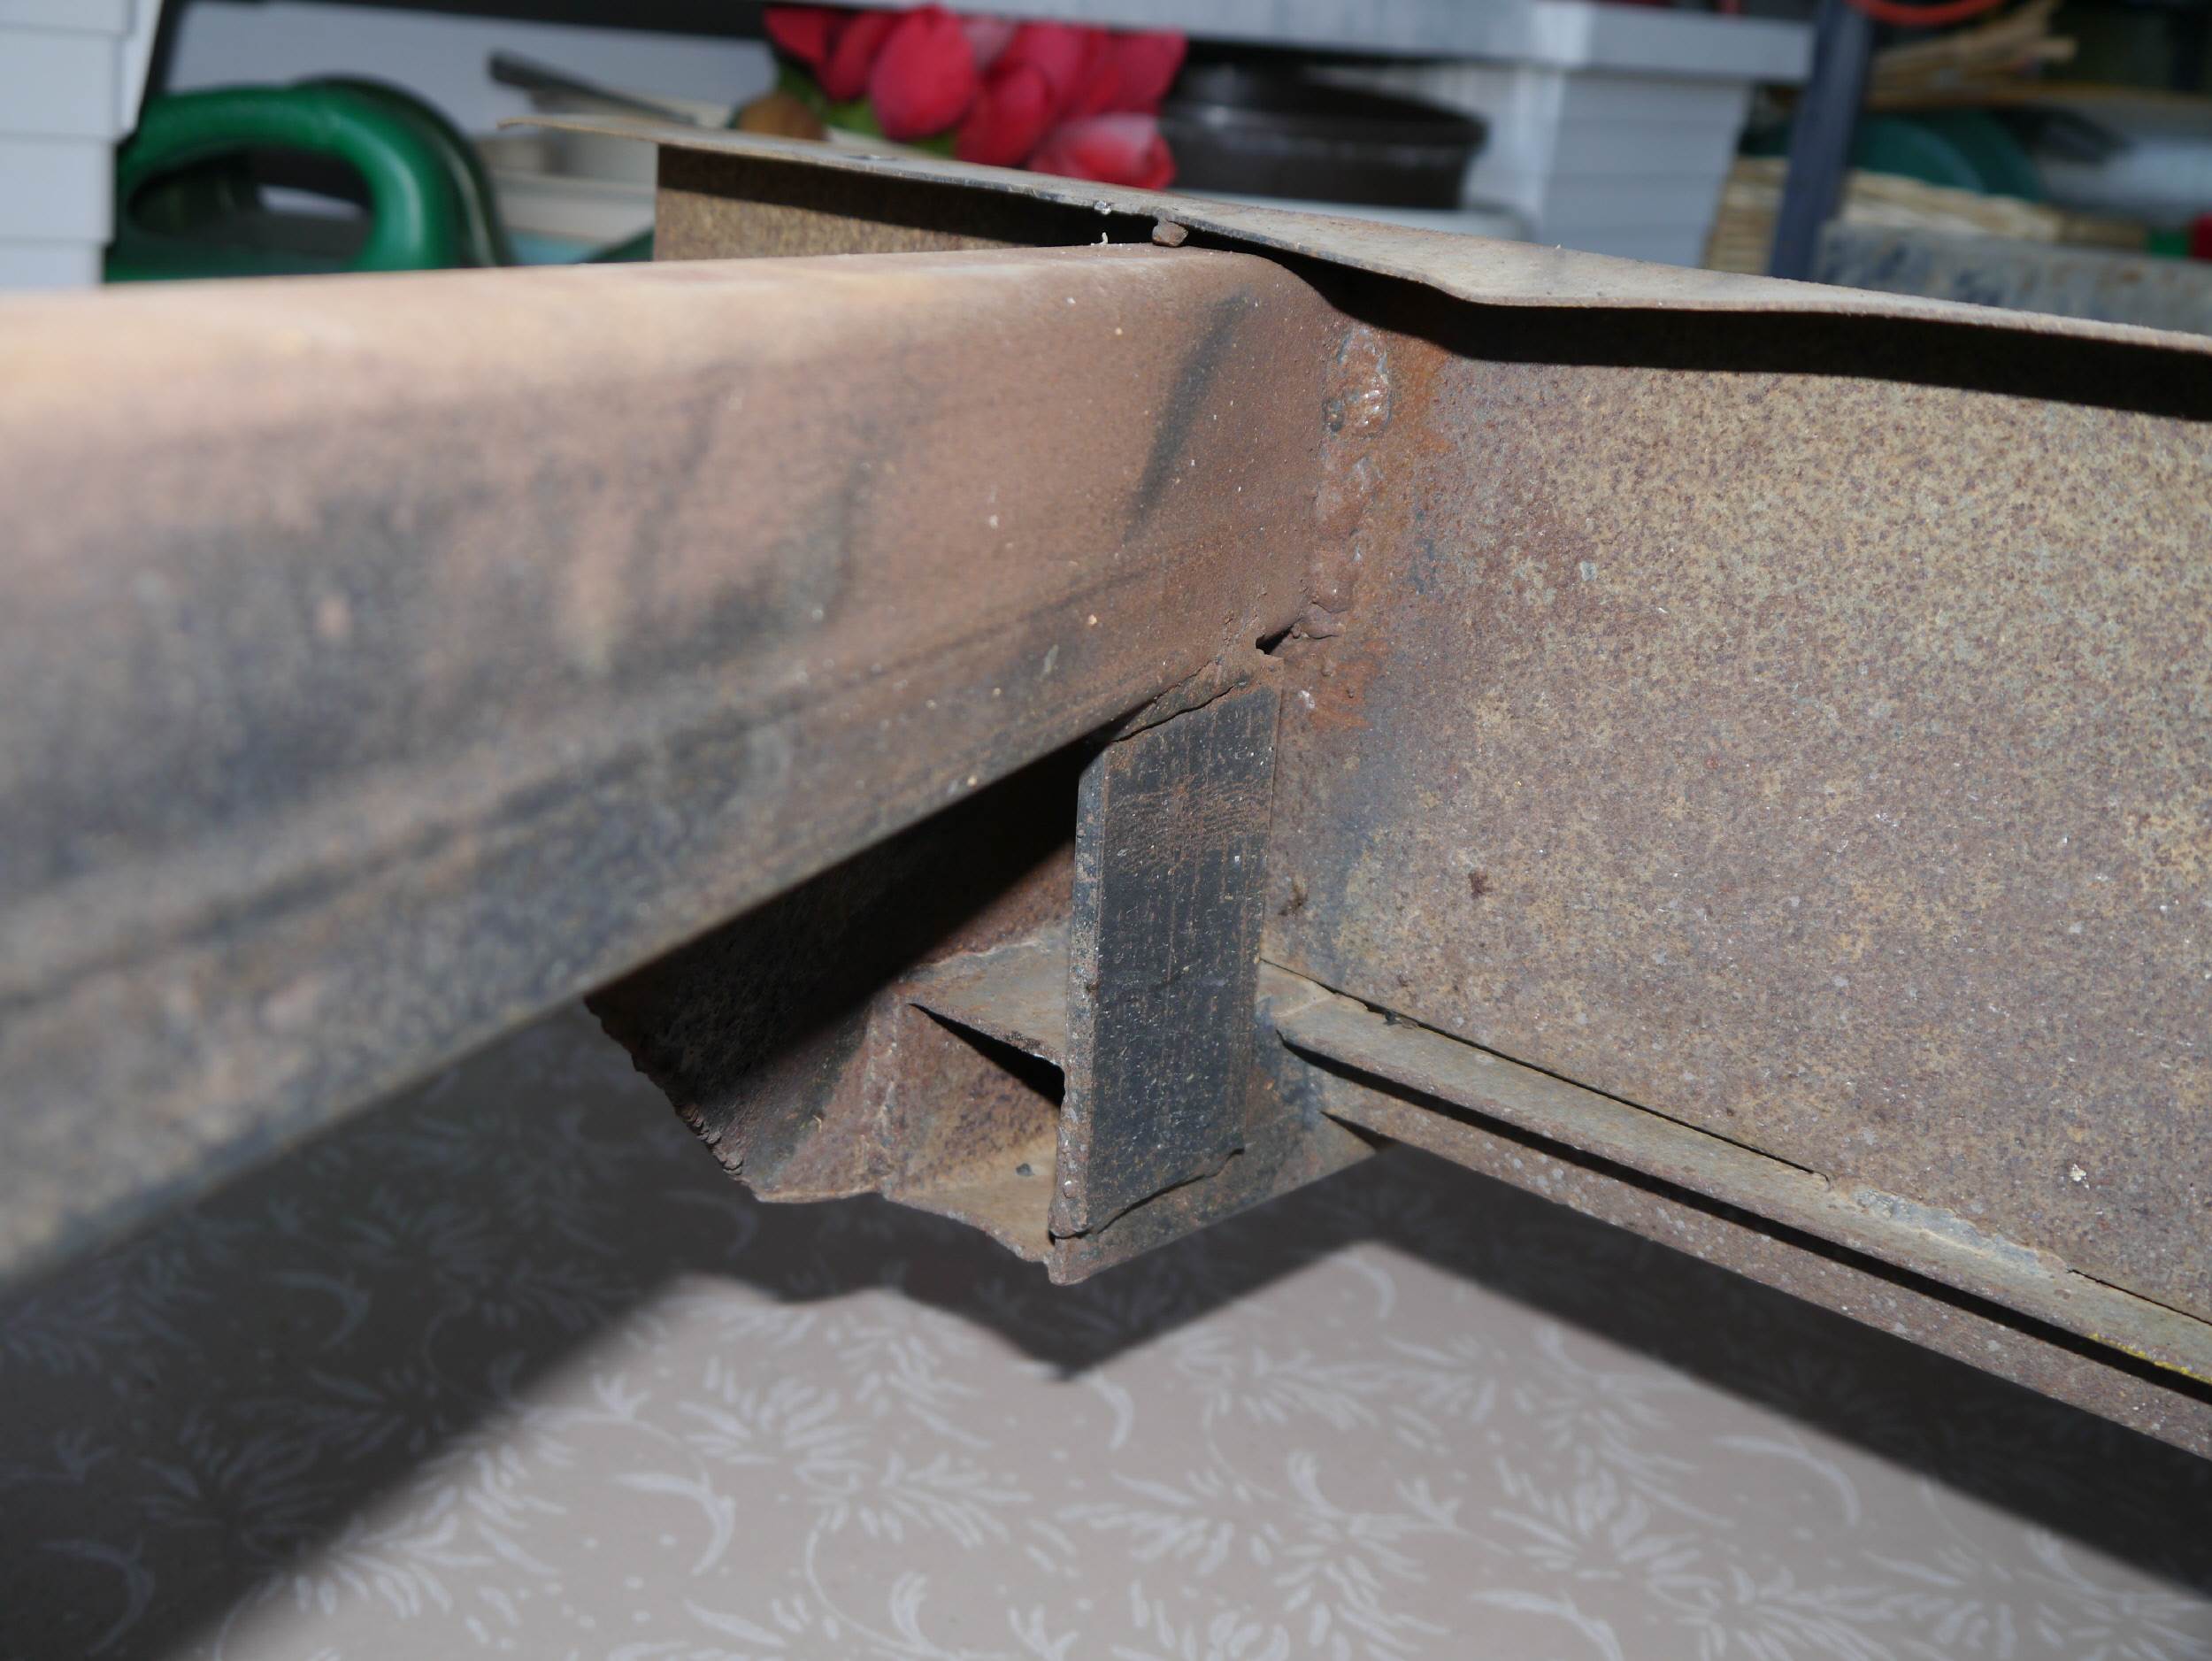
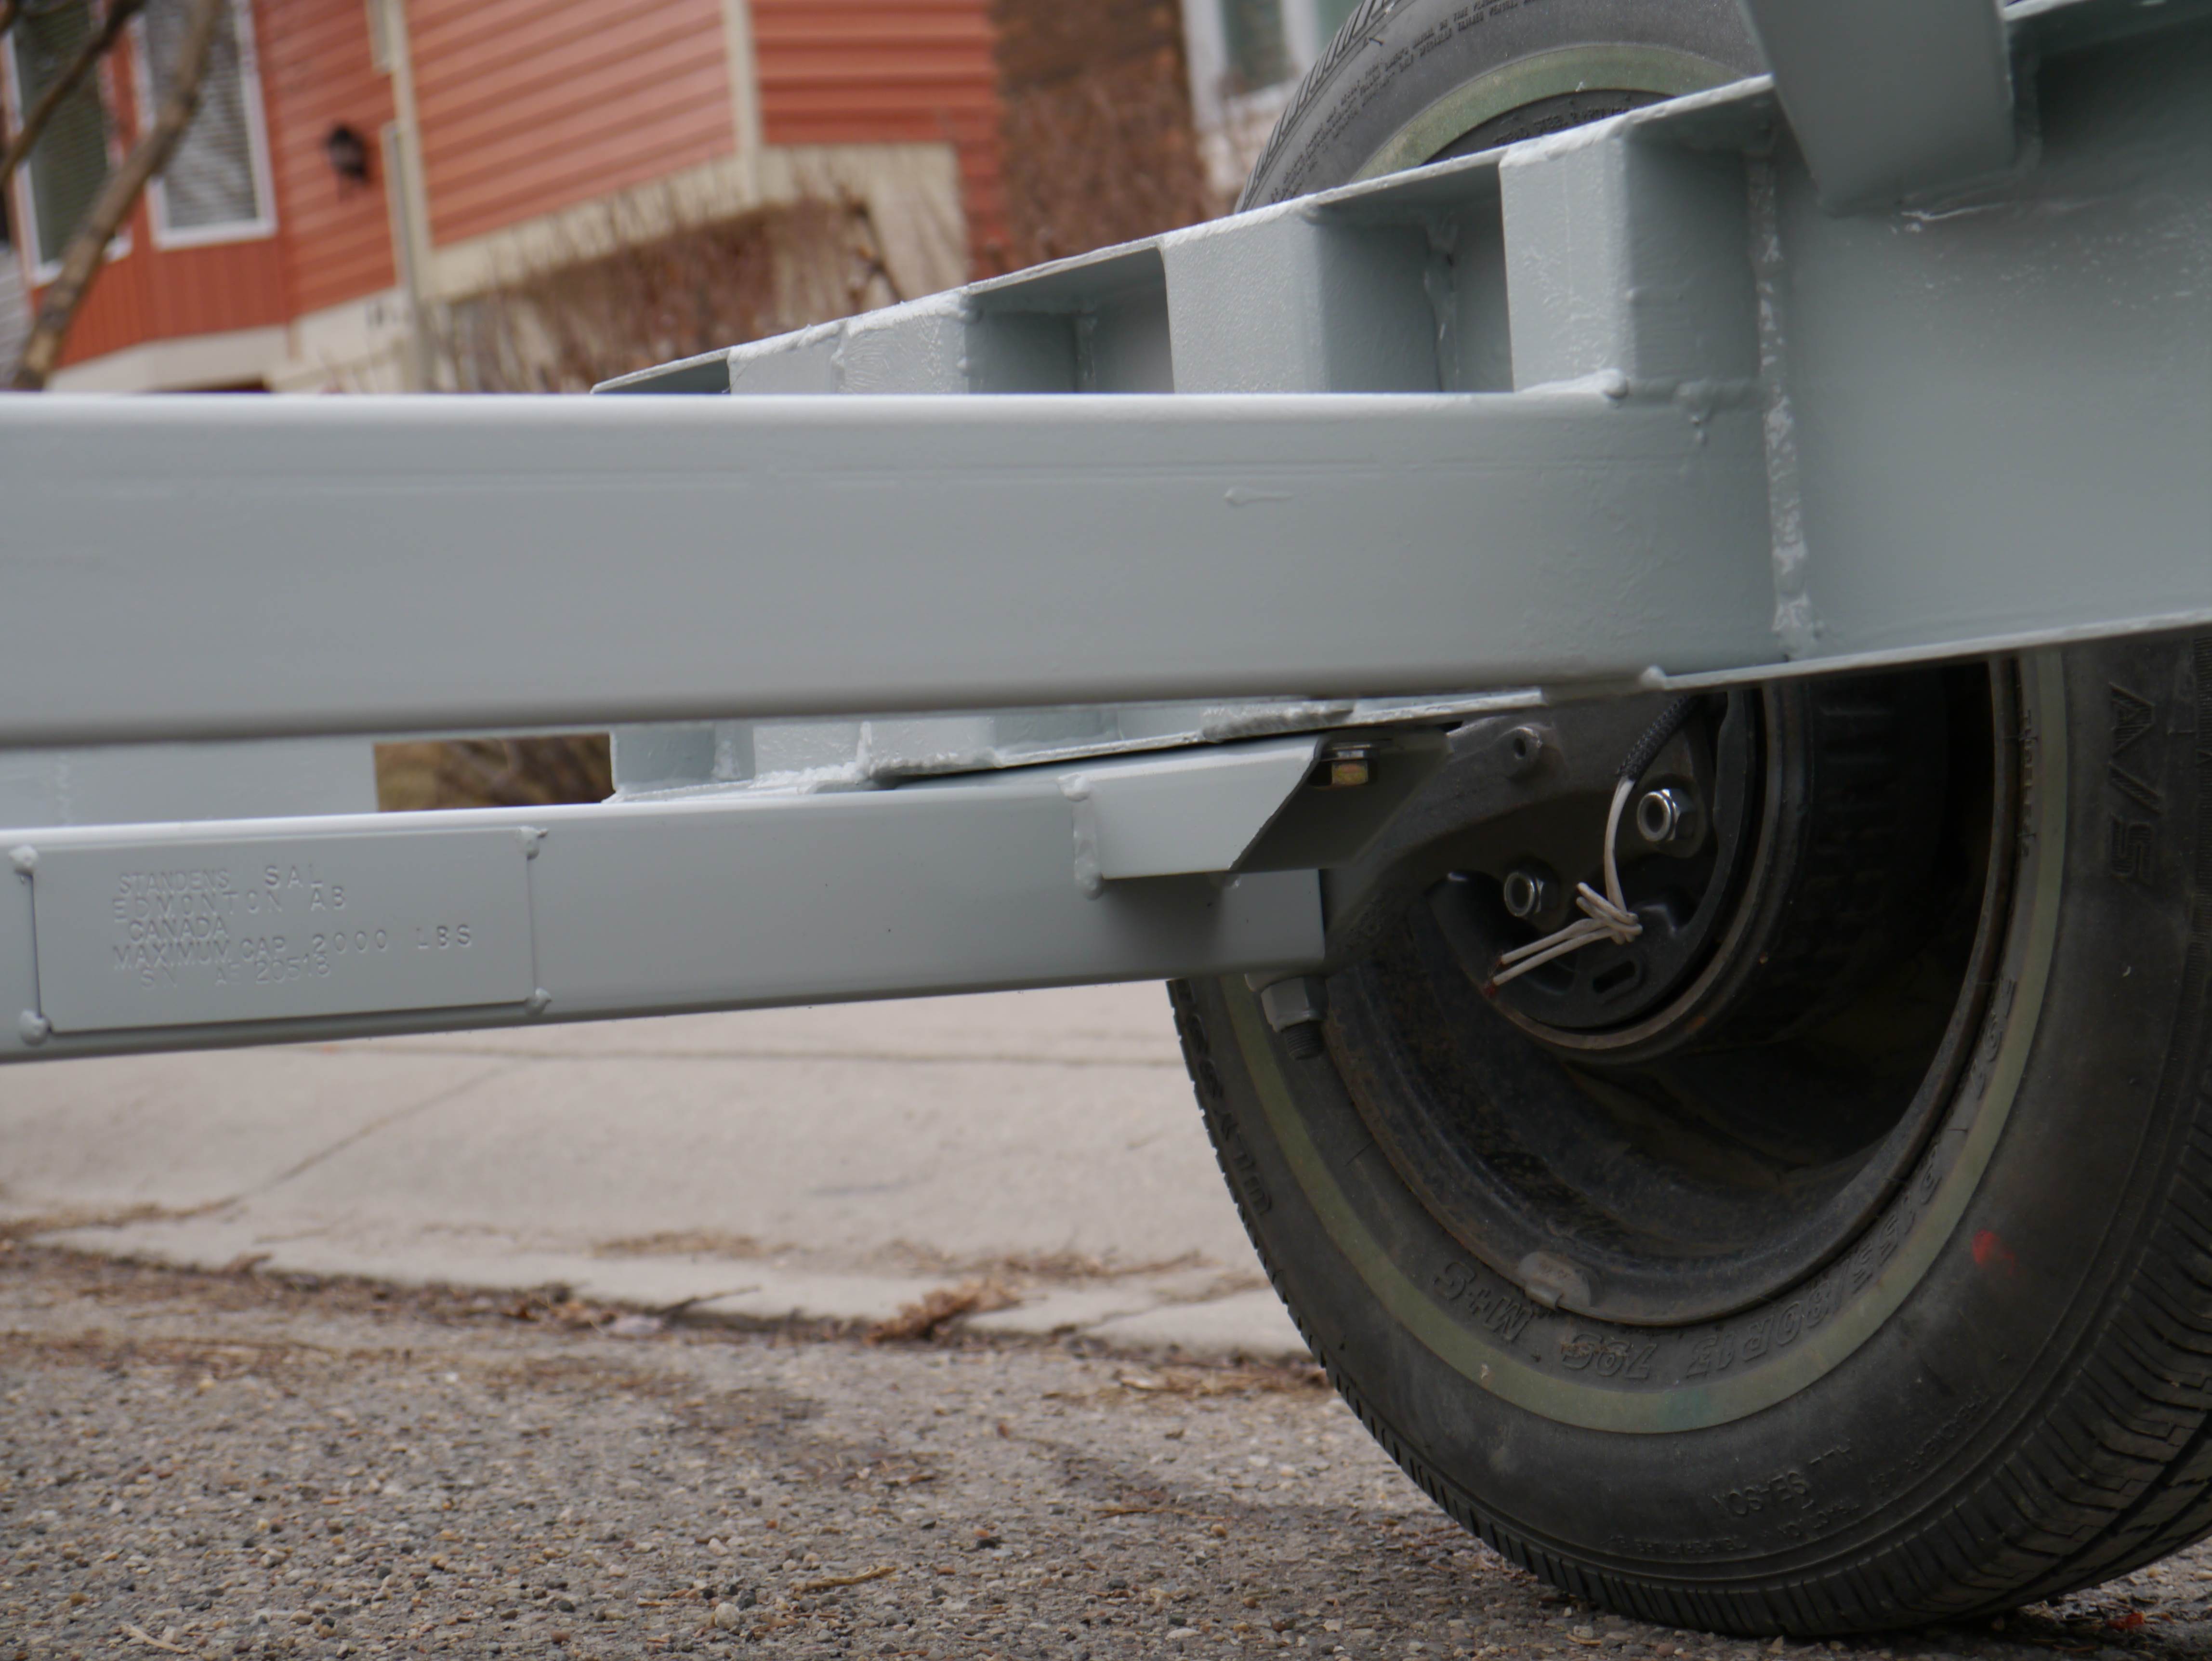
With the plan made to fix up the entire trailer and build a completely new interior I wanted to make sure the foundation (or frame) was solid and straight so I decided it was worth the extra effort to remove the body from the frame and take a real close look. The body was held on with about 6 bolts and a series of wood screws drilled right into the frame … and every single bolt and screw was either loose or had already fallen out. With the body shell off the frame it was immediately noticed that there were major problems with the frame. The original frame was not in good shape, from the Boler factory most of the cross members were only welded on the sides not the top or bottoms, the remaining welds were very poor quality. The metal used on the frame was very thin comprising of 1.5”x3” box channel 1/16” thick. Sometime in the past the frame had broken where the tongue joins the left side rails, this had been reinforced and repaired. The main left frame rail had a cracked right near the axle mount and there was a noticeable bend down from the axle to the back bumper. I think the cause of this was because the body was actually rocking on the frame due to the fact that all the bolts were loose. If you remember when we first bought the trailer there was a bulge and cracked gel coat on the left side, the bent frame was actually twisting the entire body shell and distorting it.
P1000156(1)

The original frame was in poor shape, bad welds, a break repaired, and a bent main rail.
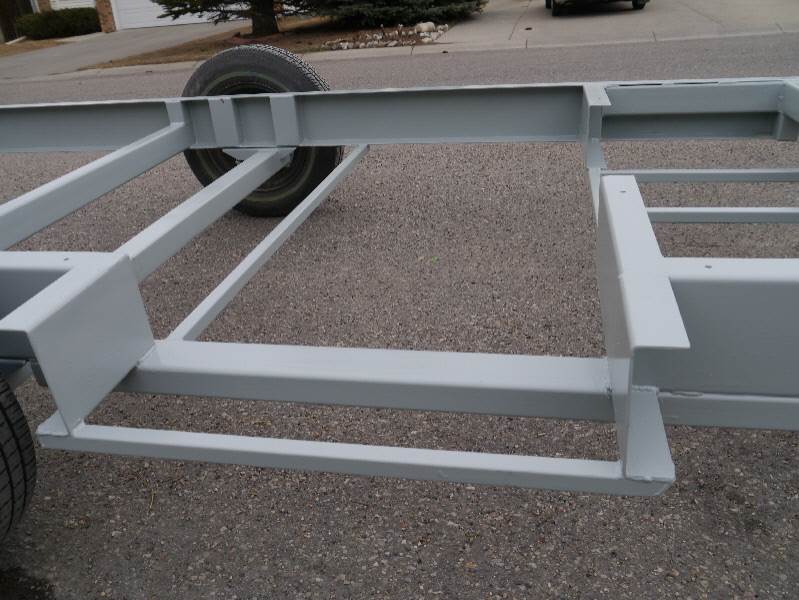
A new frame had to be built, looking at the original frame it was obvious there were several key areas that could be improved that would greatly increase the strength and reliability of the frame.
- The first area is the gauge or thickness of the steel, the original frame used 1.5”x3” 0.0625” or 16 ga rectangular tube, the entire frame with axle and wheels weighed 300 lbs.
- The floor of the Boler is stepped, you enter through the door with the kitchen area at one level then step up 6” to the dinette, this step requires the frame rail on the passenger’s side (right side) to be notched, this notched section compromises the strength of that frame rail
- The final area of concern is the angle of the tongue which concentrates a lot of load and stress right at the point where the right frame rail is notched. There is insufficient area to brace and/or gusset that area to handle the load.
Slide 3 Diagram of the standard Boler frame
Slide 5 Notice the narrow 30° tongue angle
slide 6 This design change greatly increases the strength of the frame
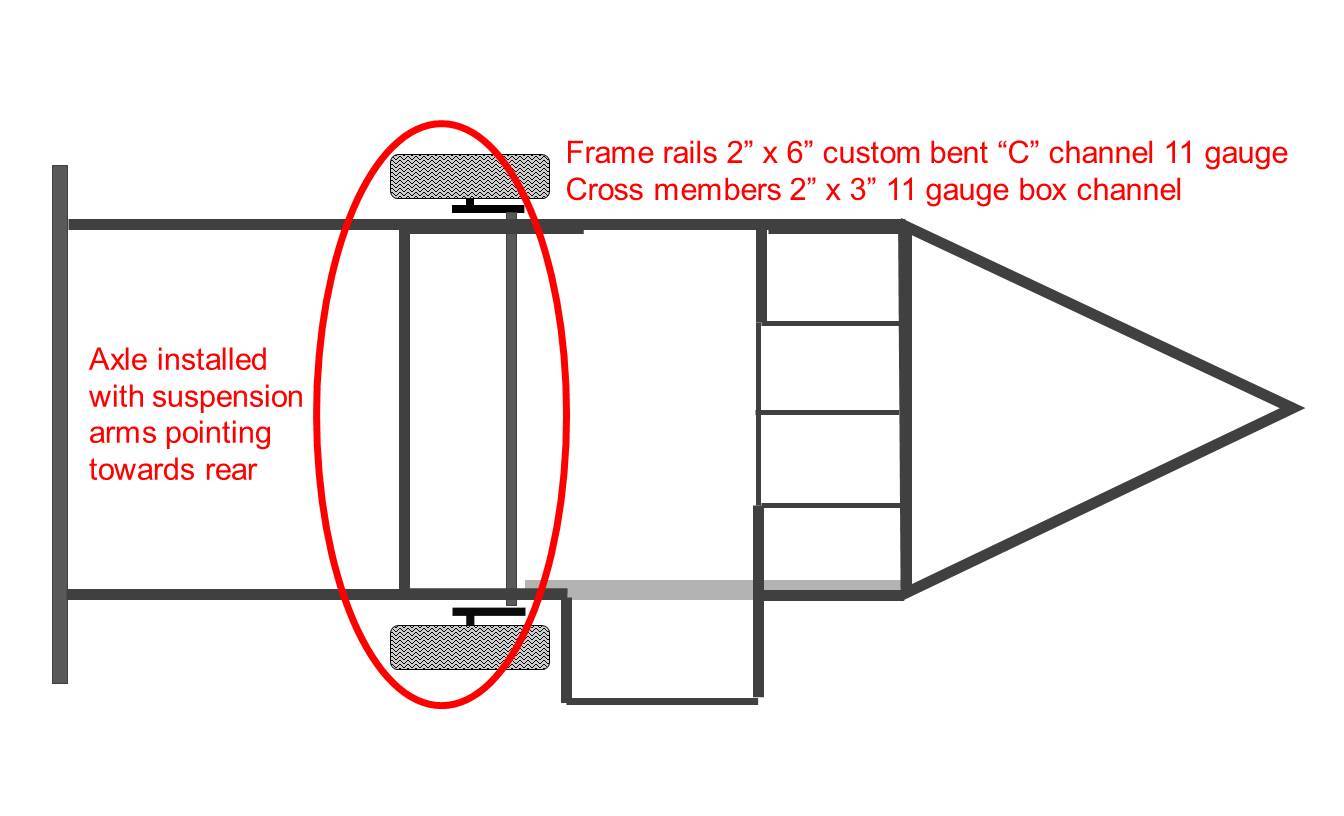 The new frame design changed the axle to a proper trailing arm
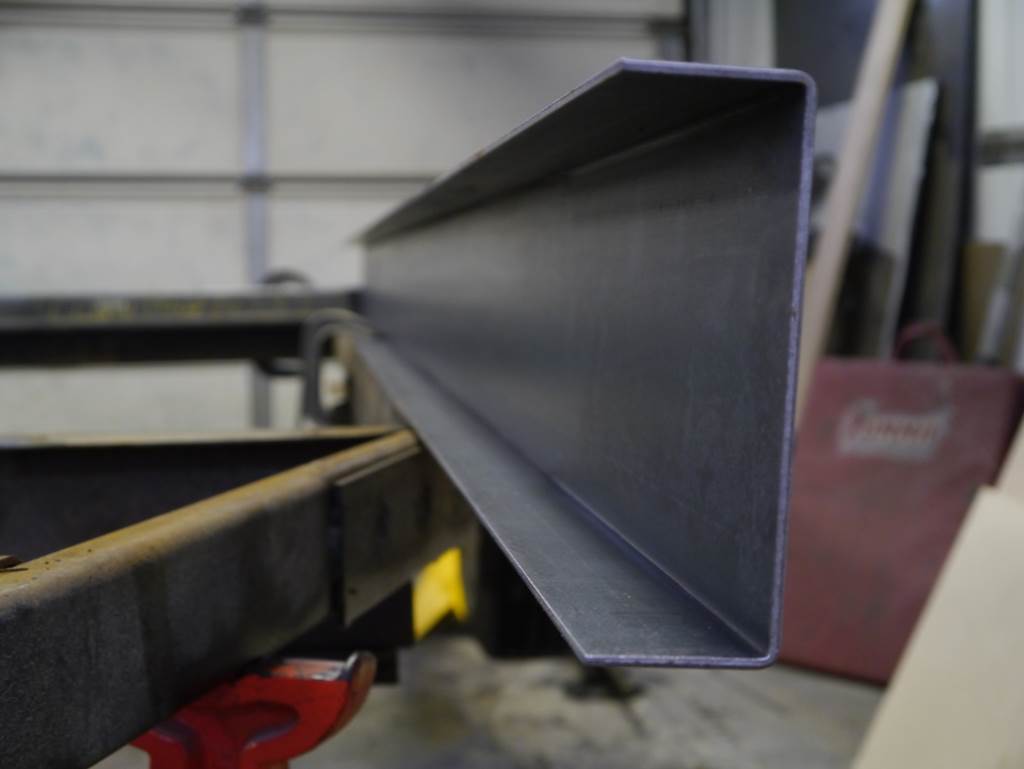
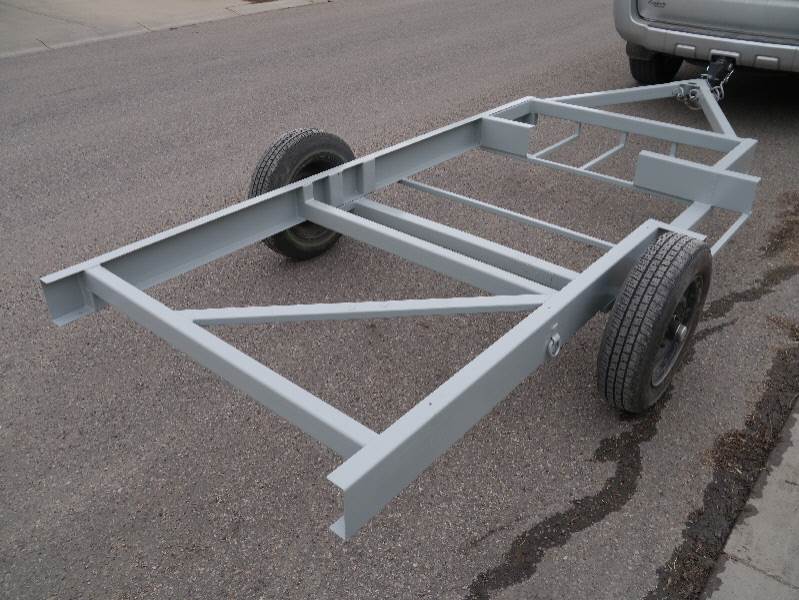
I designed and built the new frame to be considerably stronger in both design and materials. Even though the frame is over twice the profile (2″x6″ vs 1½”x3″) and material thickness (1/8″ vs 1/16″) of the original frame it only weighs 50 lbs more.
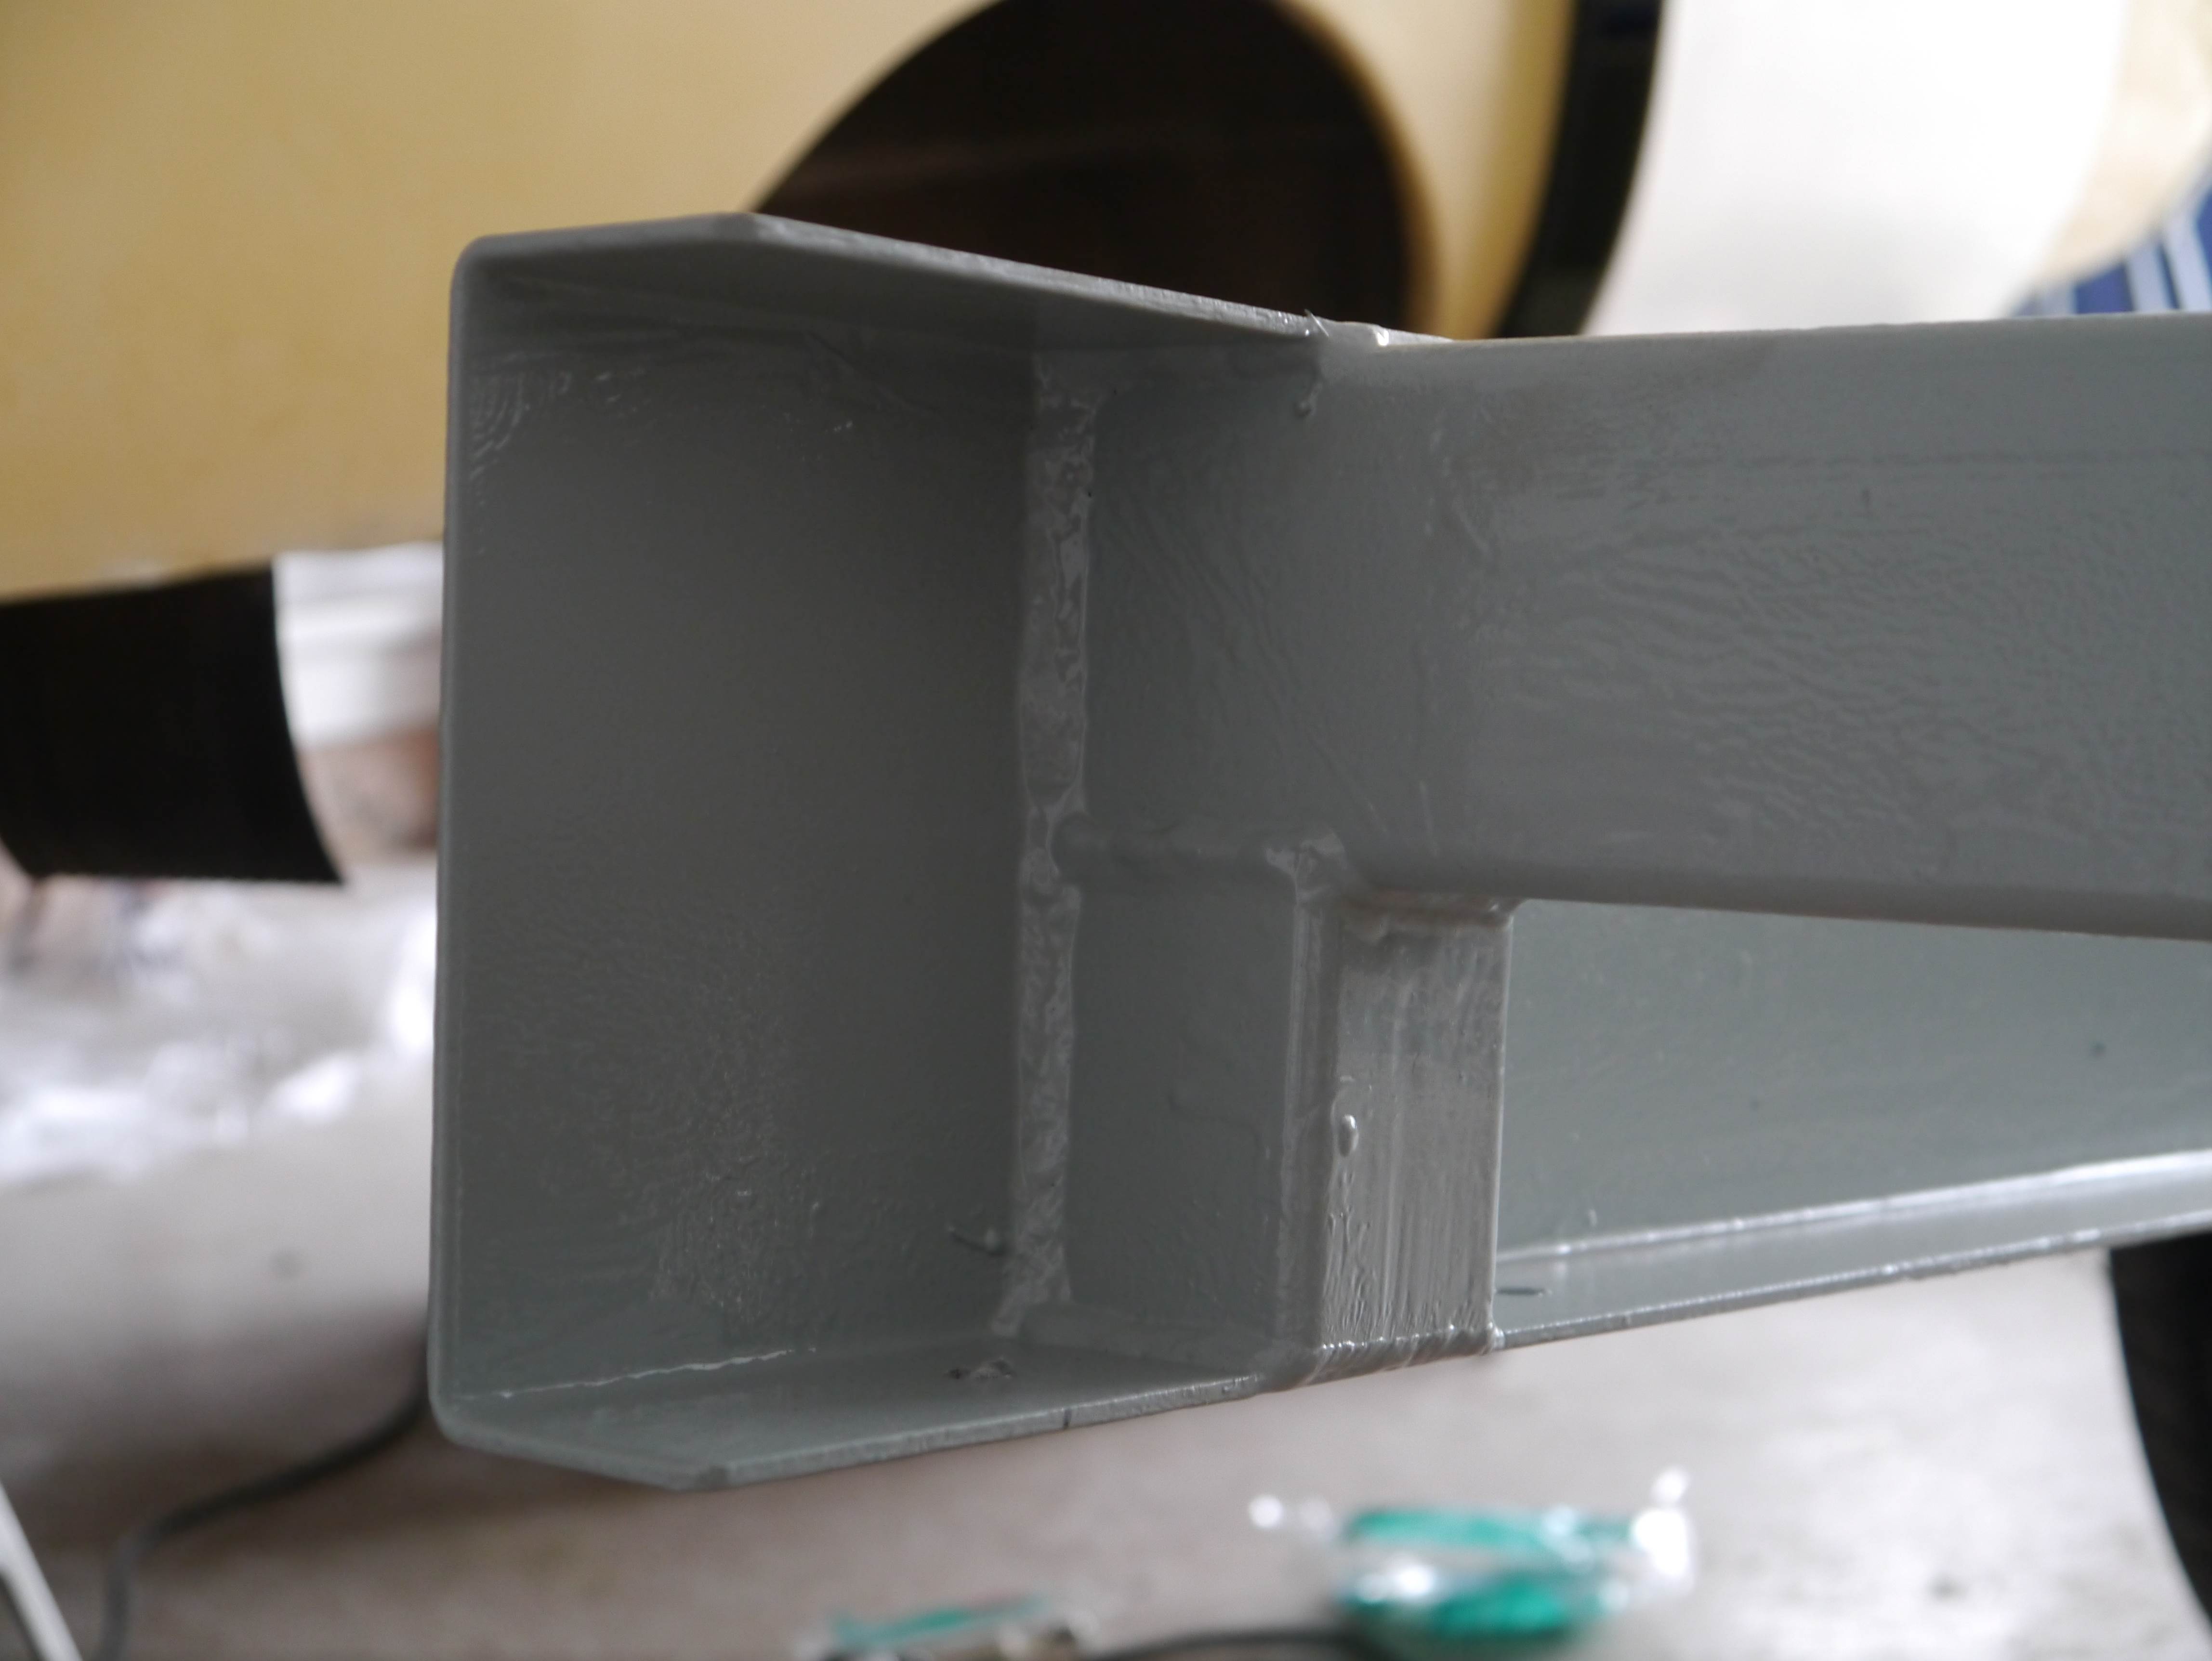
The final few steps in completing the frame include sandblasting to remove the mill scale, this is a smooth finish or coating on new steel, it should be removed by sandblasting or the paint will not stick. A local company offers a DIY area where for an hourly rate they supply all the equipment and space to sandblast your items.
After sandblasting the frame is painted with a two part epoxy primer followed by 2 coats of catalyzed polyurethane. This results in a very durable, long lasting finish.
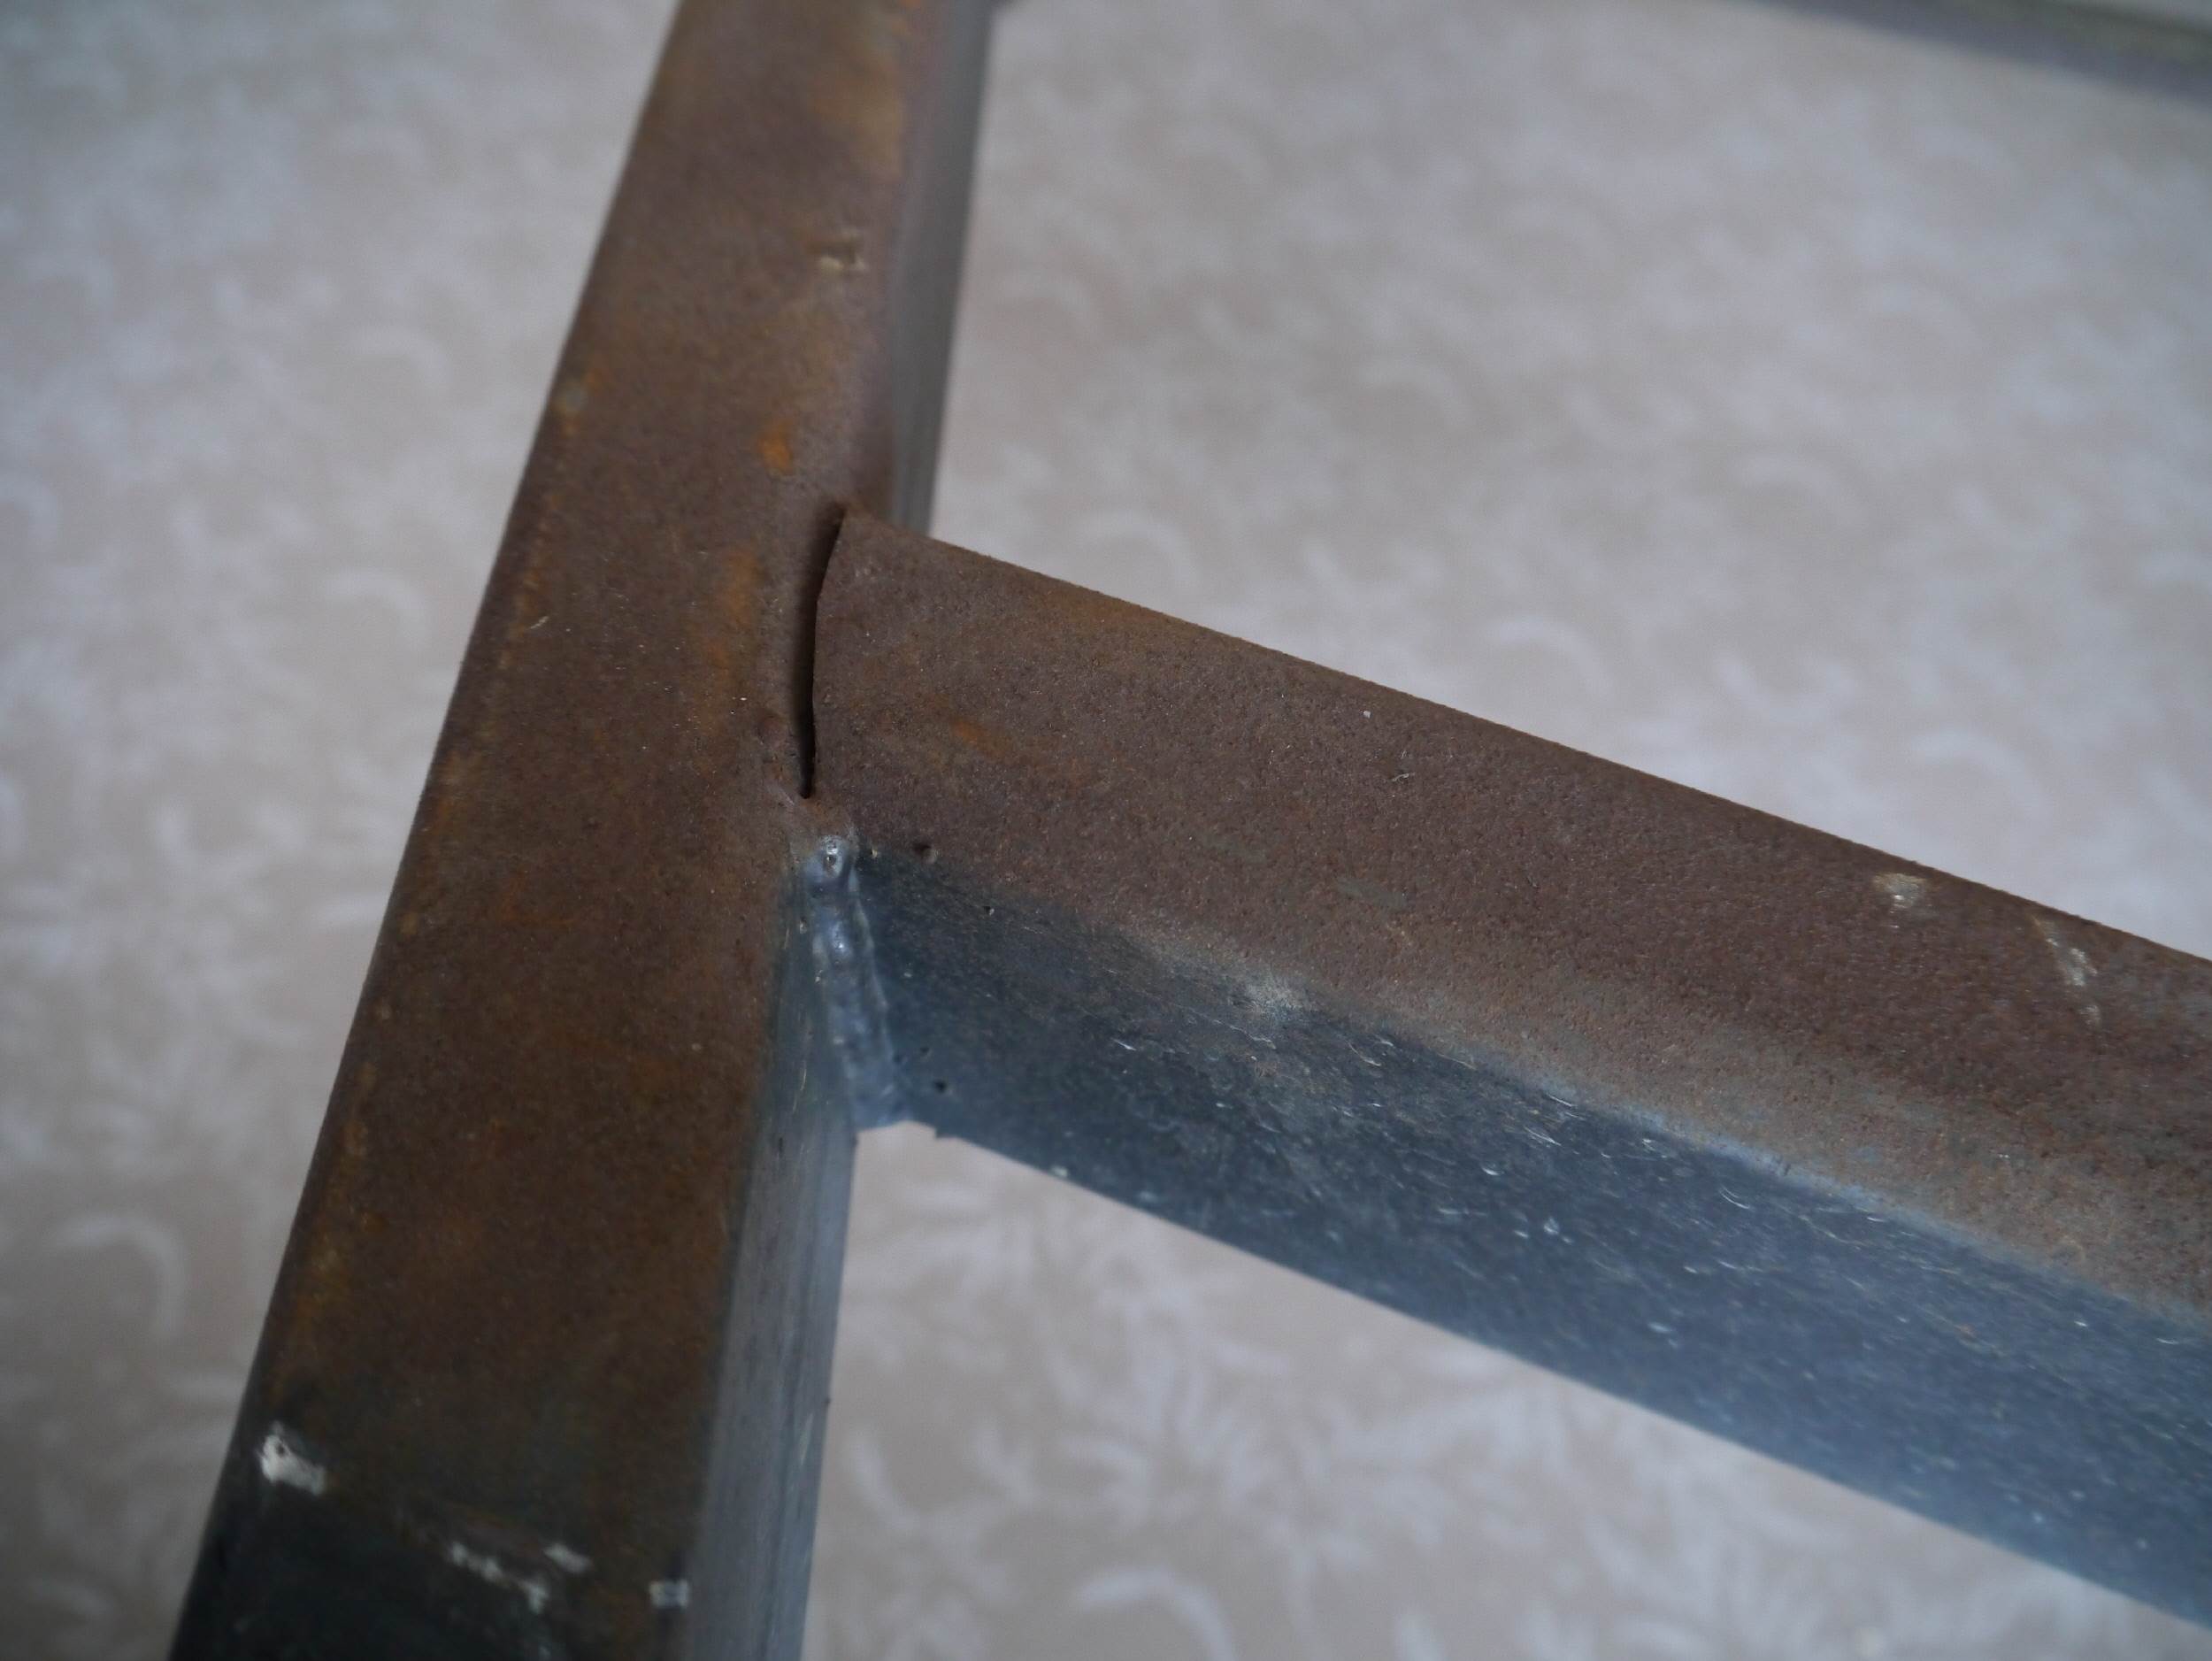
 New side rail sitting on top of the original frame
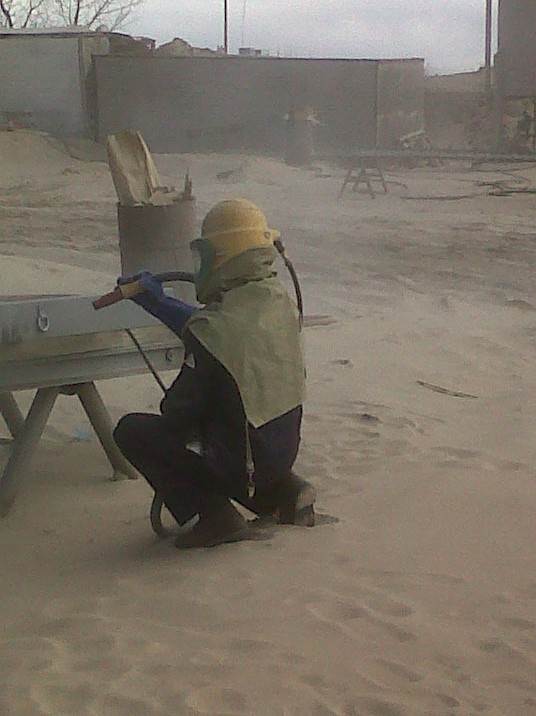
Sandblasting the new frame
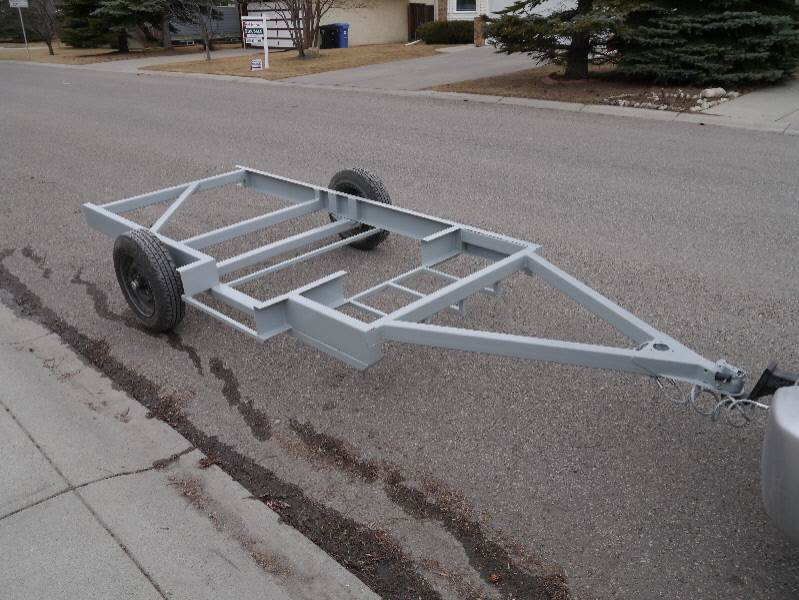
The finished frame
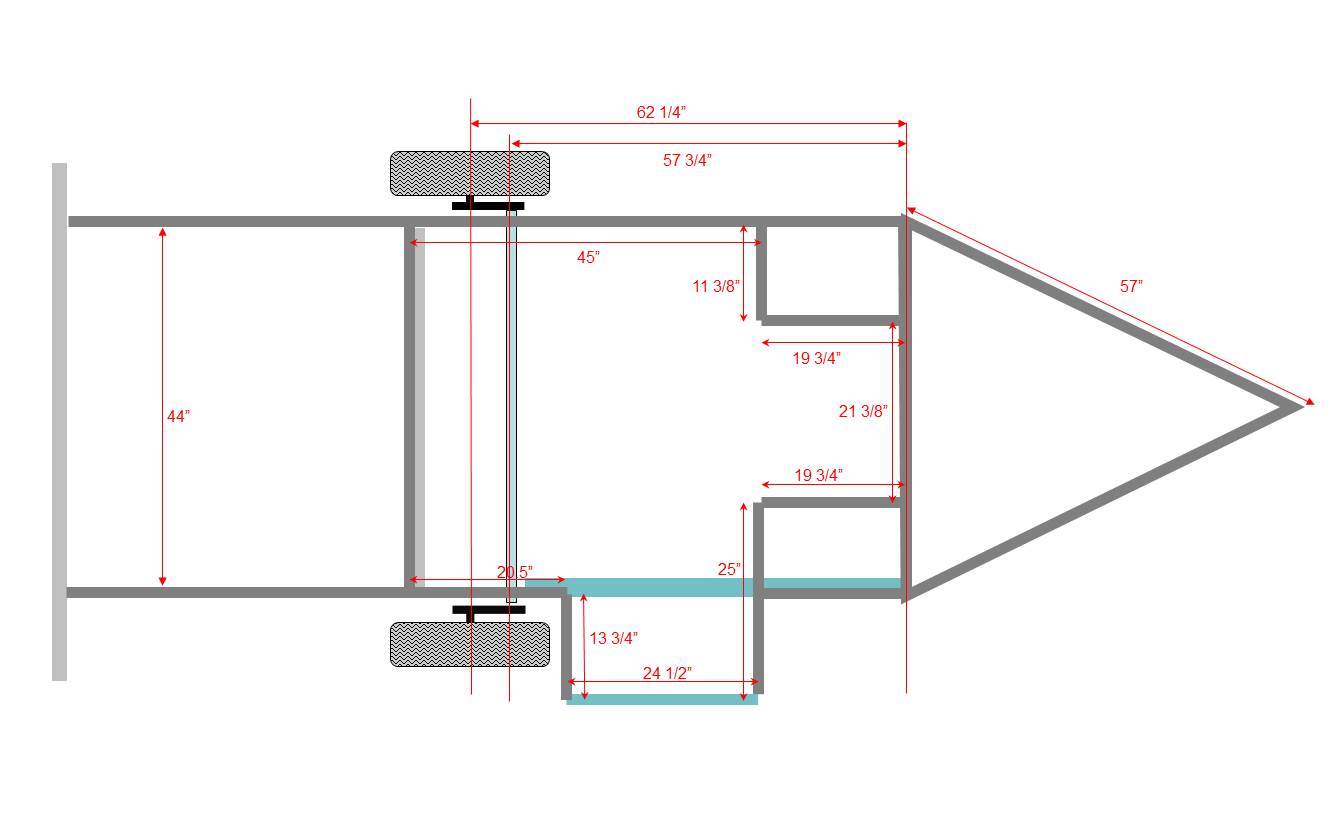
Drawing w/ measurements
The the original Boler axle is installed backwards meaning the suspension arms are pointing forward as the trailer is pulled down the road, this was done deliberately to lower the ride height and allow axle to be tucked behind the dinette step. The problem with the axle installed this way is the suspension arms are being “pushed” down the road rather than being “pulled” resulting in a rougher ride.
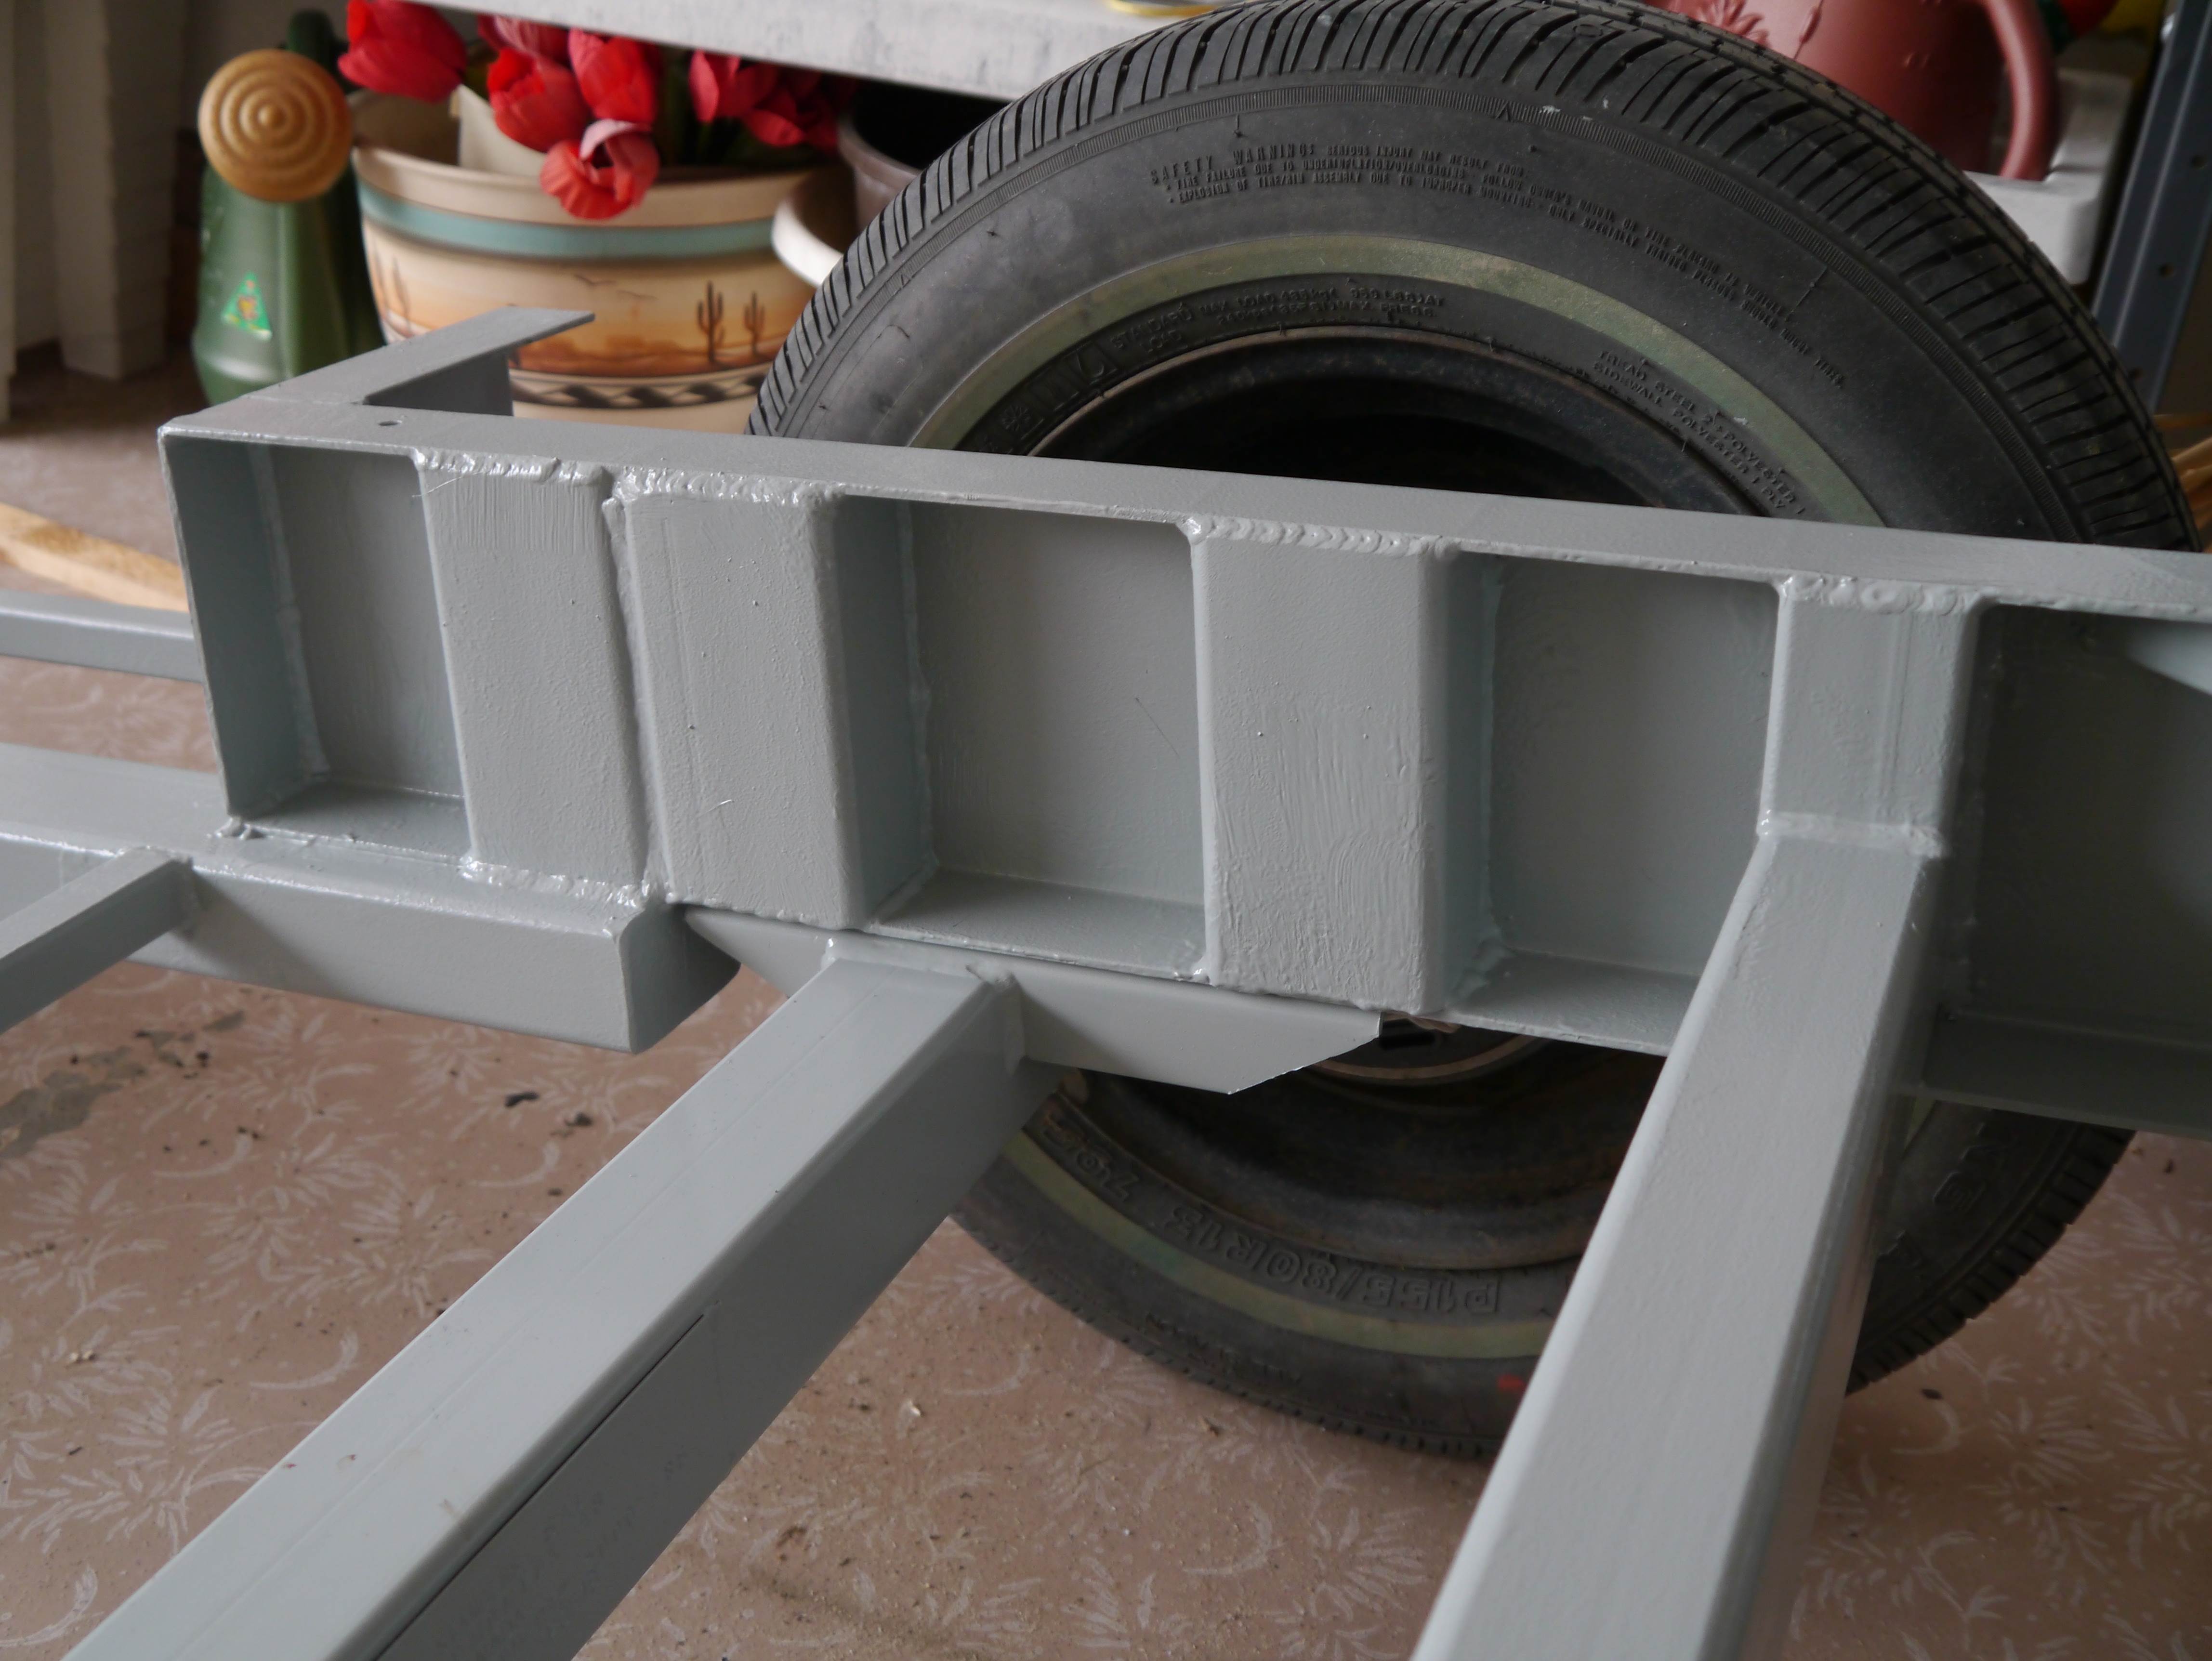
The axle I selected is a 2000 lb Flexiride rubber torsion axle which I had custom made at Standen’s in Calgary. The main reason I chose this axle is the ride height is adjustable. The suspension arm is splined onto the torsion bars, by simply removing a clamp bolt the arm can be repositioned and installed at any angle on the spline. The new axle also included 7″ electric brakes. One interesting fact is that the Boler body is offset on the frame by one inch towards the left side (drivers side). This offset is assumed to allow a little more room in the kitchen area, but the result is if the axle is centered on the frame the right wheel will be closer to the fender opening than the left wheel. If you ever need to replace your axle have the axle mounts offset so the axle is centered under the Boler body and not centered under the frame. I positioned the trailing arms at a 10 degree up angle which results in the Boler sitting just over 1″ higher than the original on the original, with just under 11″ of ground clearance to the bottom of the lowered kitchen floor, and 9″ clearance to the frame support under the door and the bottom of the axle tube.
Flexiride 1 The Flexi-Ride adjustable axle
Flexiride 2 Mine is set at 10° up, this example is at 24° down
Frame sitting on the new axle
sm_P1070281
Ground clearance to bottom of kitchen floor/frame is 11″
The final step is installing the fiberglass body shell back onto the frame. This was a relatively straight forward task, byy installing small 4.80×8” wheels on the axle it lowers the trailer enough to where it clears the garage door, making it easy to maneuver, just DON’T use these wheels for towing, they are not designed for the trailer weight or road speeds. As mentioned earlier the redesigned frame was the same length as the original but with the angle of the tongue changed to allow the side rails to be longer. This required some minor trimming of the fiberglass at the front so the body would slip down onto the frame rails. With the shell lowered onto the frame it is securely bolted down using 3/8” grade 5 bolts (5 bolts on each side) with deformed thread lock nuts, large fender washers are used on the inside to distribute the load over a larger area of the fiberglass.
Boler Trailer – Designing & Building the Frame
Designing the Interior
NOTE: Although it is nice to work with a blank canvas where you strip everything out of the inside of the boler to build it exactly the way you want it “Be Forewarned”,
The closet next to the door and the steel support between the upper and lower kitchen cabinets are structural !!!
If these items are removed the body will sag and the roof will collapse.
The original plan
With the above in mind the transformation was about to begin, our plan needed to included a number of “must have items”:
- Larger kitchen and counter space
- Larger bed, preferably about 54″ wide ( a true double bed)
- 12 volt power
- Bright open “feeling”
Bonus items include:
- Larger fridge
- Full size sink with pressure water system
- Stove w/ oven
- Lots of storage
I am not much for making detailed sketches or CAD drawings, my plans are usually ideas and visions in my mind, maybe quick sketched on the back of a napkin along with some measurements. I actually went into great detail on this project by roughing out some design ideas in the program I am most comfortable with PowerPoint. Many will laugh, and that is OK, it works for me. The final design really excited me; a front closet, a “U” shaped kitchen with corner sink, 5’ of counter with a stove and oven. The bed would be 8” wider than the original at 54” and convert into a “U” shaped dinette. A small side cabinet just inside the door would hold the porta-potty and provide a bedside table.
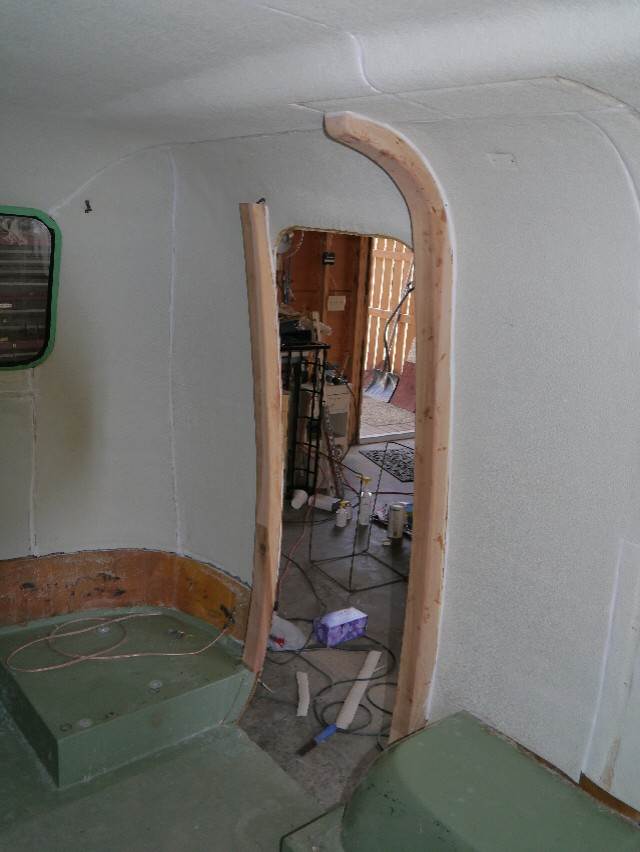
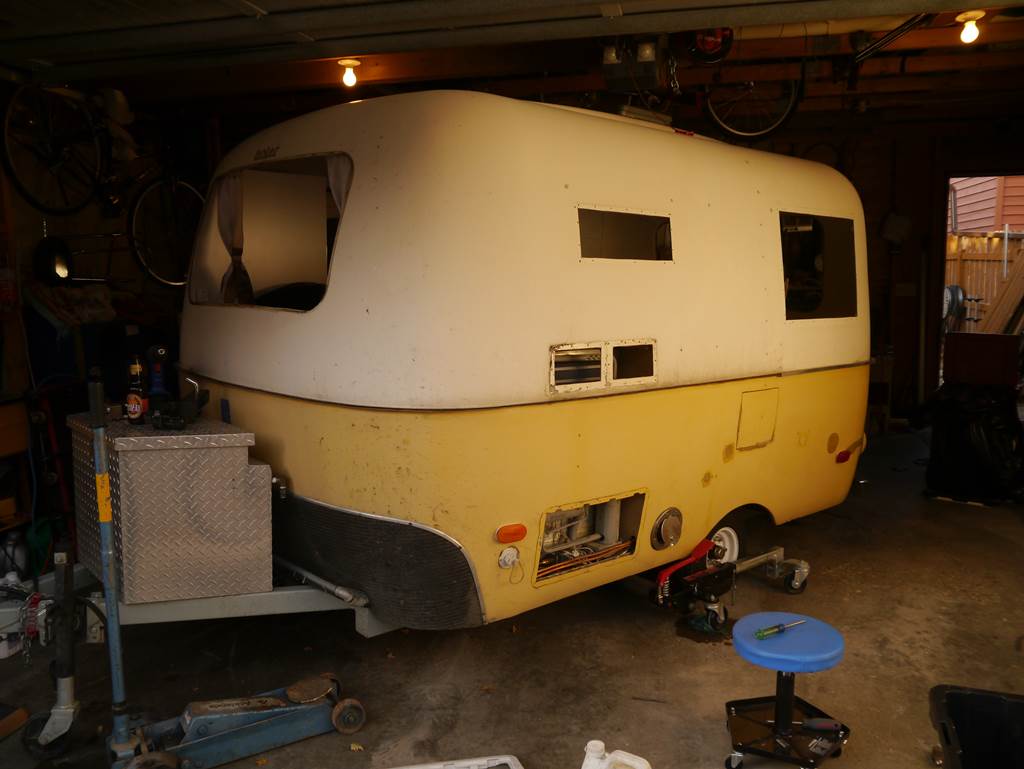
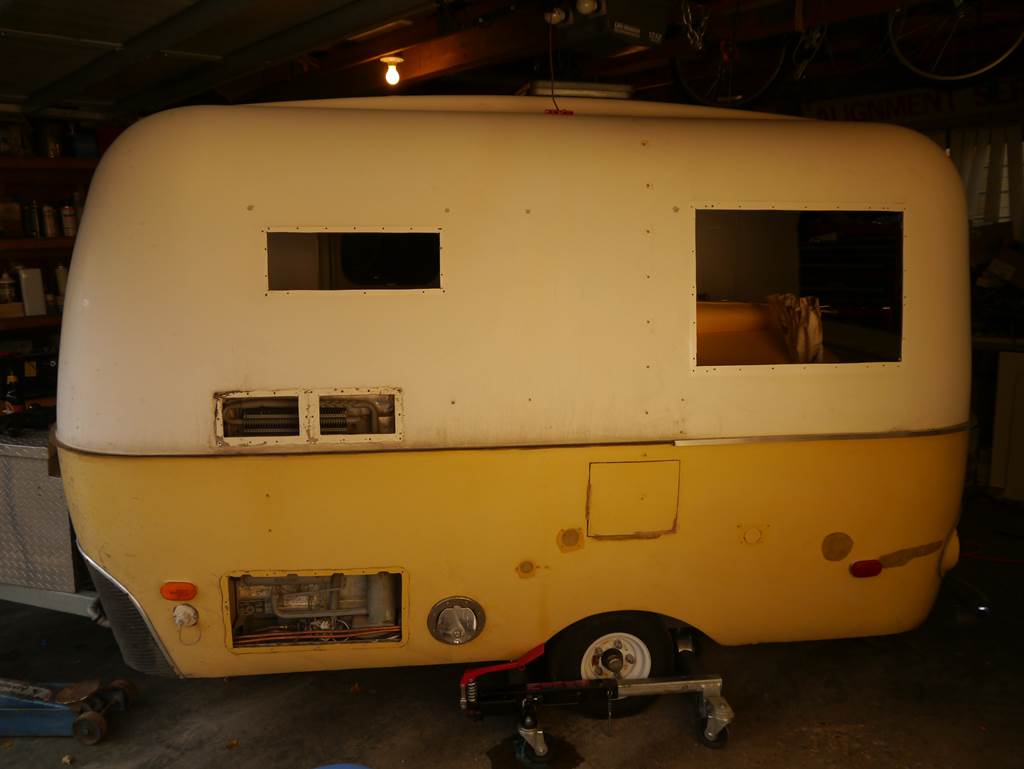
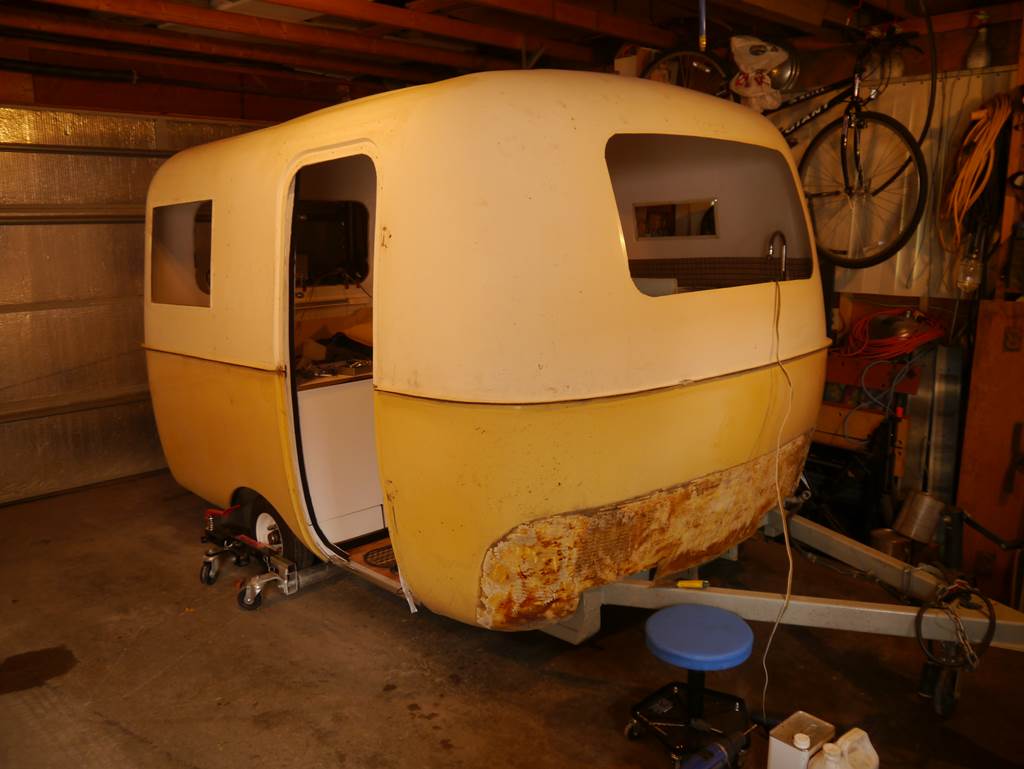
The first step in rebuilding the interior was to remove everything. All the original cabinets are held in with pop rivets through the walls and some screws into the floor. The only exception to this is the closet is fiberglassed to the body shell next to the door opening. If you notice in the accompanying pictures I used a pole jack to support the roof and walls while the interior was emplty to prevent the walls from sagging.
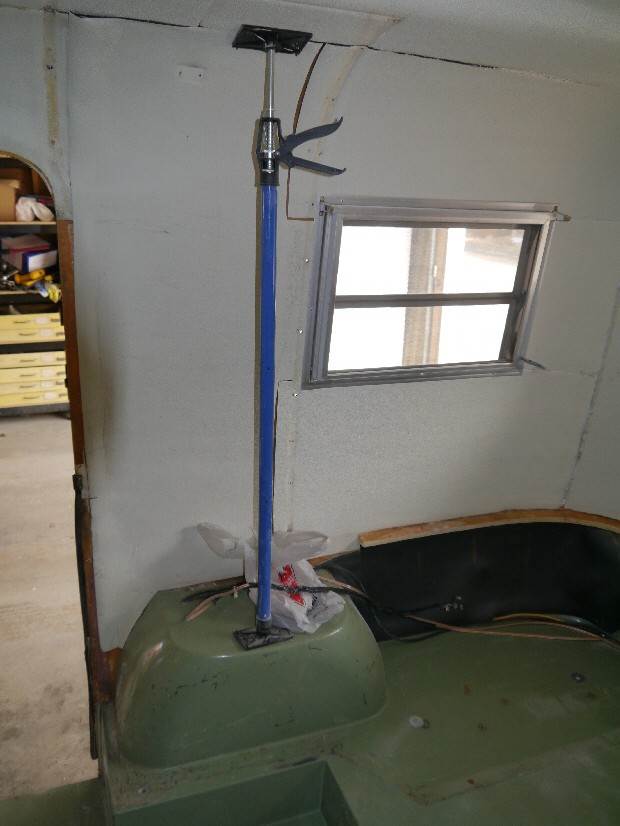
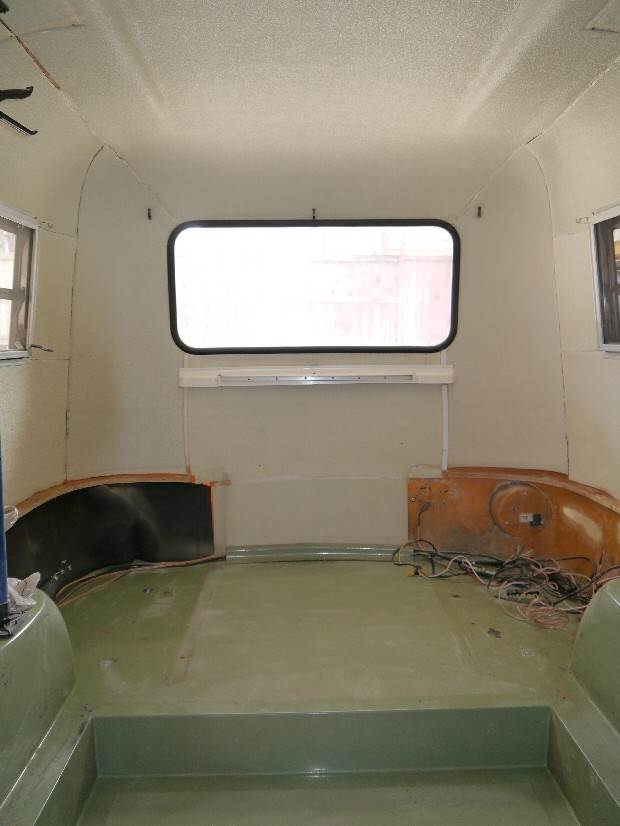
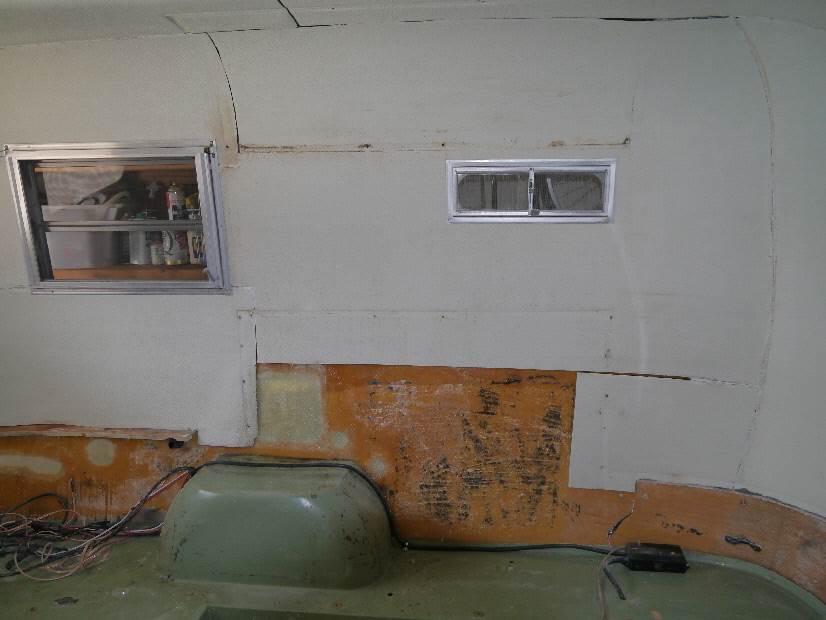
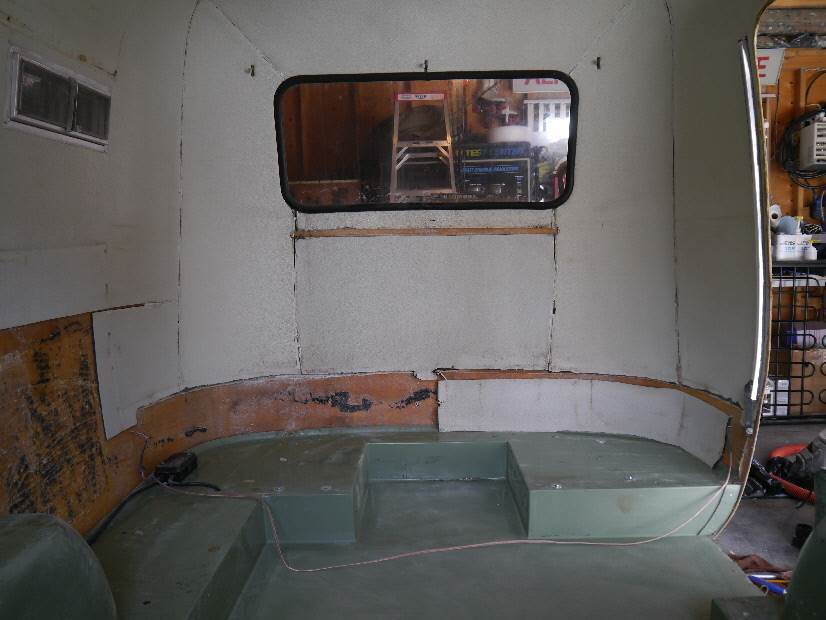
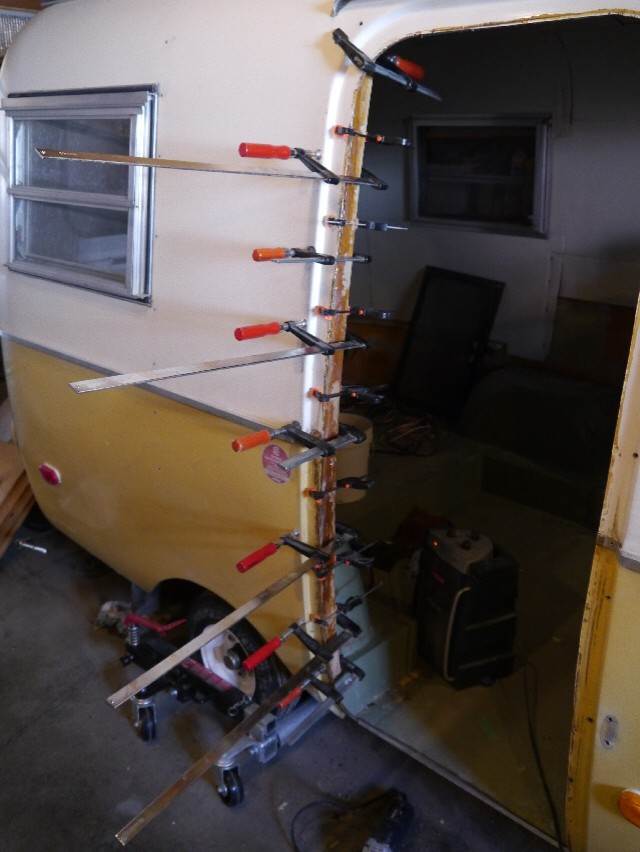
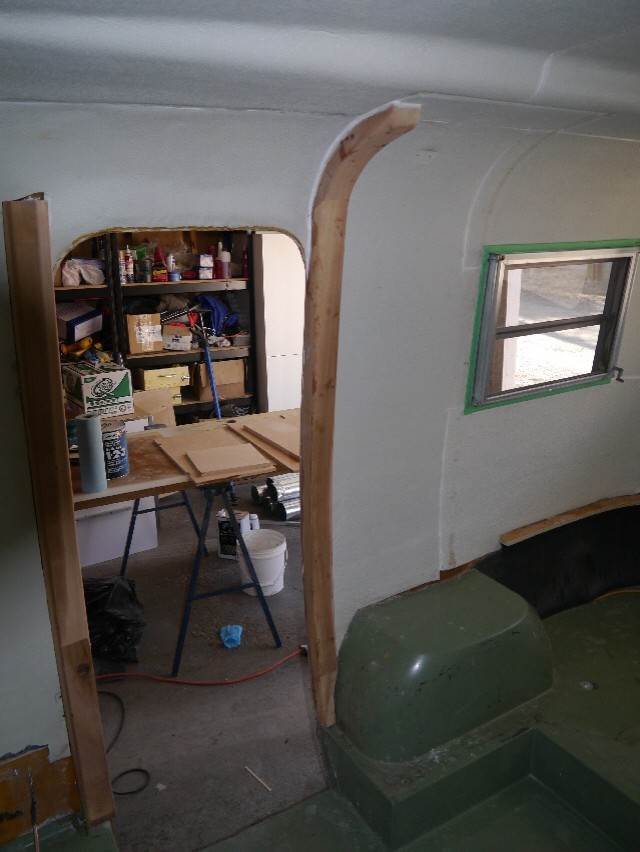
With all the interior cabinets removed there was nothing left to support the shell. With no support the walls will sag and in extreme cases the roof will collapse. Prior to removing the cabinets I made detailed drawings, templates and measurements of the wall profiles. These profiles were transferred onto four (4) curved support posts built from laminated western red cedar, this wood was chosen for its high strength to weight ratio and its resistance to rot. The locations for these supports would be one in the middle of each side wall just ahead of the side window frame, and two additional supports are added one on each side of the door opening.
These member are glued directly to the fiberglass walls of the shell using West System 105 epoxy with Colloidal Silica filler to thicken it, this epoxy is designed for use on acidic woods like cedar. to secure these posts while the epoxy cured I was able to use a multitude of clamps to hold the supports on each side of the door. The only way I could secure and clamp the supports in the middle of each wall by the windows was to drill and screw through the shell into the wooden supports, the screws were removed after the epoxy cured and the holes filled.
P1010770_1_
Interior Cabinets
Cabinet making is one of my interests and hobbies; I have a very well equipped shop and have tackled a number of large and complex projects including building a complete custom kitchen in our house from cherry. Although I have many years experience I can honestly say building the cabinets in the Boler was the most complex and difficult project I have ever done. The outside walls of the Boler curve both vertically and horizontally, there is nothing straight for a reference. Each cabinet required numerous templates make from cardboard and/or foam core, each section is test fit, adjustments are made to make sure they fit correctly. The cabinets are all made from Baltic birch plywood, this is an extremely strong and stable wood but the cost often limits its use. I used thicknesses varying from 1/4” to 5/8” depending on the function and load but always keeping overall weight in mind, the majority are made from 3/8” and 1/2” thickness. The sides and the tops of all the cabinets are covered with satin white plastic laminate (Arborite) since it is very durable, easy to clean and heat resistant. The main kitchen area consists of five interconnected cabinets: the oven cabinet which goes over the wheel well and has a small cupboard underneath; the fridge cabinet; a 4 drawer front cabinet; a larger counter height cabinet with adjustable shelves that backs onto the front closet; and finally the front closet with shelves. An individual cabinet is placed beside the door which is an ideal bed-side table and conveniently holds the folding PETT toilet
One of the overall design considerations was to eliminate the rivets through the fiberglass shell, this required a different way to fasten the cabinets. Throughout the interior blocks and anchors are epoxied and fiber glassed to the inside of the shell, these are used to firmly attach the cabinets, this also helps stiffen and support the body shell.
The vertical edges of the cabinet frames are covered with ½”x½” anodized aluminum angle using epoxy, cupboard door hinges are “No-Mortise Ball-Tip Hinges” from Lee Valley. Drawers slide on fill extension ball bearing sliders, drawer and door pulls are checkered ceramic and finally the drawers are secured during travel using brass barrel latches, all from Lee Valley.
One of the most common questions I get asked is where I got the chrome edging used on the counter tops throughout the trailer. The answer is simple and available at your local auto store or Canadian Tire, it is chrome self adhesive automotive side molding.
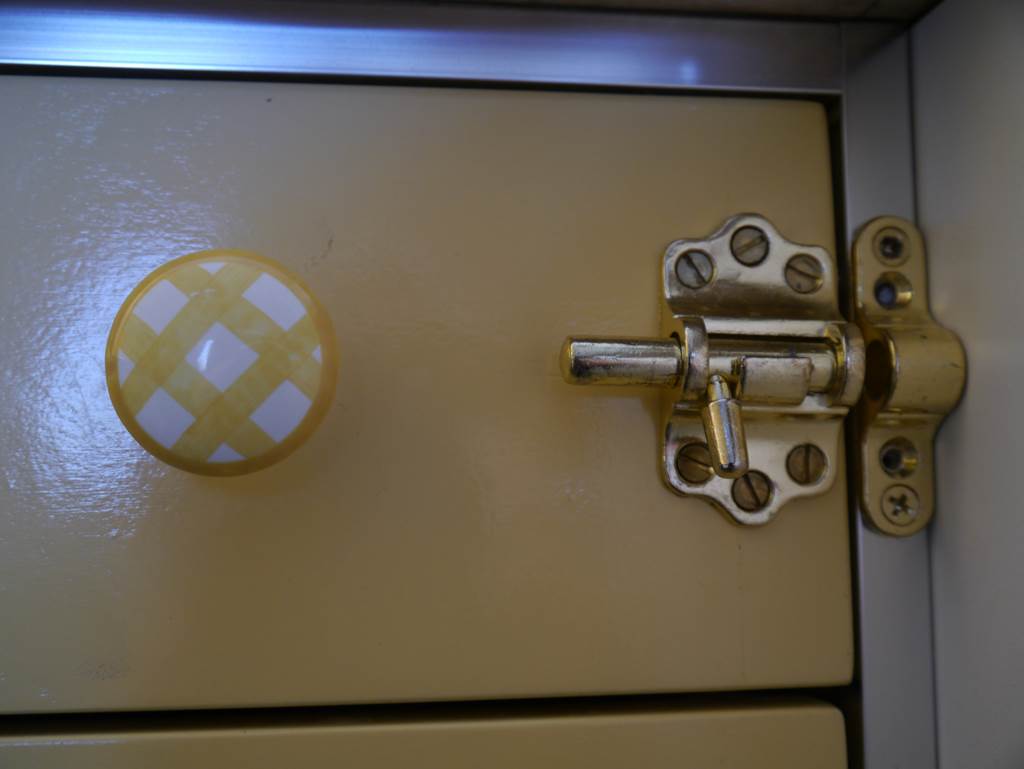
In place of the original closet beside the bed/kitchen was an ideal location for a small cabinet that would conceal our folding porta-potty. The switches on the side of the cabinet will control reading lights above the bed/table.


Making the dinette/bed area bigger was a priority in the design, having a 54″ wide bed, almost 10″ wider than the original. Having this size bed allowed for a “U” shaped sitting area around the dinette table … this means additional storage under the bench area. The actual benches are simple, I made the inner “U” structure then framed back to blocking attached to the shell with 1″x2″ fir supports. The opening lids are made from ½” baltic bitch and hinged to provide easy access to the storage underneath.
The final item is the table, a simple slab of 5/8″ thick baltic birch 34″ square. I needed a leg system that would be easy to raise and lower the table easily, initially I designed a prototype version of a scissor leg stem, but just before I was about to build the final version I found a commercially available system that has been working great, I can raise and lower the table with one hand and also take the table outside if needed.
P1030250
able in the “folded” bed position
P1030251
he table sits is on a ledge on the sides and back
P1030549
he commercial leg system in the raised position
P1030551
Table in the lowered position, note the spring to counterbalance the weight
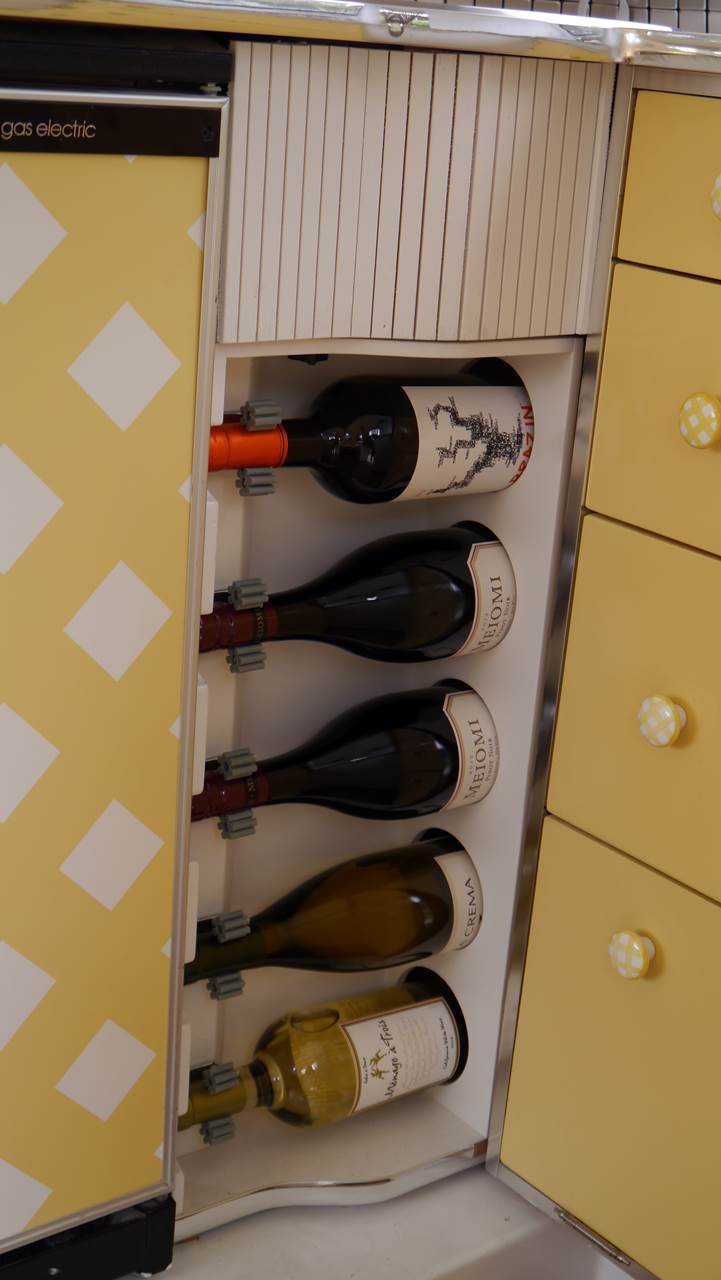
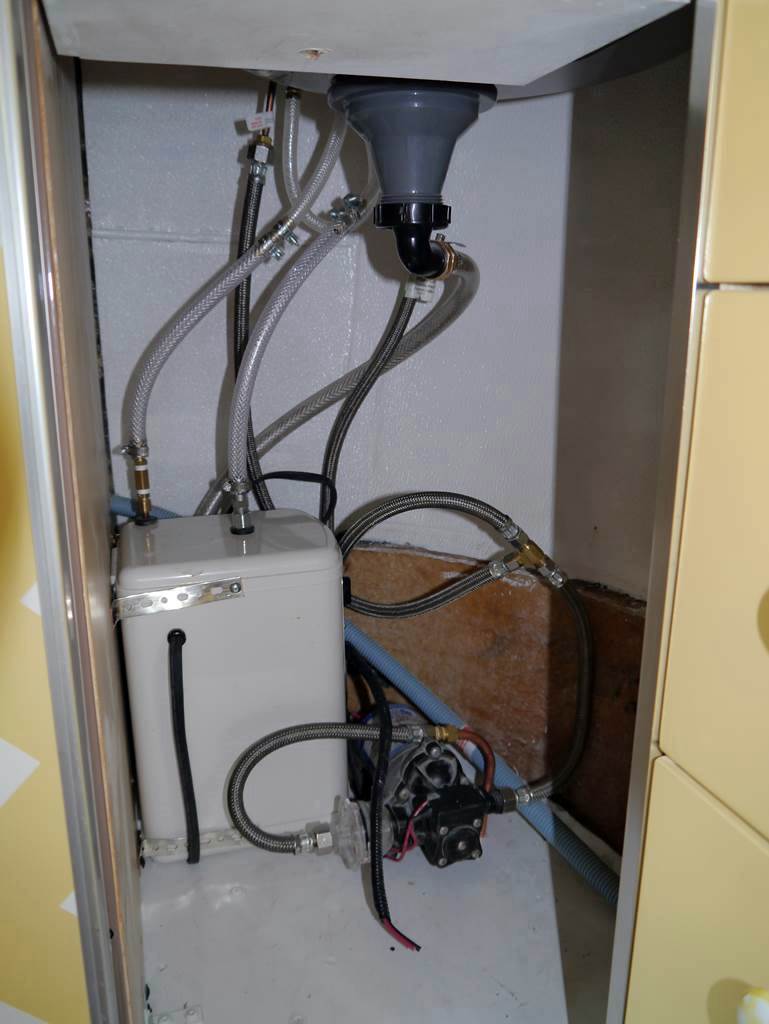
The interior cabinets are complete except for the odd shaped opening under the sink. after some creative thinking influenced by our love of wine I decided the Boler needed a wine rack, The finished rack securely holds 5 bottles of wine and slides sideways to access the utility area under the sink which contains the water pump and hot water tank.
Boler Trailer – Interior Design & Construction
Propane & Appliances
All the appliances in the trailer operate on propane so the first thing to do is upgrade the propane supply and distribution. All components of the propane system were replaced including the 20 lb tank, the 2 stage regulator and the flexible propane lines. I connected the low pressure flexible hose from the regulator to a 3/8″ black pipe mounted under the kitchen side of the trailer for distribution to the appliances. Black pipe is heavy but I wanted something that would not be damaged by any rocks or road debris that may flip up during travel. “T” junctions are installed into the black pipe to supply each appliance (the fridge and stove/oven), connected to each “T” I installed a gas shut-off valve, this would allow the gas to be shut off to each appliance separately if needed. Soft copper gas line is flared and used to connect the shut-off “T” to the appliance.
The original Boler came with either an ice box or a 1.7 cu/ft fridge. I wanted something larger and was able to find a good used Dometic RM2300 2.7 cu/ft fridge. This larger 3 way fridge fit perfectly between the raised floor around the perimeter of the kitchen and the counter top. The front panel of the fridge was painted in a checkerboard pattern which matches the ceramic handles

Every trailer needs a stove or cooktop but most models available are not the best quality nor are easy to control the burner flame. We have all tried to select simmer which is just on the edge of the gas being on or off, as you try to get the flame just that little bit lower “poof” it is out ..relight … try again. About a year before we bought the Boler I had purchased a Camp Chef stove/oven combo and was really impressed with both the quality and burner control, plus it had the small built-in oven (which was more of a novelty but still fun and functional). Looking at the stove there are warning stickers all over it stating “for outdoor use only” DO NOT use indoors”, etc., but let’s face it, an open flame should NEVER be used in a closed space, always have a window or ventilation open and keep an eye on it, this goes for any stove installed in a trailer. My biggest concern with installing the stove was how hot the outside would get with the oven on. I performed extensive temperature testing on the stove with the oven running at maximum temperatures for extended periods of time and calculated safe clearances on all sides. The stove is mounted to 1″x1″ square aluminum tube which in turn is mounted to the cabinet and the copper propane supply line is connected directly to the propane inlet line for the stove, After installation I rechecked the temperatures with the oven running and my calculations were confirmed the surrounding cabinet surfaces remain well below any dangerous temperatures.
Interior – Finishing Touches
Painting the Inside
After a lot of research on the interior Elephant skin lining and trying to get the surface clean and white I came to the conclusion painting was the only alternative. Researching paint I found some very interesting information. First was surface preparation, I have always used trisodium phosphate (TSP) as a cleaner but discovered that many paint manufacturers will void their warrantee if it is used, the reason appears to be related to insufficient rinsing which leaves a residue that the paint will not adhere to.
The recommended cleaning agent is ammonia and water in a 1:1 ratio. The ammonia water cleaner works very well on oil, grease and stubborn stains, it also does not require rinsing and dries leaving no residue. After cleaning, and with the seam tape removed, all the seams are filled with a paintable latex caulking. I used DAP Dynaflex 230, which is an indoor outdoor latex caulking that is incredibly easy to work with and offers a 50-year satisfaction guarantee.
The entire interior is primed using a high adhesive primer, I used Zinsser Bulls Eye 1-2-3, this is a Rustoleum product that can be used to prime ceramic tile for painting so it should work. Over the primer use a high quality latex paint, I used Rustoleum Painter’s Touch in gloss white. The paint has currently been on since 2012 and I am extremely pleased with the look and durability at this time.
Cushions & Upholstery
I am very handy and capable of doing most things, but sewing is where I draw the line, although I have tried it a number of times it is something that does not interest me so I will admit I don’t have any skills, but I sure appreciate and respect those that are skilled sewers. Looking through our local Kijiji (Craig’s List) I ran across an add for custom made RV cushions, my search for a seamstress was over. Most cushions in trailers are very firm lower quality foam, we worked with the seamstress and a foam specialty shop to spec out the highest quality upholstery foam ideal for a mattress and sleeping. We figured that our comfort when sleeping was more important than the few times we would actually be sitting at the table. I can honestly say the bed in the Boler is more comfortable than our one at home.
Covering the cushions we used “Buttercup” yellow Sunbrella fabric. This material is specifically designed for outdoor use on patio furniture. It has also worked out great except that although the yellow is bright a cheery it may not have been the best color to use in for camping, keeping the cushions clean is a challenge and requires annual washing a reapplying Aerospace 303 fabric protector.
Flooring
With the larger double bed the dinette seats now overhang the original step; the first thing I had to do was to build a small extension on the floor to even out the benches with the step. With the floor flat and level it was time to select the best flooring, many install laminate flooring which looks great and is very durable, but in out northern climate and the extreme in temperature, laminate flooring is known to give troubles, like buckling and seams opening up.
I chose a higher quality sheet vinyl flooring with wood grain pattern. The flooring could the cut to size for a seamless installation and lightly glued into place. One caution on gluing floors in a Boler, the original floor in mine is textured fiberglass with a gel coat, since the sheet vinyl flooring is waterproof and so is the fiberglass, make sure you do two things. First keep the glue very thin, second choose glue that will adhere in these conditions, if you don’t the glue will never dry. The final step is to add metal stair edging to the step in the dinette step and the doorway entrance to protect the edge of the vinyl.
Window Blinds
Window coverings are the one item that is easy to change and make a considerable difference in the decor in the Boler. We initially started out with curtains with a wine motif, these worked great but I didn’t like that they always covered part of the window edges and did reduce the bright airy feeling. These were changed to white vinyl venetian blinds, the look was transformed to a much more modern and lighter look. I updated the interior side window molding first with wood molding painted yellow, I didn’t like this so it was immediately change to 1½” wide anodized aluminum, the look it currently has.
When we travel I pull the venetial blinds fully open and secure them to the header rail with velcro strips, two per blind. Then we stop the blinds are lowered and white, ½” wide elastic strips hold the bottoms of the blinds angled back on the front and back walls
Backsplash
The stainless steel tile backsplash is a peel and stick product from Home Depot. Although each tile is quite expensive at $18.00 each, the area is so small the overall cost is reasonable. The adhesive is extremely strong so make sure you line things up straight before pushing the tiles to the wall, they will not come off without some heat and a lot of effort (and forget about trying to save or reuse that tile)
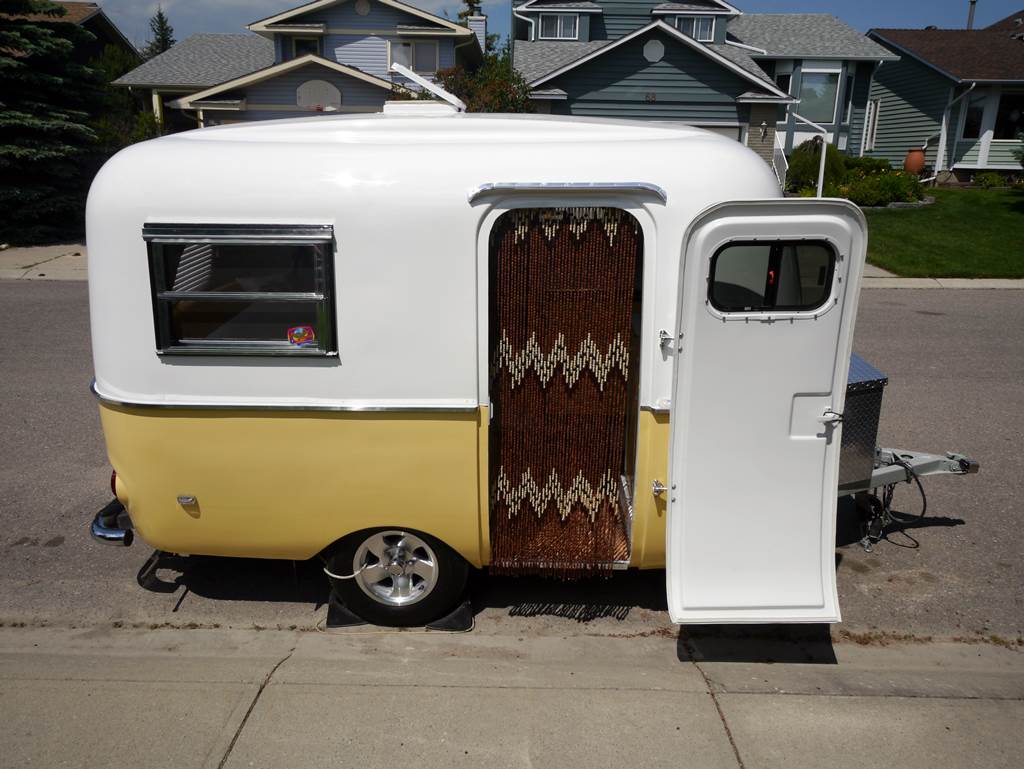
Beaded Curtain
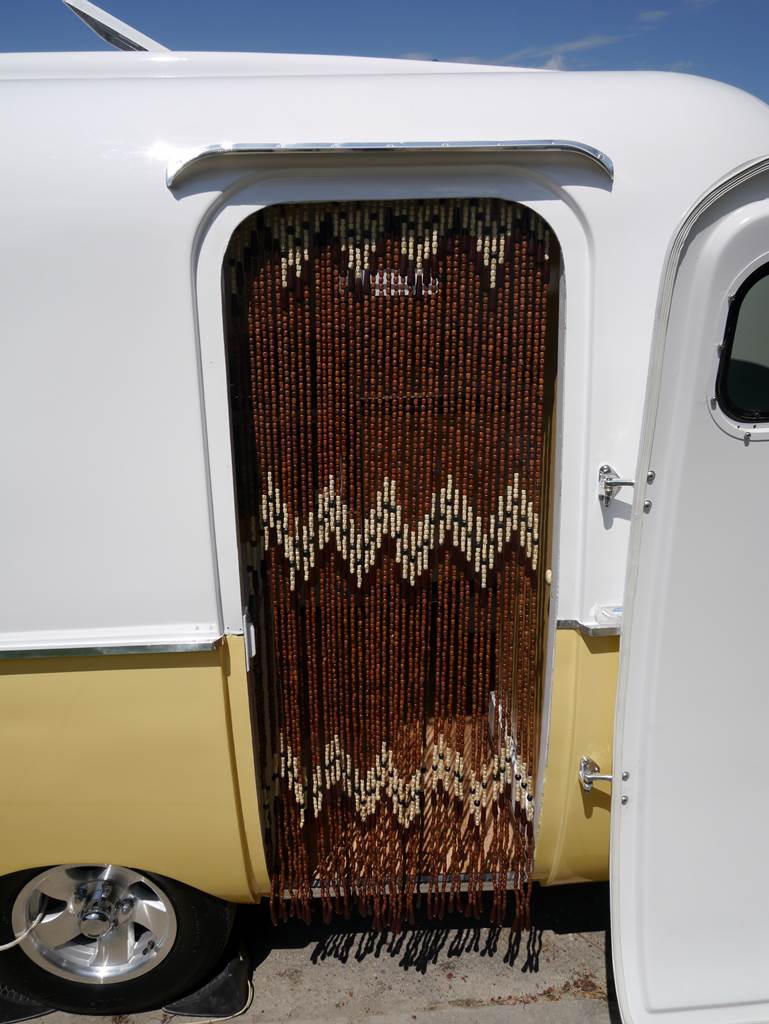
You may think the wooden beaded curtain on the door is stricktly decorative, well it does look very cool, but it serves a very important function. The curtain acts as a very effective bug screen, I am not sure why it works so well, maybe it is because in the breeze each strand moves and this scares the bug off but I can attest it has worked very well in keep fly’s, mosquitoes and most all bugs out of the trailer except for wasps. We were in one campground where wasps were a real problem, the wasps landed on the beads and because they are wood probably thought they would be good nest building material. as they crawled around the bead they would end up inside the trailer. Tie to close the door.
Exterior – Everything Shines
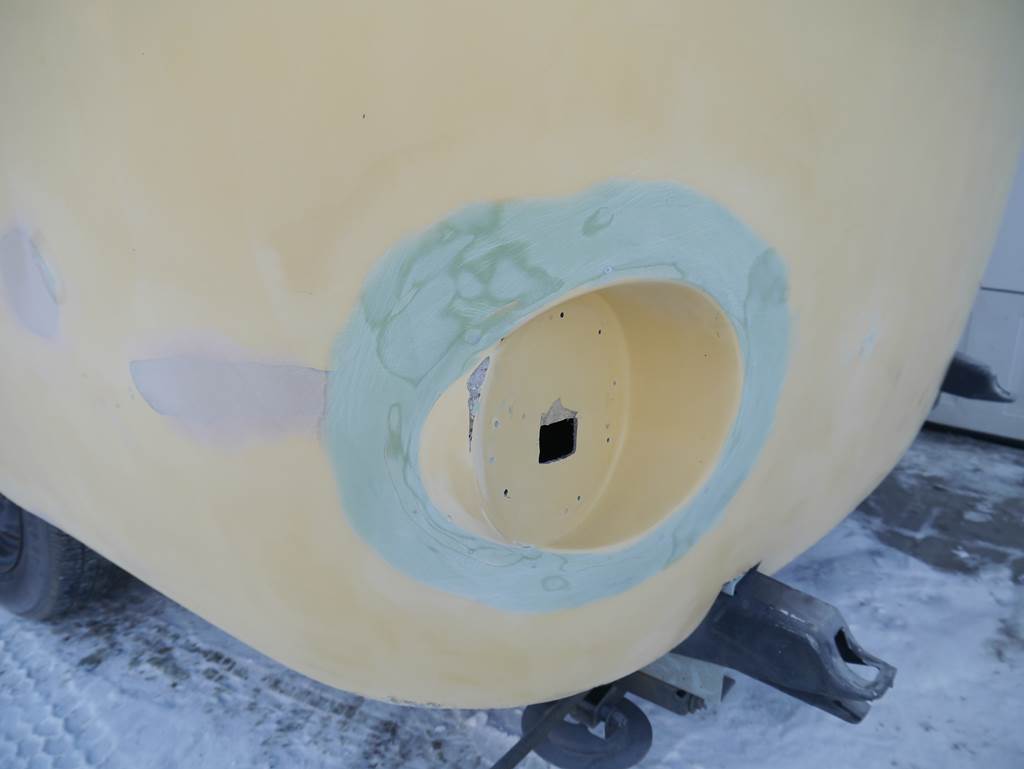
With the inside complete the next step was patching and refinishing the outside of the Boler. There were holes and patches where every rivet was, the furnace vent, water inlet and drains, as well as a damaged area in the rear corner where it was backed into something by a previous owner. The Boler looked pretty rough from the outside. With the Boler in the garage disassembly of the outside began, for a proper paint job everything on the outside needed to be removed including; the front and rear windows, both side dinette Jalousie windows, the small kitchen window, the fridge vents, belly band and the Boler emblems. With the Boler emblems removed I had officially eliminated every rivet through the fiberglass shell.
The following day the disassembly continued, cleaning the butyl tape sealant from around the fixtures, refrigerator vents, side dinette windows, water access hatch, tail and marker lights. By far the worse job was removing the front rubber rock guard, it was ripped and torn, but still put up great resistance to being removed. It was held in place with a thick layer of what appeared to be carpet or flooring adhesive, whatever it was it took considerable time to clean off. After many hours of applying lacquer thinner, scraping and finally a rubdown with a stainless steel pot scrubber, my hands were aching but the glue was gone.
I wanted the smooth look of Frenched in the rear tail light housings rather than the riveted in tail light buckets, so I drilled out the original rivets and fiber glassed the housings into the body, With all the prep completed I was able, or wanted. to do I attached some temporary tail lights and off to a professional to complete the work. I found an experienced autobody man through a local classified ad,(Kijiji again) he had 30 years’ experience, factory trained by Mercedes, and was now working out of his home shop. He had refinished a Boler a few years earlier and was interested in working on my project.
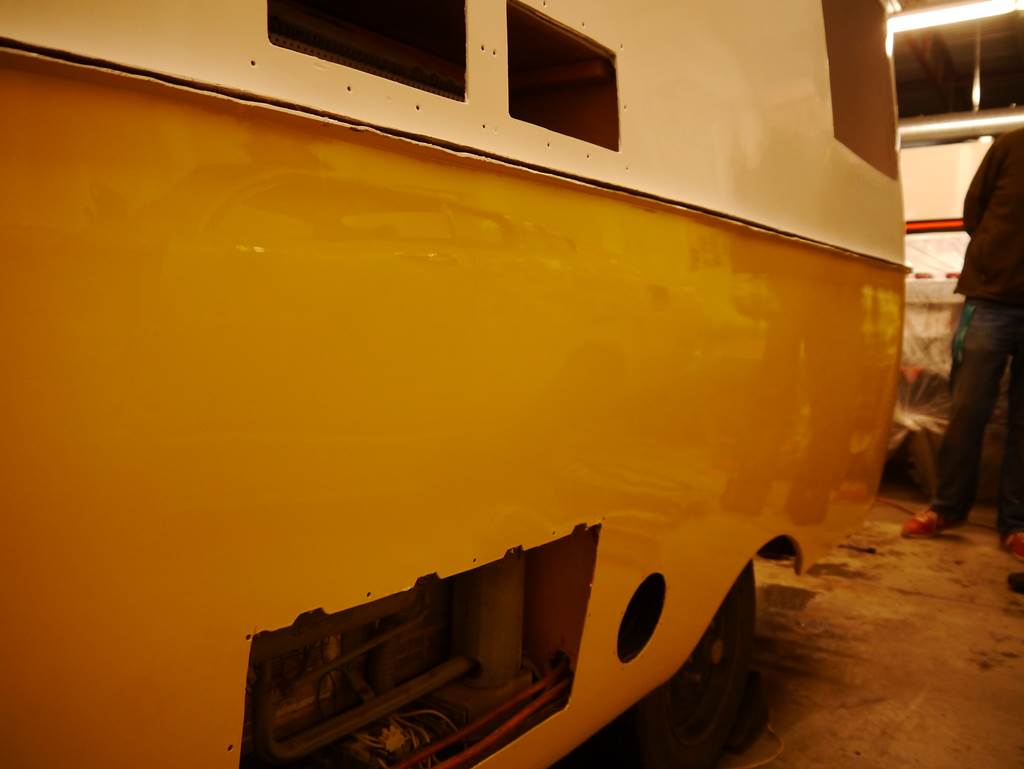
After a few weeks I was eager to inspect the work, to my surprise when I arrived the Boler was sitting outside his garage. I will start by answering the obvious question NO we are not doing the bodywork outside in the snow and frigid temperatures!!! We simply moved it outside to blow off the dust and clean the shop. First part of the bodywork is complete, any damage, holes, patches have been repaired, filled and board sanded.
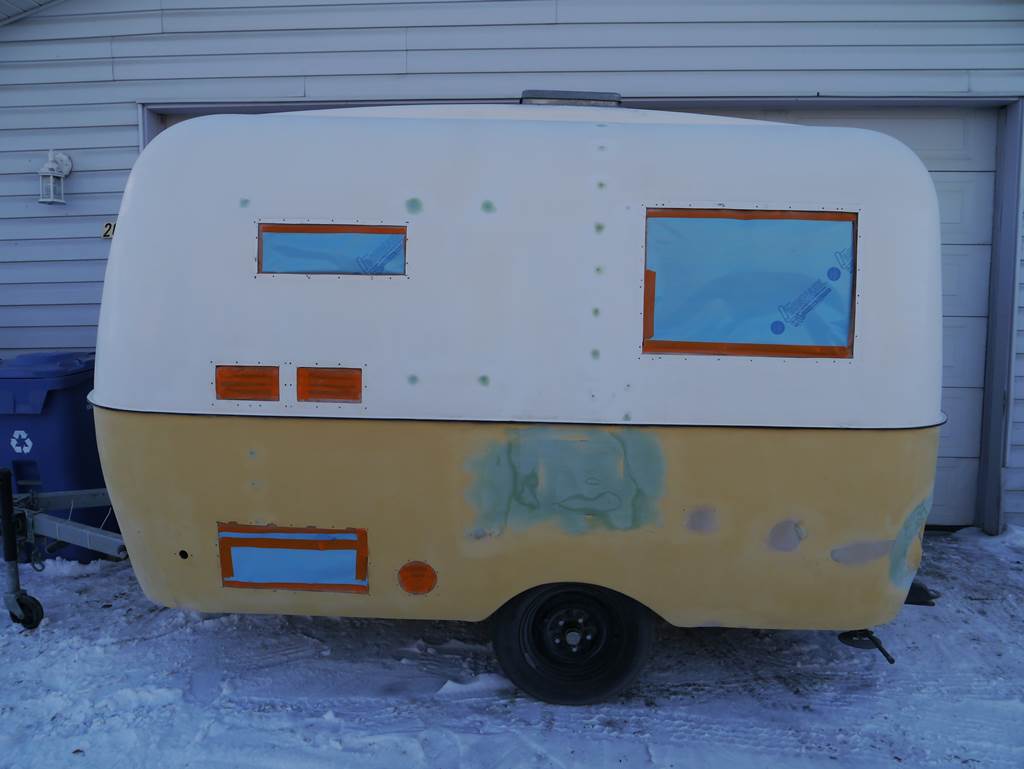
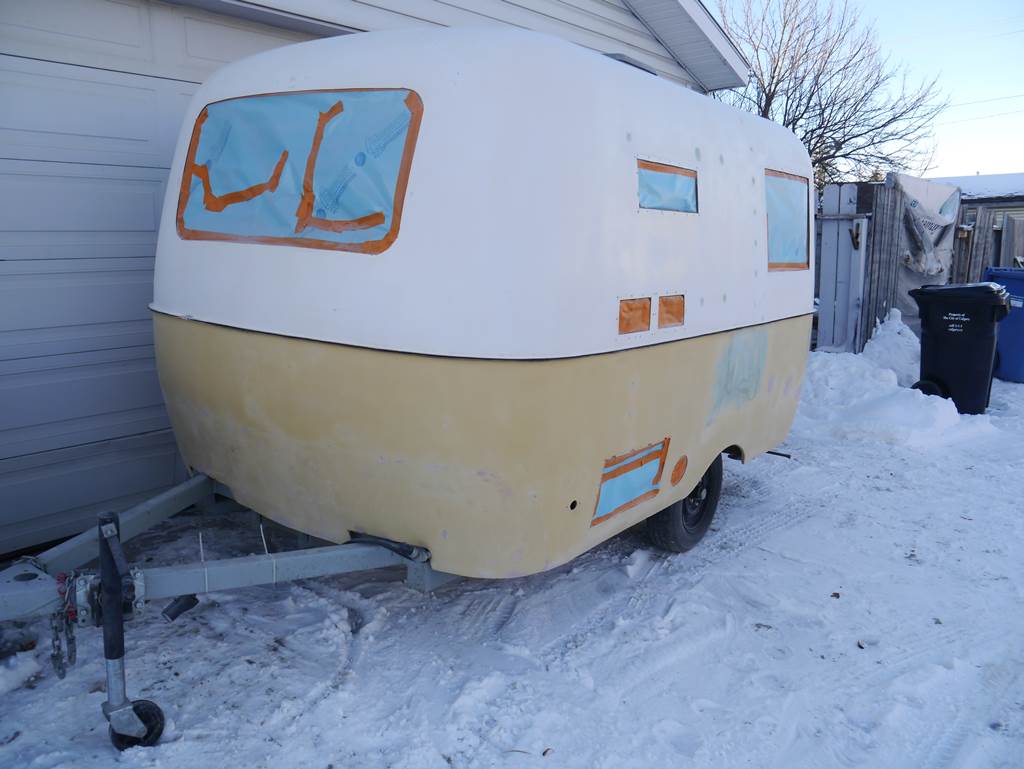
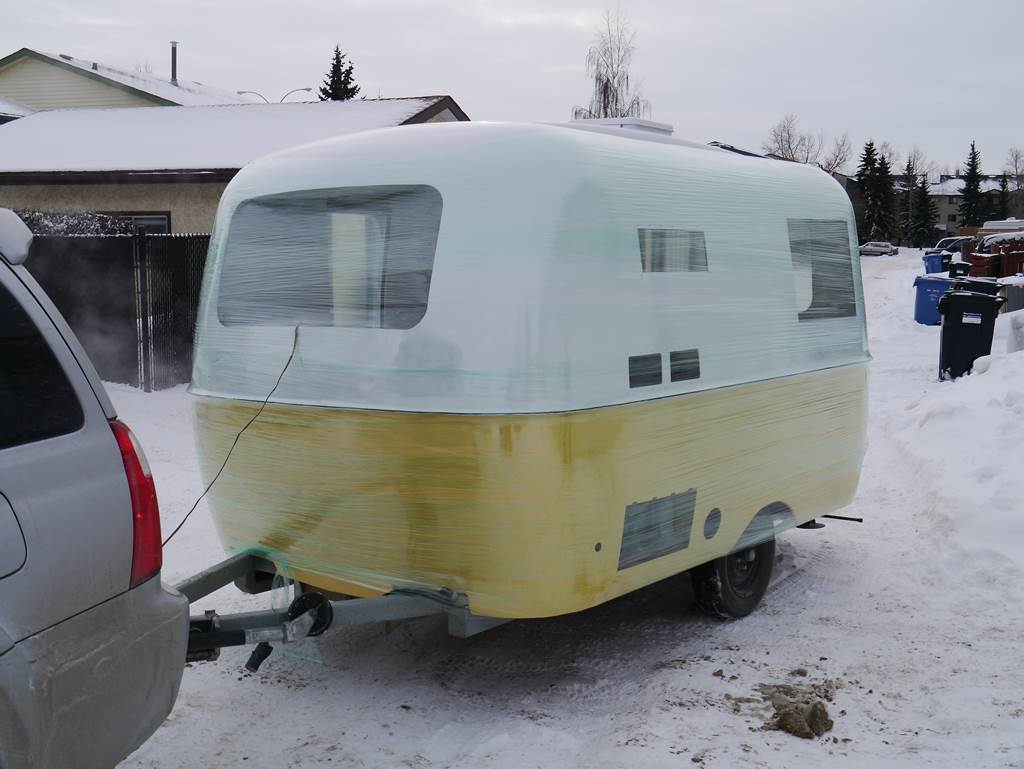
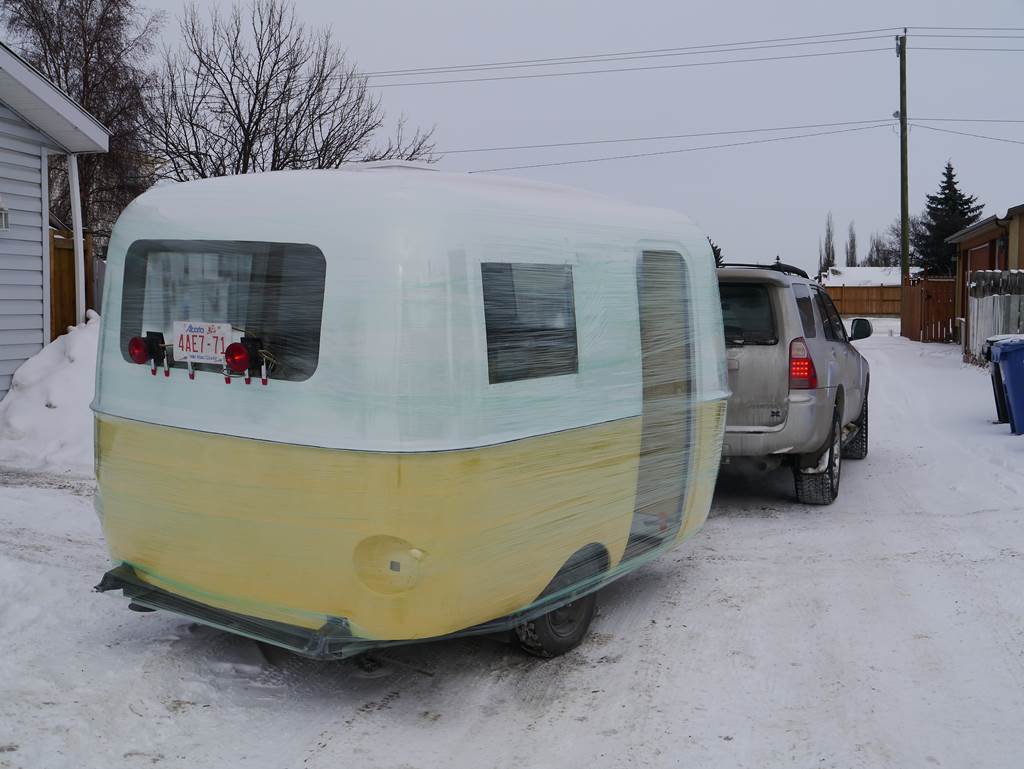
Not one rivet is left through the shell since all the cabinets and components are connected with brackets or anchors fiber glassed to the shell. The next step is for the primer to be applied along with a guide coat, it is then board sanded again and any minor imperfections are repaired. After priming any missed areas and imperfections are high lighted by board sanding the guide coat, then the final paint was applied. The paint we chose is an industrial coating designed for the marine and aviation industries. It is an extremely tough yet flexible two component highly cross-linked, high performance polyurethane coating made by Endura. We chose colors closely matched the original theme yet had a modern feel, using pure polar white for the top and matching the buttercup yellow from the interior (CLR28419 Tier 1 YELLOW (TM PPG 88283)). It is now just before Christmas, the weather is very cold and the streets are snow covered, how do I get the Boler home and protect the still fragile paint …. You wrap it like a Christmas present in pallet or plastic wrap.
A good friend offered to let me store the Boler in his warehouse for the winter, this provided a warm place for the paint to fully cure. When I arrived at the warehouse I was able to unwrap the trailer and get a close look at the new paint job. I am very pleased, the colors are perfect, the shine is incredible, the Frenched in tail lights look awesome. As soon as the warmer weather comes I can start the reassembly.
Polishing Aluminum
The winters here in Calgary are long and cold, this is a great time to clean-up and prepare all the parts I removed from the Boler so they will be ready for installation when spring arrives. The side Jalousie windows, although in good shape, were a bit stiff in opening and needed new seals and weather-stripping. While looking at the work involved in replacing the seals I noticed at many of the parts taken off the Boler they are made from aluminum, the side windows are made from extruded aluminum and have that dull grey finish, the bellyband is the same, the door hinges are cast aluminum with a dull rough finish, and the new radius door window is all black powder coat on aluminum. In the past I had “played” around with polishing a few scraps of aluminum and was blown away at how great you could make them look is a very short time. With a small polishing setup using an old furnace motor, arbour, and 6” buffing wheel I dove in to see how the grey windows would react to polishing. No surprise the small test area on one of the window frames gleamed … there was no turning back, I had started on a black, messy journey to make the dull bits shiny.
Jalousie window side rails, one polished one not
 Before Polishing
 After Polishing

Jalousie widow fully disassembled
Knowing my little polishing set-up was not going to be efficient I purchased a ¾ HP 8” grinder, removed the side guards and attached 2 8” buffing wheels, one a sewn wheel and the other a loose wheel. Using white buffing compound which is basically a bar of wax impregnated with diamond dust I started polishing, and polishing, and polishing. I have documented the basic process in a YouTube video, but I do have to warn you it is a messy job, black aluminum oxide now coats every surface of my shop.
sm_P1040530
Polishing Boler (Scamp) Cast Aluminum Hinges
Boler Jalousie Window Disassembly
Reassembly
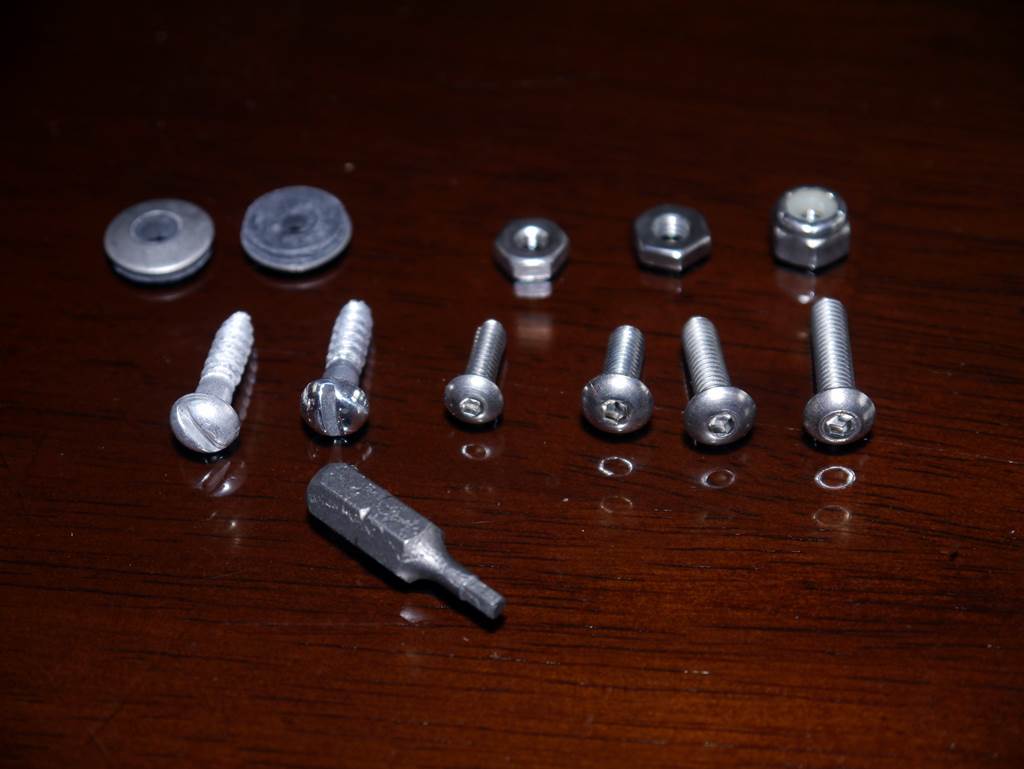
Although bolting everything back is relatively simple it is important to take your time because you don’t want any leaks or problems while out on the road. Everything is sealed to the body using a seamless application of high quality butyl tape (see the note below) and then connected using #6 or #8 stainless steel button head fasteners with bonded rubber washers and nylock nuts
putty
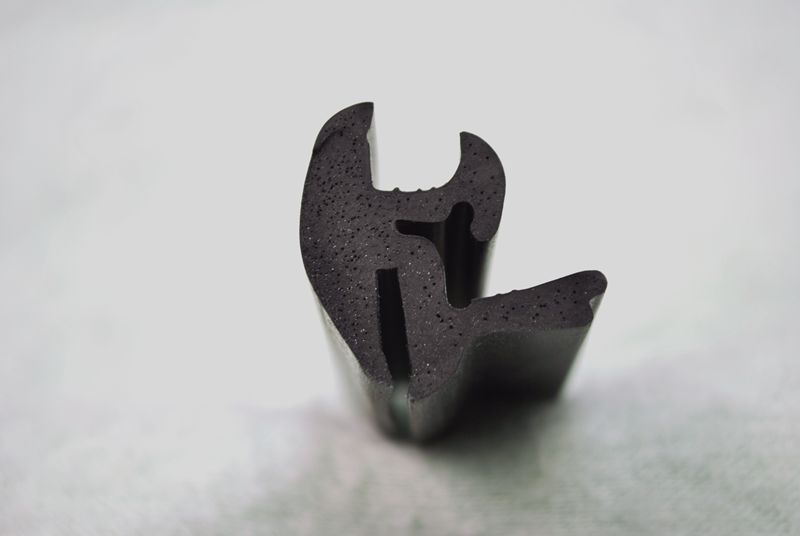
There are two different products that are often called butyl tape, these pictures show the difference. The left picture is actually butyl putty which is of a lesser quality and only lasts about 8-12 years.
The product on the right is butyl tape, a very high quality product which will last over 40 years.The easiest way to tell the difference between the two is by looking at the release paper. The release paper on the putty is like crape paper or wrinkly, the release paper on the butyl tape is smooth and a heavier coated paper.
Tape
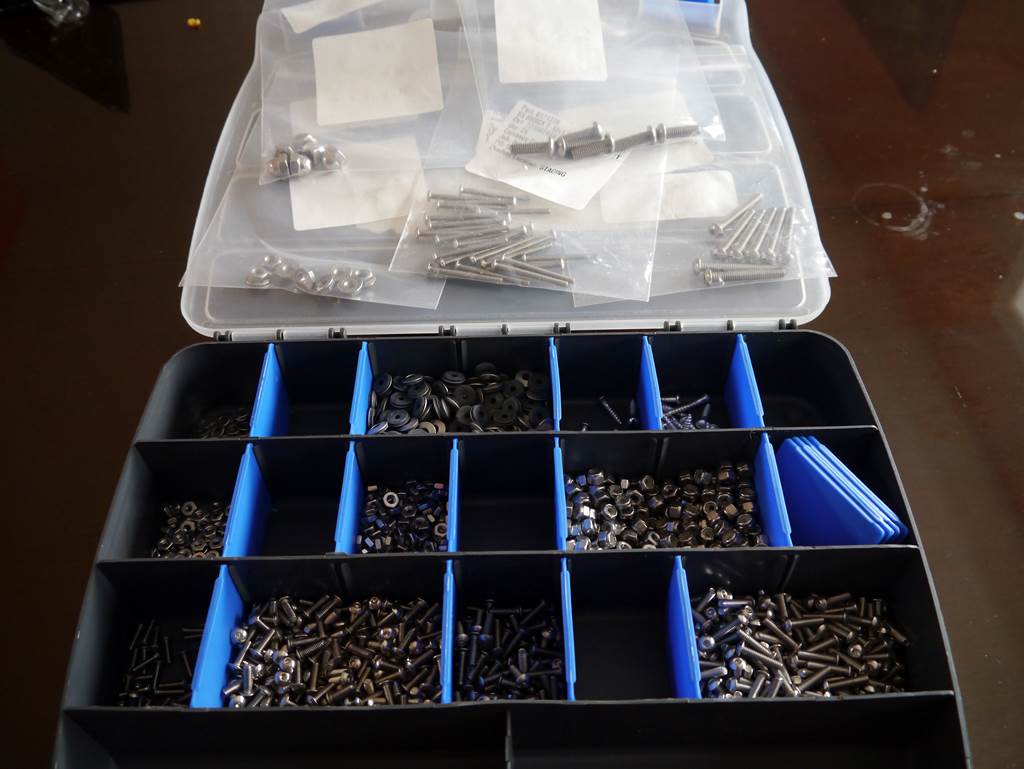
The pictures on the right show the #6 & #8 button head stainless steel fasteners, bonded rubber washers and nylock nuts I used throughout this project.
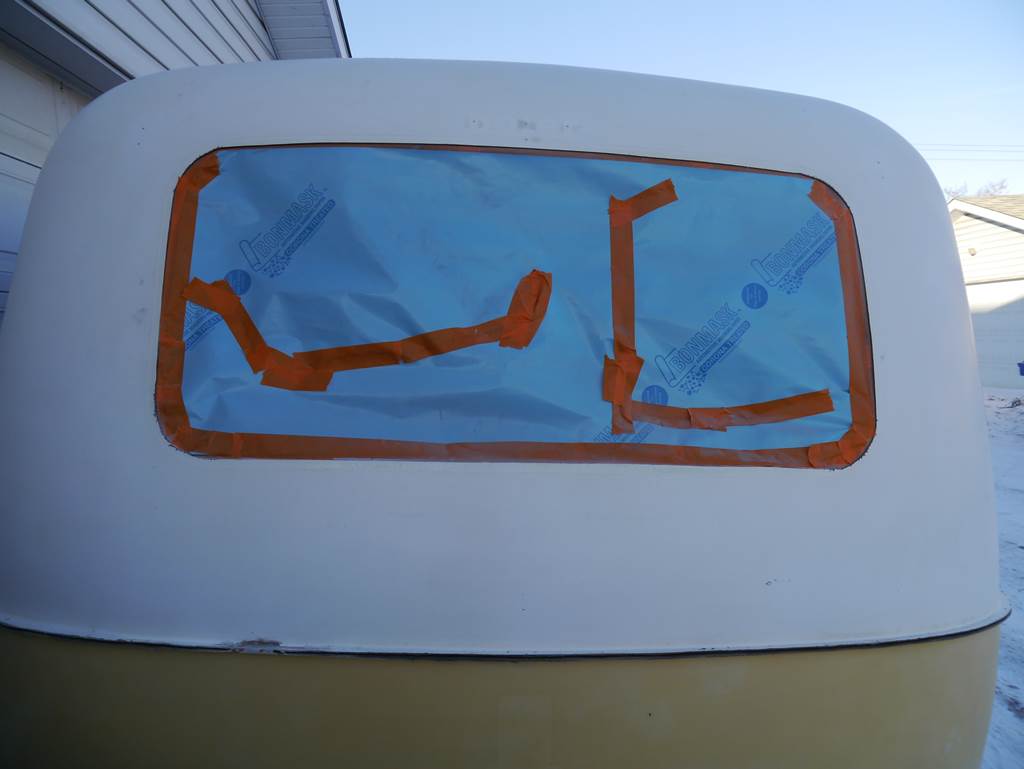
Replacing the Front & Rear Windows
With age the rubber molding around the front and rear windows will become hard and shrink, this will often be the source of leaks as water can easily migrate around the seal. Also with age the windows themselves will become fogged and brittle with micro cracks forming that will soon start to spread into larger cracks. Always replace the rubber molding when you replace the windows.
I made two changes with the front and rear windows during my build. First I made the windows from polycarbonate rather than acrylic. Polycarbonate has higher impact resistance and less prone to cracking, If using Polycarbonate make sure you purchase it with a UV coating suitable for outside use or it will yellow very quickly. The second change I made was to use one piece locking molding to install the windows rather than the original 2 piece molding that uses a separate locking bead.
Please make sure you install the molding, either one piece or 2 piece, with the locking seam facing the outside (I have seen a number of Boler’s where the molding is installed backwards with the locking strip on the inside). Water leaks are more common when the molding is installed backwards and a number of owners have had troubles with their front window blowing in when traveling. The reason is the molding is designed to have a better weather seal on the one side, it is also stronger and won’t flex as much when pressure is applied to the outside, when installed backwards the molding can flex enough that the window will push out with just the air pressure from towing at highway speeds.
locking gasket
The original 2 piece molding
The one piece molding I used

The one piece molding has a very smooth look
When replacing the front and rear acrylic (Plexiglas) windows on your Boler make sure you use 4.5 mm or 3/16″ thick material. Many glass shops will try to use 1/4″ thick material as this is a more common thickness which they probably have in stock. Any window material (acrylic or polycarbonate) thicker than 4.5 mm or 3/16″ is too stiff and WILL NOT bend enough to conform to the compound curve of the window opening.
To clean the front and rear windows NEVER USE GLASS CLEANER, follow my instructions in the maintenance section on how to clean and polish your windows Windows Care of and Cleaning
Boler Windows – Making Your Own Acrylic Windows
Installing Front & Rear Windows
Coming very soon
Lighting & Electrical System
In designing and building the electrical systems in the Boler I always considered twp primary principles
- The system had to be very reliable, there is nothing worst than an electrical problem, especially while on the road or on vacation.
- The entire system had to draw a minimum of current, I wanted to be able to go long periods of time without charging and if charging was required an small and simple solar panel would easily keep the battery topped up.
The primary causes of electrical troubles can usually be traced back to either poor grounds and/or poor connections (usually when low quality crimp connectors are used). The ground issues are especially bad when standard automotive or trailer light assemblies are used that are designed to ground through the metal case of the light fixture, these work great on a metal bodied vehicle but the fiberglass is non-conductive so usually a make-shift ground wire is either connected to a screw or sandwiched between the housing and body, neither method works for very long. To address my two primary principles I ran separate ground wire to each component; and every connection would be soldered and protected with heat shrink tubing. If a connector is needed, like on a distribution block or to connect to the battery, the plastic cover is removed from the connector, the connector is then crimped and soldered to the wire followed by heat shrink tubing. Now lets look at the components.
Tail Lights, Brakes Lights & Marker Lights
The two common approached to the Tail/Brake lights on a Boler are to either keep the original lights and install LED bulbs, but this approach does not address the grounding issue.Another option is to install 7″ round LED “bus” lights which contain 31 LED diodes, these are available from many sources and are almost a direct replacements for the original “top hat” lights and very easy to install, I just don’t like the looks of them. I wanted the look of the original top hat lights and I wanted the reliability that the 7″ LED lights have with separate power and ground wires. To accomplish this I found a 4” LED tail lights containing 40 diodes fit perfectly inside the original tail light lenses.
LED Tail light
4″ 40 diode light that fits inside the original top hat lens
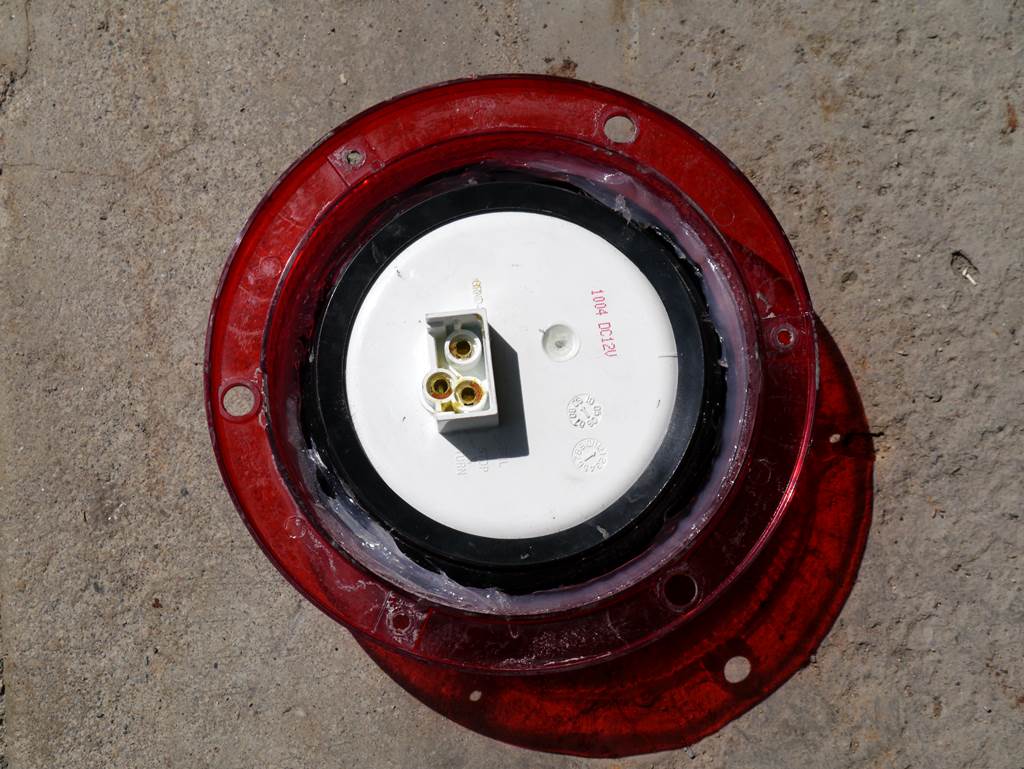
The 4″ light sealed into the original lens
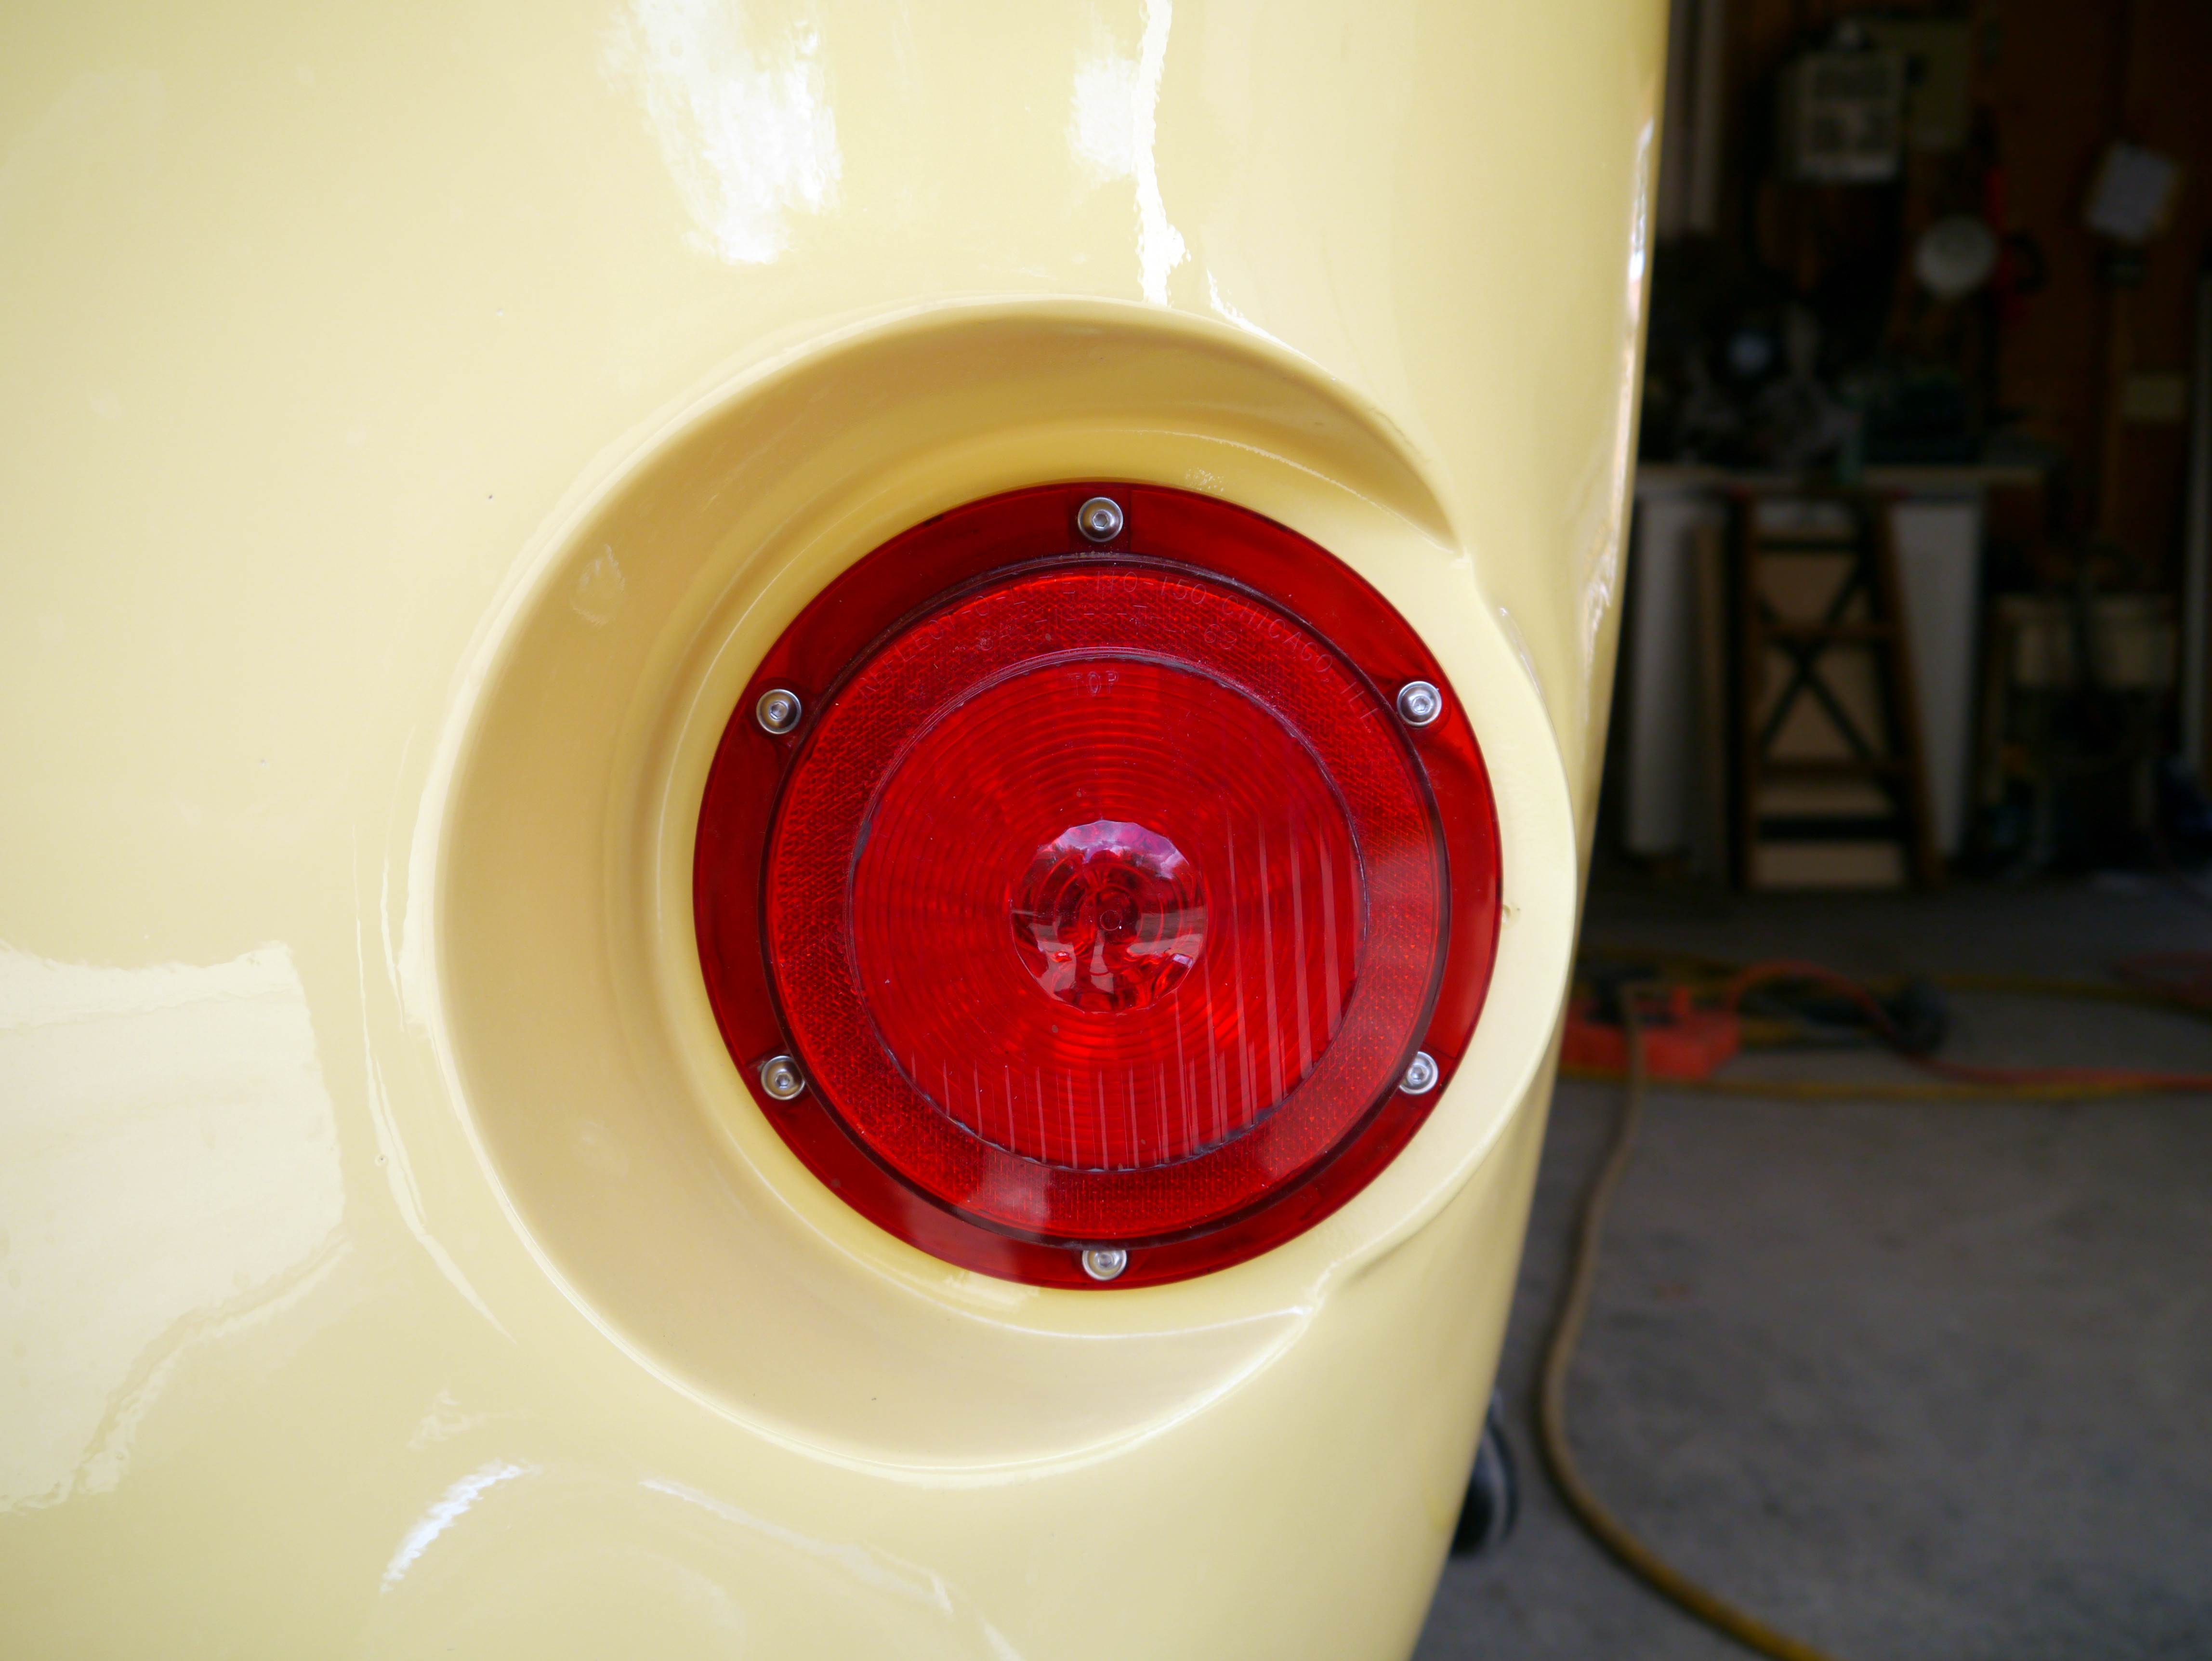
Looks great!!!
They are also very bright
I actually started the outside light wiring by installing a new 7 pin plug at the front connected to a 14-7 wiring harness which I ran a weatherproof connection box mounted under the front left of the trailer. From this connection box a branched harness is made that runs to each LED side marker light, the rear tail lights (brake, signal and park), the trailer brakes and to the battery for charging.
Just like the tail/brake light the marker lights a LED, there are several advantages in using LED lights for both the inside and outside including; vibration resistance, long life, low power draw, and my favorite is separate power and ground wires to each light.
The Battery and Power Center
sm_P1030376 (2)
Under the passenger side kitchen bench seat is the “power Center”, it contains the 12 volt deep cycle battery housed in a sealed battery box that is vented through the floor, battery charger, 12 volt fuse/distribution block, and the 120 volt main panel w/circuit breakers. This location was chosen to help offset the side to side load from the fridge and by placing the heavy battery behind the axle it will also slightly reduce the increased tongue weight caused by the kitchen cabinets.
I really didn’t see the need for an expensive power converter considering the minimal current draw, and I also did not have any use for an inverter as the only 120 volt item I bring camping is an electric space heater that is only used when we are plugged into shore power. You may ask how I keep the battery charged without an converter. The battery recieves a charge from the tow vehicle when we are traveling, if we are camped at power sites I use a 2 amp/10 amp inteligent battery charger, and if we are of the grid boondocking I have a portable 80 watt solar panel that is connected directly to the battery. All these methods work very well, we have never run the battery low even when boondocking in one location for 2 weeks.
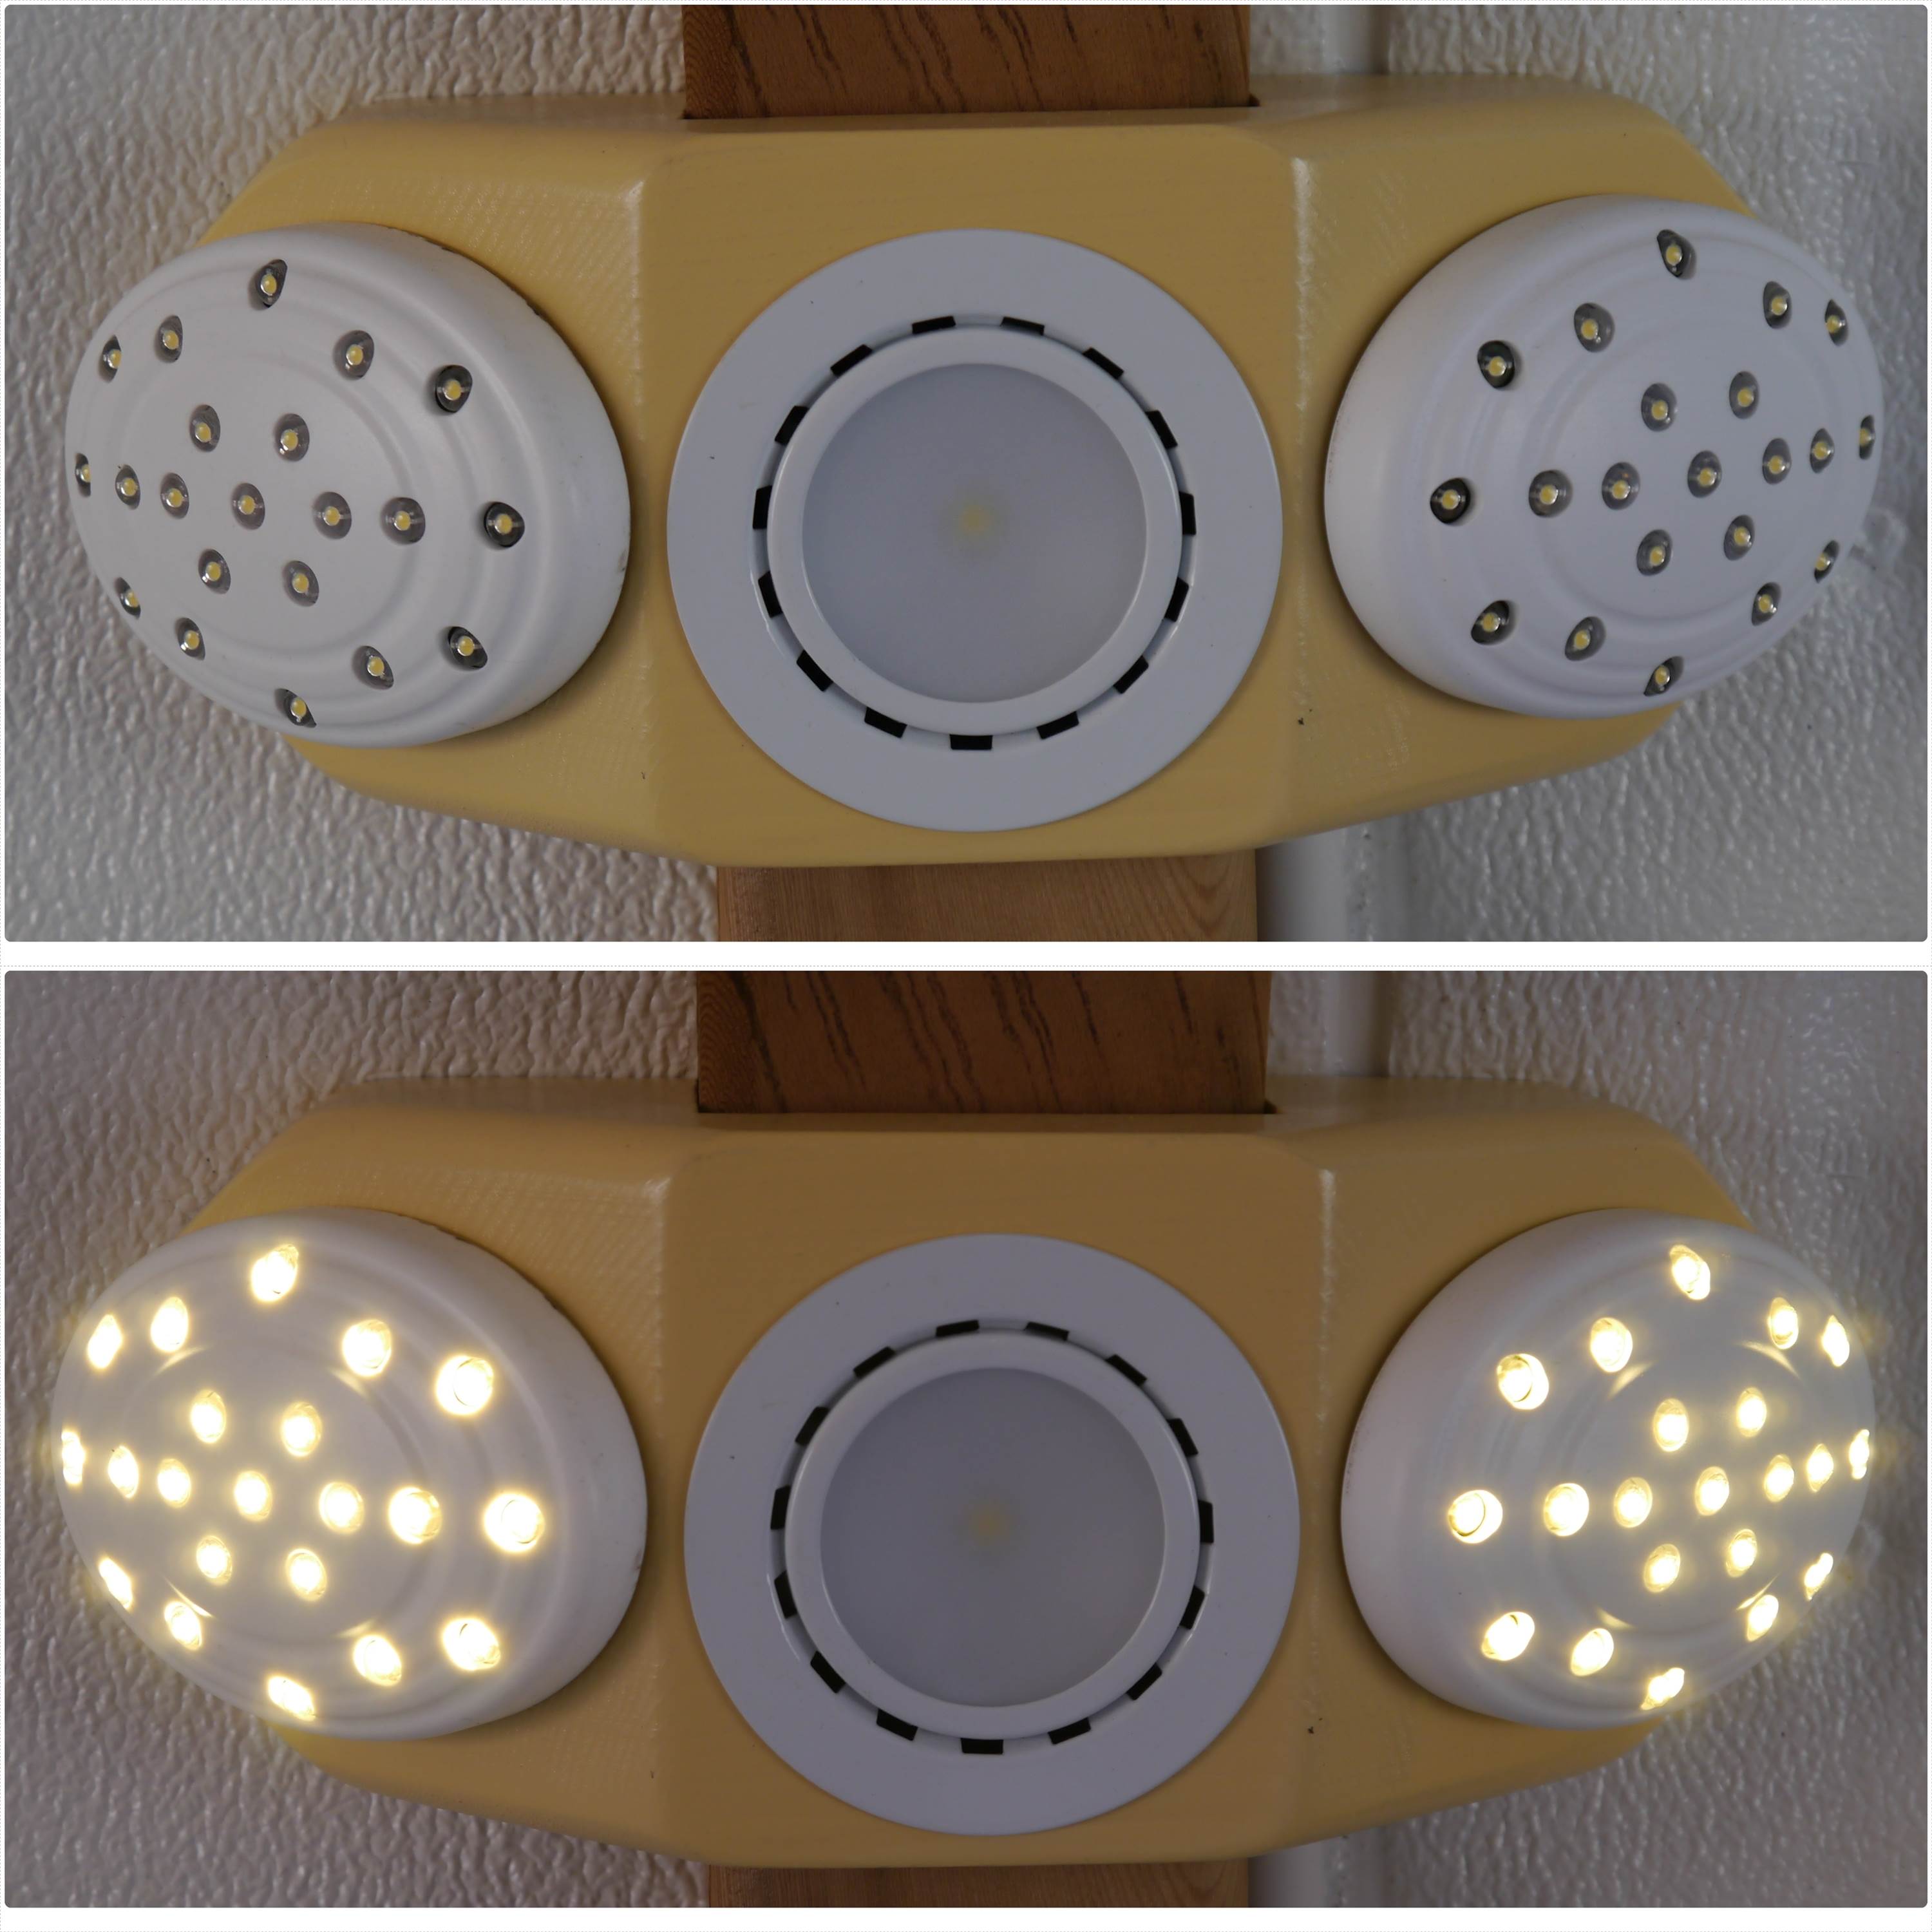
Interior LED Lighting – Adapting Kitchen Undercounter Pucklight
There are many advantages to LED lights, the main ones are they draw very little power and they last a long time. You can buy LED bulbs as replacements for most standard automotive and RV light fixtures, but I personally hate the looks and the poor quality of plastic RV light fixtures.
Most low voltage lighting, including many LED packages, sold for household use as under cabinet lighting in kitchens are 12V DC, check the packaging or the label on the transformer, if it say 12V DC you can use it in your trailer. The lighting I am using in my Boler consists of 12V LED lights designed for kitchen under counter from Rona (Canadian equivalent to Home Depot).
There are 4 very bright puck lights (2 on each side mid-cabin) that provide very good general task and work lighting. We have used these at dusk right through to total darkness and they provide all the light that is needed to cook, play cards or read.
Positioned between the bright lights are 2 low intensity lights (one on each side) that provide enough light to get ready for bed or check the time at night.
To wire these lights in you do not need the transformer that comes with the kit, just wire them directly to a switch that is connected to the battery positive and connect the negative to the battery ground. One thing to keep in mind when you are wiring LED lights is that most are polarity sensitive, hook them up backwards and you may damage them. To identify which wire is positive and which is negative connect a voltmeter to the 12V output of the transformer (be very careful, don’t touch any bare wires with your fingers).
Boler DIY Power Roof Vent
After the first season camping in the Boler I decided a fan in the roof vent would help cool the inside on those hot summer days but I find the Fantastic fan is too noisy and draws way too much battery power so I decided to build my own that would be both low current draw and very quiet..
This is a very simply design, I used two 140mm computer case fans, each of the fans has 2 speeds, they have very low current draw and are almost silent. The installation was simple, using 2 lengths of 1″ flat aluminum that is available in 8′ lengths at any hardware store is attached across the vent interior trim. I connected the fans to the strapping and then the strapping to the existing vent shroud using #8 machine screws. They are wired to switches in the kitchen area and the attached 2 speed switch is tucked in next to the fan
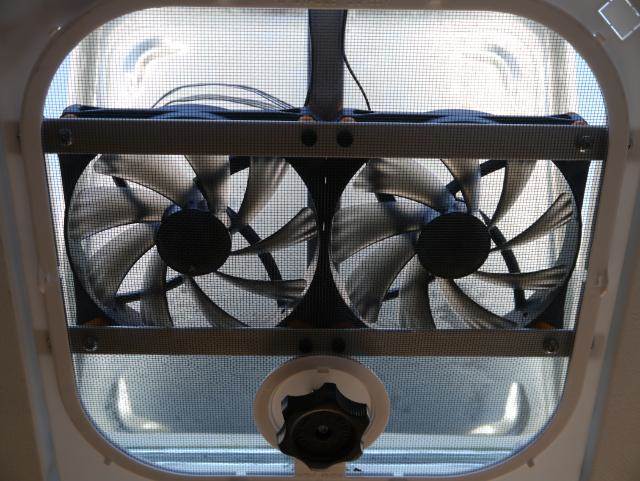
The fans I used and their specifications are:
• Antec TrueQuiet 140
• Current draw – 0.04 amps on low and 0.1 amp on high
• Decibels – 9.8 db on low and 20 db on high
• Airflow (CFM) – 40.5 on low and 65 on high
Compared to the Fantastic fan (3 speed):
• Current draw – 1.89, 2.29 and 3.0 amps on low, medium and high
• Decibels – 39.0, 39.0 and 40.0 db on low, med and high
• Airflow (CFM) – 478, 653 and 920 on low med and high
(no comparison on airflow but remember our trailers are only 360 cu/ft total volume without cabinets)
So how does it work?
We always travel with a portable weather station which displays and records temperature and humidity both inside and outside. Without the fans the interior was always hotter and had a much higher humidity than the outside, in fact in the mornings the humidity was often in the low to mid 90% range and the windows would be fogged up.
On last weeks trip to Glacier Park we used the fans, the interior temperature and humidity stayed either equal to or lower than the outside air and no window fogging or damp walls. A huge improvement. Even with both fans on high speed they were totally quiet, we could not hear them running even during the night. I would recommend this addition to anyone’s trailer.
Plumbing – Clean Water In & Dirty Water Out
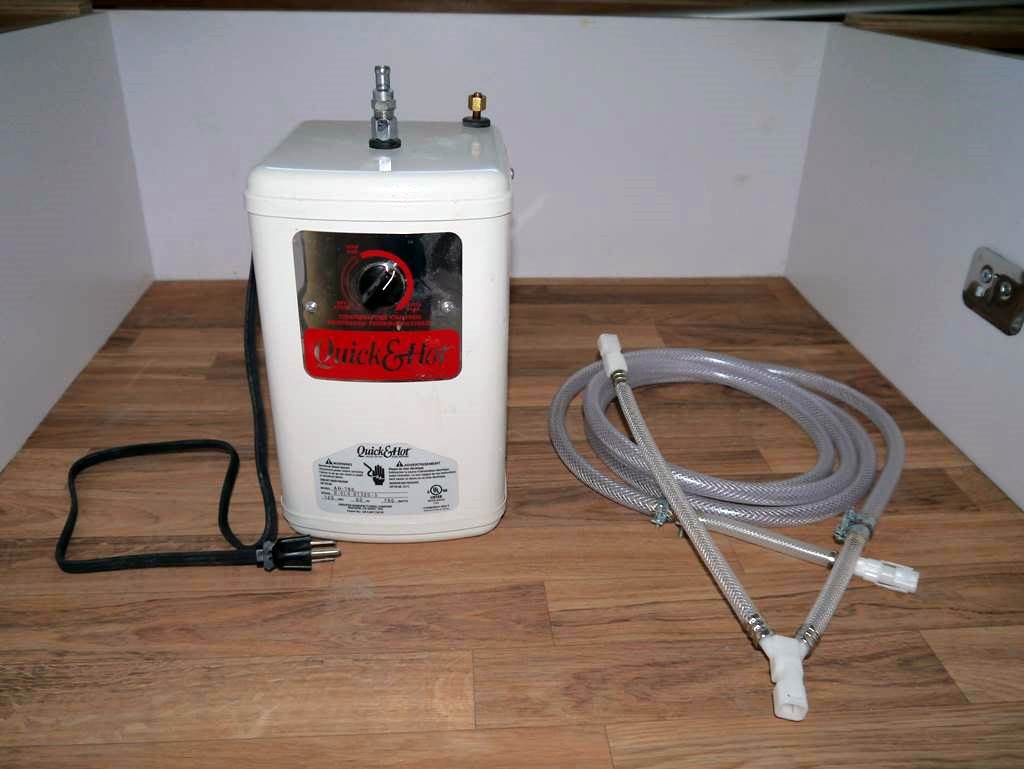
For plumbing I moved away from the conventional RV systems which uses an onboard water reservoir and “cheaper” sink and fixtures. I used a full size stainless steel sink from Ikea, the round shape fits perfectly into the corner where it is mounted. The faucet is a “wide mount faucet” that uses higher quality ceramic cartridges rather than the leak prone rubber compression type usually found in RVs. The water system is pressurized using an electric ShurFlo model 2088 water pump. It is rated for 2.8 gal/min @ 2.5 amps (max current draw is 7.0 amp @ 40 psi) We only turn the pump on when we are at the sink so the amount of power it consumes is negligible. All water lines that are inside the Boler are either annealed copper or braided steel high pressure residential lines.
One unique design in the water system is that it uses an external 5 gallon insulated cooler as the reservoir. I installed a quick connect fitting in place of the spigot at the bottom which is connected directly to the braided steel inlet line to the electric water pump. The benefits of this design are it is easy to refill from any water source, easy to clean and sanitizing, and in really hot weather we add a block of ice to the jug. A bonus to the water system is that the water does not get that “plastic” taste common with RV water holding tanks, it stays very fresh and clean.
sm_P1070042
sm_P1070043
sm_P1070041
sm_P1070038
sm_P1070045
Street water is connected directly to the braided steel inlet hose
sm_P1070047a
Ball valve on inlet hose is used to shut off street water when away from the trailer
sm_P1070050
Water enters the pump through the copper line, the pump will draw water from the 5 gallon reservoir, street water also goes through pump but no need to turn it on.
The drain system is very simple, from the sink a ¾” line goes to a water fitting on the side of the trailer. A short hose is connected to this fitting and waste water from the sink is collected in a 5 gallon container.
sm_P1070048
sm_P1070049
Since I had a 1 gallon “instant hot water” tank sitting in my workshop I thought I might as well add it to the Boler. This is a one gallon electric water heating system, we will only be able to use it when we have shore power, but it is an easy, light and provides that luxury of hot water in many campgrounds.
Water heaters like these are not designed to be pressurized. The tap that is included with the kit directs the pressurized water from the faucet valve, water flows into the tank and then the hot water is forced out of the tank to the faucet spout. (does that make sense?).
To replicate this design and ensure the tank would not be pressurized when the pump is running, or street water connected, I used a “wide mount faucet”. This type of faucet has the spout and valves separate, they are connected under the counter with flexible hoses rather than the one piece brass construction usually found in most faucets.
I cut the hose between the valve and the spout and by adding some short lengths of hose installed the hot water tank in series. When you turn on the tap water flows into the hot water tank which pushes the hot water out the tap.
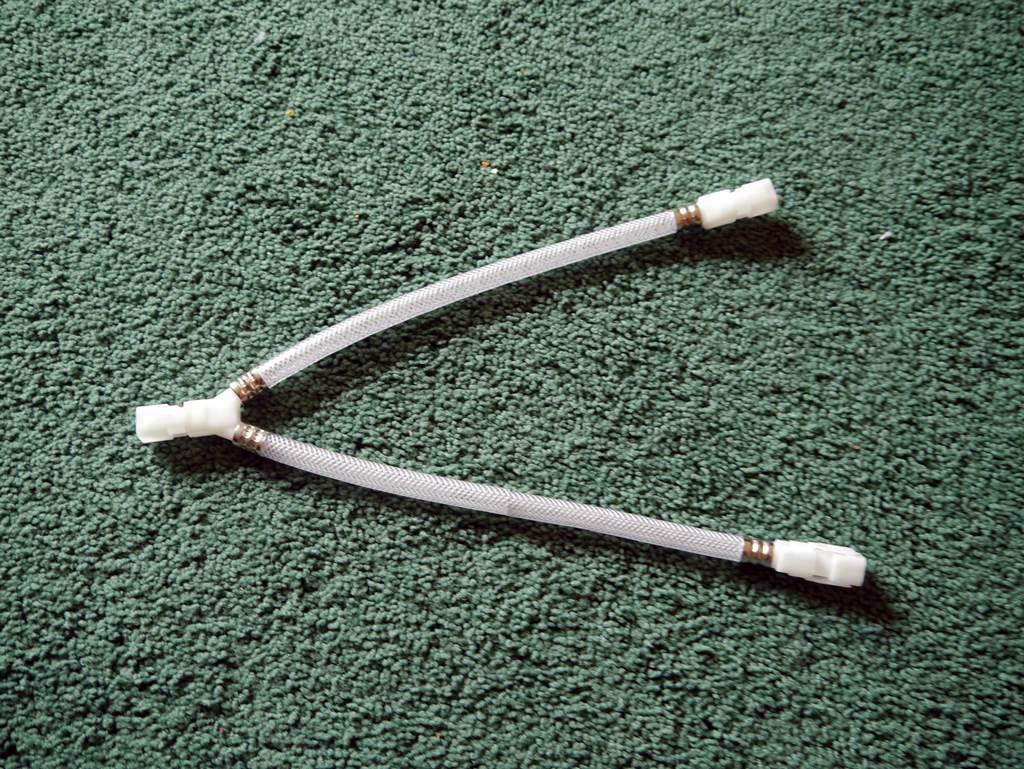 The original “Y” pipe that comes with the faucet, each end is designed to connect to the hot & colt valves, the center connects to the spout.
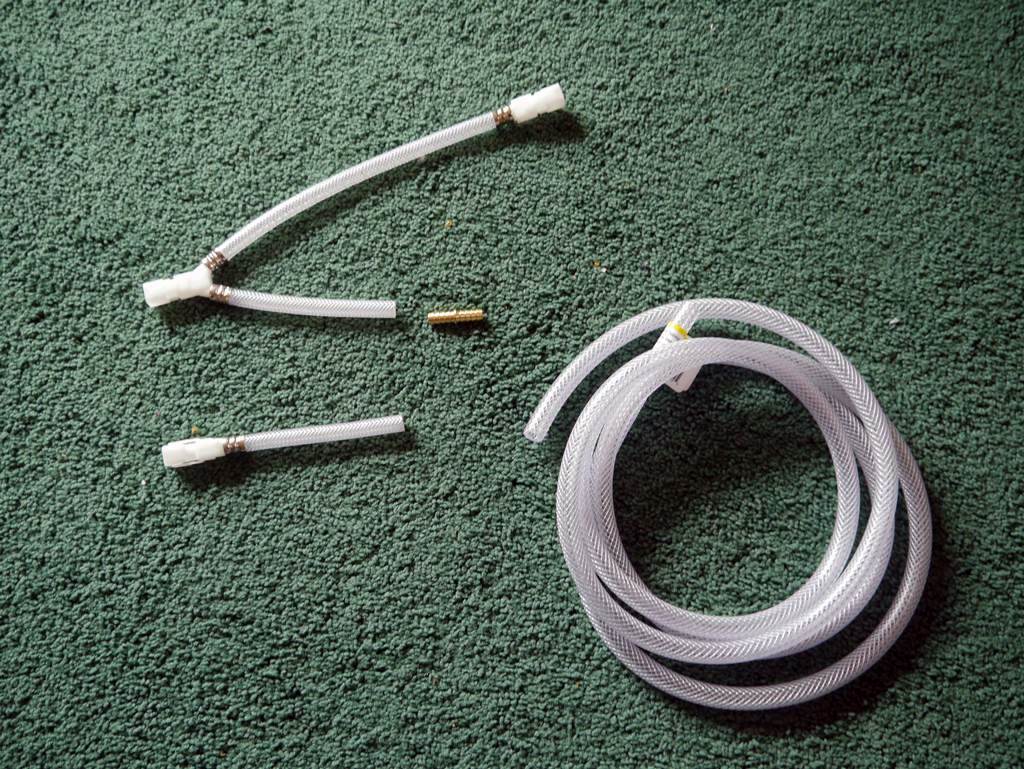 The line going to the hot valve is cut and tubing is spliced onto each side to make them longer.
The final unit installed under the sink
…and just when you think you are all finished…
Like most projects like this they are never really finished.
Rear Bumper
When I completed building the new frame I realized I needed a bumper, while driving home from work one day I noticed a vehicle passing me and got an idea, a search on Kijiji (the Canadian version of Craig’s list) and I found what I was looking for. The chrome tubular running boards from a Hummer H2 would work perfect and there was a set for sale … SOLD.
Although this bumper did serve the purpose and looked OK, it just didn’t meet my expectations for styling, so the search continued.
I found the answer when a good friend and master fabricator offered me the bumpers from a 1954 Jaguar Mk2 that he had collected years before for another project. One look and I instantly fell in love, they were perfect.
sm_P1070233
The starting point, the rear bumper (lower one) from the 1954 Jaguar Mk2 is about 16″ too narrow so we will need to weld in sections from the front bumper to make this modification work.
sm_P1070234
Set-up and ready for fabrication surgery
sm_P1070240
Cutting a section from the front bumper
sm_P1070243
Cutting the section to length
sm_P1070245
…a little hammer shaping. You cannot expect a 55+ year old bumper to be straight … yet.
sm_P1070252
Looking good
sm_P1070254
After cutting the rear bumper in half the ends are squared
sm_P1070265
TIG welding the sections together
sm_P1070293
The new bumper is fabricated but far from finished.
[contact-form to=’1974Boler@gmail.com’][contact-field label=’Name’ type=’name’ required=’1’/][contact-field label=’Email’ type=’email’ required=’1’/][contact-field label=’Comment’ type=’textarea’ required=’1’/][/contact-form]